Safe and Responsible Driving
Safe and Responsible Driving tinachenBeing a safe and responsible driver takes a combination of knowledge, skill and attitude.
To begin, you must know the traffic laws and driving practices that help traffic move safely. Breaking these “rules of the road” is the major cause of collisions.
Traffic laws are made by federal, provincial and municipal governments, and police from each level can enforce them. If you break a traffic law, you may be fined, sent to jail or lose your driver’s licence. If you get caught driving while your licence is suspended, your vehicle may be impounded.
But you need to do more than just obey the rules. You must care about the safety of others on the road. Everyone is responsible for avoiding collisions. Even if someone else does something wrong, you may be found responsible for a collision if you could have done something to avoid it.
Because drivers have to co-operate to keep traffic moving safely, you must also be predictable, doing what other people using the road expect you to do. And you must be courteous. Courteous driving means giving other drivers space to change lanes, not cutting them off and signalling your turns and lane changes properly.
You must be able to see dangerous situations before they happen and to respond quickly and effectively to prevent them. This is called defensive or strategic driving. There are collision avoidance courses available where you can practice these techniques.
Defensive driving is based on three ideas: visibility, space and communication.
Visibility is about seeing and being seen. You should always be aware of traffic in front, behind and beside you. Keep your eyes constantly moving, scanning the road ahead and to the side and checking your mirrors every five seconds or so. The farther ahead you look, the less likely you will be surprised, and you will have time to avoid any hazards. Make sure other drivers can see you by using your signal lights as required.
Managing the space around your vehicle lets you see and be seen and gives you time and space to avoid a collision. Leave a cushion of space ahead, behind and to both sides. Because the greatest risk of a collision is in front of you, stay well back.
Communicate with other road users to make sure they see you and know what you are doing. Make eye contact with pedestrians, cyclists and drivers at intersections and signal whenever you want to slow down, stop, turn or change lanes. If you need to get another person’s attention, use your horn.
- Getting ready to drive
- Driving along
- Sharing the road with other road users
- Driving through intersections
- Stopping
- Changing directions
- Changing positions
- Parking along roadways
- Freeway driving
- Dealing with particular situations
- Driving at night and in bad weather
- Dealing with emergencies
- Driving efficiently
Getting ready to drive
Getting ready to drive tinachenBefore you drive, make sure you are comfortable with your physical, mental and emotional state, your vehicle and the conditions in which you will be driving. If you have doubts about any of them, don't drive.
Your ability to drive can change from one day to the next. Illness, fatigue, prescription and over-the-counter drugs, stress and your mental or emotional state can greatly diminish your ability to operate a motor vehicle. You should consider these factors before you begin driving, and you should not operate a motor vehicle when you are not fit to do so.
Be physically and mentally alert
You must be in good physical and mental condition to drive. Don't drive when you are sick or injured or when you have been drinking alcohol or taking any drug or medication that may reduce your ability to drive.
Don't drive when you are tired. You might fall asleep at the wheel, risking the lives of others on the road. Even if you don't fall asleep, fatigue affects your driving ability. Your thinking slows down and you miss seeing things. In an emergency, you may make the wrong decision or you may not make the right decision fast enough.
Don't drive when you are upset or angry. Strong emotions can reduce your ability to think and react quickly.
Know your vehicle
Get to know your vehicle before you drive it. There are many types of vehicles available today with many different characteristics, including fuel ignition systems, anti-lock brakes, four-wheel drive, and systems for traction control and stability control. Many newer vehicles offer technologies that assist drivers with steering, braking and/or accelerating to help you stay within your lane, avoid, or reduce collisions, and maintain safe following distances. Check the vehicle owner’s manual and other information available from the automaker to learn how these systems work, how to properly operate them, and to understand their limitations.
No matter what technologies are available in your vehicle, you must always pay attention to how they operate, be ready to take over control of the vehicle in the event of an unusual or unforeseen situation, and recognize that you remain responsible for all driving tasks.
For driving in difficult situations and conditions, see the section on dealing with particular situations.
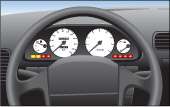
Make sure you know where all the controls and instruments are and what they do. Check that all warning lights and gauges work. Watch for a warning light that stays on after you drive away; it could mean a serious problem with your vehicle.
Get to know the controls well enough to turn on wipers and washers, headlights, high beams, heater and defroster without having to look. Learning to use these essential controls without taking your eyes off the road is an important part of driving.
Get into position
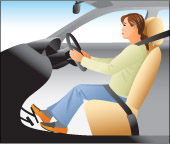
Make sure you sit properly behind the wheel. You should sit high enough in the driver’s seat to see over the steering wheel and hood. You should be able to see the ground four metres in front of the vehicle. Use a firm cushion if needed.
Be sure that you are sitting straight upright in the seat with your elbows slightly bent. Adjust the seat so your feet reach the pedals easily. To check your position, try placing your feet flat on the floor under the brake pedal. If you can do this without stretching, you are seated properly. This keeps you in the proper, upright sitting position and gives you more stability when manoeuvring your vehicle.
If your vehicle has an adjustable headrest, you should make sure it is at the right height. The back of your head should be directly in front of the middle of the headrest to protect you in a collision.
Check that you have enough room in the front seat to drive properly and safely. Do not overcrowd your driving space with passengers or property.
Keep a clear view
Keep a clear view when driving. Do not put anything in your windows that will block your view. The windows of your vehicle must not be coated with any material that keeps you from seeing out in any direction. Neither should the windshield or front door windows be coated to keep someone from seeing inside the vehicle.
Find your blind spots
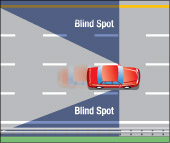
Check and adjust your mirrors and find your blind spots, the area on each side of your vehicle where you cannot see. You may not see people or cyclists when they are in these spots. On some vehicles the blind spot is so large that a vehicle could be there and you would not see it.
Adjust your mirrors so that there are as few blind spots as possible. Blind spots in most vehicles are to the back left and back right of the vehicle. To reduce the blind spots even more, position the interior mirror so that the centre of the mirror shows the centre of the rear window. You should be able to see directly behind the car when the interior mirror is properly adjusted. Position the left outside mirror by leaning towards the window and moving the mirror so that you can just see the rear of your car. Position the right outside mirror by leaning to the centre of the vehicle and moving the mirror so that you can again just see the rear of your car. Avoid overlap in what you can see in your mirrors. Because your side mirrors show only narrow angles of view, turning your head to do shoulder checks is the only way to make sure there is nothing in your blind spots.
You should know the blind spots on your own vehicle. You can learn where and how large they are by having someone walk around your car and watching the person in the mirrors.
Fasten your seatbelt

The proper use of a seatbelt can save your life. Even a small increase in the number of people who wear their seatbelts can save many lives.
You must use your seatbelt every time you travel in any vehicle equipped with seatbelts. All passengers must be buckled up in their own seatbelt, child car seat or booster seat.
Drivers who do not buckle up can be fined and will be given two demerit points. Drivers may also be fined and receive demerit points if they fail to ensure that all passengers under 16 years of age are properly buckled in a seatbelt, child car seat or booster seat. Level One (G1) drivers are only allowed to have his or her accompanying driver as a front-seat passenger, and must have a seatbelt for him or her. Novice drivers must have a seatbelt for every passenger. Drivers who do not ensure there is a working seatbelt for every passenger can lose their licence for at least 30 days.
Seatbelts should be worn snugly enough to keep you in your seat during a collision. Never put more than one person into a seatbelt; this can cause serious injury or even death in a collision. Wear the shoulder strap over your shoulder, never under your arm or behind your back. The lap belt should be worn low over the hips, not against the stomach.
Use your seatbelt always, even when you are sitting in a position with an active airbag. Airbags do not replace seatbelts. In a collision, your seatbelt will keep you in position so that the airbag can protect you.
Note: The safest place a passenger can travel is inside a vehicle, properly buckled in. It is not safe to travel outside a vehicle, such as in the back of a pickup truck, or in a trailer that is being towed. It is important for passengers to be secured within a vehicle to avoid being thrown from the vehicle during a collision.
For more information on seatbelts, visit the Ministry of Transportation website.
Child safety
To be safely protected in a vehicle, children must be properly secured in a child car seat, booster seat or seatbelt, depending on their height, weight and/or age. Research shows that a correctly used child car seat can reduce the likelihood of injury or death by 75 per cent.
As a driver, you are responsible for ensuring that all passengers under 16 years of age are properly buckled into a seatbelt, child car seat or booster seat. In Ontario, all drivers must use proper child car seats and booster seats when transporting young children.
Child car seats must meet Canadian Motor Vehicle Safety Standards. Buckles and straps must be fastened according to the manufacturer’s instructions. Newer vehicles that come equipped with a lower universal anchorage system (UAS) for securing a child car seat do not require the use of a seatbelt. A booster seat requires a lap and shoulder belt combination.
Infants who weigh less than 9 kilograms (20 lbs.) must be buckled into a rear-facing child car seat attached to the vehicle by a seatbelt or the UAS strap. A rear-facing child car seat is always best installed in the back seat. Never put a rear-facing child car seat in a seating position that has an active airbag. If the airbag inflates, it could seriously injure the child.
Toddlers 9 to 18 kilograms (20 to 40 lbs.) must be buckled into a child car seat attached to the vehicle by a seatbelt or a UAS strap; the seat’s tether strap must also be attached to the vehicle’s tether anchor. Children weighing more than 9 kilograms (20 lbs.) may remain in a rear-facing child car seat if it is designed to accommodate the child’s height and weight. Always follow the manufacturer’s instructions when installing a child car seat in your vehicle.
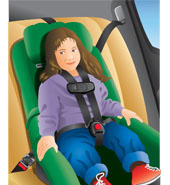
Booster seats provide 60 per cent more protection than seatbelts alone. These must be used by pre-school and primary-grade-aged children who have outgrown their forward-facing child car seat, are under the age of eight and weigh 18 kilograms (40 lbs.) or more but less than 36 kilograms (80 lbs.), and who are less than 145 centimetres (4 feet, 9 inches) tall. Booster seats raise a child so that the adult seatbelt works more effectively. The child’s head must be supported by the top of the booster, vehicle seat or headrest. You must use a booster seat with a lap/shoulder belt. The lap/shoulder belt should be worn so that the shoulder belt fits closely against the body, over the shoulder and across the centre of the chest and the lap belt sits firmly against the body and across the hips. Always follow the manufacturer’s instructions when installing a booster seat in your vehicle, and secure the booster seat with a seatbelt when a child is not travelling in it, or remove it from the vehicle.
If your vehicle has lap belts only, secure the child by the lap belt only. Never use a lap belt alone with a booster seat.
Children may begin wearing a seatbelt once they are able to wear it properly (a lap belt flat across the hips, shoulder belt across the centre of the chest and over the shoulder), and if any one of the following criteria is met:
- The child turns eight years old.
- The child weighs 36 kilograms (80 lbs.) or more.
- The child is 145 centimetres (4 feet 9 inches) tall or taller.
Do not place a child in a seating position in front of an air bag that is not turned off. The safest place for a child under age 13 is in the back seat.
Always secure loose objects in the vehicle with cargo nets or straps, or move them to the trunk to prevent them from injuring passengers in a collision or sudden stop.
Correct installation of a child car seat is important for ensuring a child’s safety. Your local public health unit is a good resource for finding out how to properly install a child car seat, or visit a local car seat clinic where certified technicians will help you install the seat.
For more information on child car seats visit the Ministry of Transportation website.
Note: Be careful if buying a used child car seat. Considerations should include ensuring the child car seat comes with complete manufacturer’s instructions and all necessary equipment; does not show signs of deterioration or damage; has never been in a collision; is not under recall; and has not exceeded its useful life expectancy as determined by the manufacturer.
Seatbelts and child car seats save lives
Seatbelts and child car seats reduce the risk of injury or death in collisions.
- Seatbelts help keep you inside and in control of the vehicle during a collision. People who are thrown from a vehicle have a much lower chance of surviving a collision.
- Seatbelts keep your head and body from hitting the inside of the vehicle or another person in the vehicle. When a vehicle hits a solid object, the people inside keep moving until something stops them. If you are not wearing your seatbelt, the steering wheel, windshield, dashboard or another person might be what stops you. This “human collision” often causes serious injury.
- Fire or sinking in water is rare in collisions. If it does happen, seatbelts help keep you conscious, giving you a chance to get out of the vehicle.
- In a sudden stop or swerve, no one can hold onto a child who is not in a seatbelt or child car seat. Infants or children who are not properly restrained can be thrown against the vehicle’s interior, collide with other people or be ejected.
- When using a child car seat, make sure that the seat is tightly secured by the vehicle seatbelt or by the universal anchorage system (UAS) strap, and for a forward-facing car seat, ensure the tether strap is also used. When installing the child car seat, press one knee into the seat and use your body weight to push it into the vehicle seat, then tighten the seatbelt or the car-seat UAS strap as much as possible. The installed child car seat should move no more than 2.5 centimetres (1 inch) where the seatbelt or UAS strap is routed through the child car seat.
- Use a locking clip where needed to ensure the seatbelt stays locked into position and will not loosen during a collision. Refer to your vehicle owner’s manual to see if you will need to use a locking clip.
- If a rear-facing child car seat does not rest at the proper 45-degree angle, you can prop up the base of the seat with a towel or a Styrofoam bar (“pool noodle”). Eighty per cent of the base of a forward-facing car seat should be firmly supported by the vehicle seat.
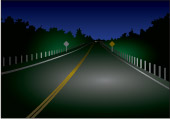
Turn on headlights at night and in poor conditions
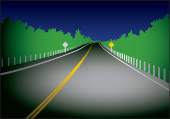
Headlights enable you to see the roadway in front of your vehicle when visibility is poor, as well as making your vehicle visible to others. Your vehicle’s headlights must shine a white light that can be seen at least 150 metres in front and is strong enough to light up objects 110 metres away. You must also have red rear lights that can be seen 150 metres away and a white light lighting the rear licence plate when headlights are on. Headlights are equipped with the option to use a high beam to enhance vision further down the roadway and the use of a low beam when you are near other vehicles to minimize the glare of your headlights onto others. When you use high-beam headlights, remember to switch to low beams within 150 metres of an oncoming vehicle. Use your low beams when you are less than 60 metres behind another vehicle unless you are passing it. These rules apply to all roads, including divided ones.
Turning your headlights on activates other required light systems, such as your parking lights, tail lights and rear-licence plate light. Daytime running lights, which are often another mode of your headlights or can be a separate lighting system, are specifically designed to make your vehicle more visible during times of good light conditions, and are automatically activated when your vehicle is in operation and your headlight switch is turned to off.
When driving your vehicle, headlights are required to be turned on between one-half hour before sunset and one-half hour after sunrise, and any other time of poor light conditions, such as fog, snow or rain, which keeps you from clearly seeing people or vehicles less than 150 metres away. Please see the section on driving at night and in bad weather. Don't drive with only one headlight or with lights that are not aimed properly. Have your full lighting system checked regularly, keep them clean, and replace burned-out bulbs as soon as possible.
Parking lights are only for parking. In low light, use your headlights, not parking lights.
Your daytime running lights are not to be used as headlights during poor lighting conditions. They provide an inappropriate form of light that may cast glare onto others or deactivate other required light systems, such as tail lights. Daytime running lights are only to be used during good light conditions to enhance the visibility of your vehicle. If your vehicle is not equipped with daytime running lights, you should turn your headlights on to provide similar visual enhancement.
Driving with your vehicle’s full lighting system set to automatic is recommended, if your vehicle is equipped with this option. This will better ensure that the appropriate lighting system is being used. You should also monitor the activation and operation of your vehicle’s full lighting system at all times to ensure that appropriate lighting is being provided.
Summary
By the end of this section, you should know:
- The concepts of safe and responsible and defensive driving
- Factors that may affect your physical and mental readiness to drive
- How to familiarize yourself with your vehicle’s controls and how to set your seating position
- The legal requirements surrounding seatbelts, booster seats, and child car seats
- How and when to use your vehicle’s lighting system
We've moved this content over from an older government website. We'll align this page with the ontario.ca style guide in future updates.
Driving along
Driving along tinachenAlways be aware of traffic around you as you drive. Develop a routine for looking ahead, behind and from side to side. Check your mirrors every five seconds or so, and check your blind spots by turning your head to look over your shoulder. Keep other drivers out of your blind spot by changing your speed and don't drive in other vehicles' blind spots. This is especially true when driving around large commercial vehicles, as they typically have large blind spots to the sides and back. Be extra careful at dusk and dawn when everyone has difficulty adjusting to the changing light.
Keep a cushion of space around your vehicle and be prepared for the unexpected. Anticipate other drivers movements and make allowances for every possible error. Look well ahead and watch for people in parked vehicles, they may be about to pull out in front of you or to open a door. Watch for smaller vehicles, bicycles and pedestrians.
Steer smoothly
All steering should be smooth and precise. You should do most steering and lane changes without taking either hand off the wheel. You must be able to steer in a straight line while shifting gears, adjusting controls or checking your blind spot.
Picture the steering wheel as a clock and place your hands at nine o'clock and three o'clock.
Use of turn signals and brake lights
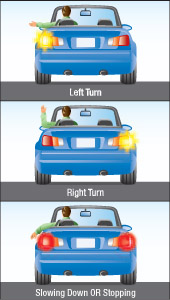
Diagram 2-8
Signals tell other drivers what you want to do, alerting them to your intention to turn or stop.
Use your turn signals and brake lights to signal before stopping, slowing down, turning, changing lanes, leaving the road or moving out from a parked position. Give the correct signal well before taking the action and make sure other drivers can see it. Check that the way is clear before you act, just signalling is not enough. Follow the rules for turns, whether left or right, on lane changes and on yields to other vehicles and pedestrians.
If your turn signals and brake lights are not working, use hand and arm signals. The pictures on the previous page show how to make hand and arm signals. When watching for signals made by others, remember that cyclists may signal right turns by holding their right arms straight out.
After signalling, move only when it is safe to do so.
Keep right
Keep to the right of the road or in the right-hand lane on multi-lane roads unless you want to turn left or pass another vehicle. This is especially important if you are driving more slowly than other vehicles.
Obey speed limits
Obey the maximum speed limit posted on signs along the road, but always drive at a speed that will let you stop safely. This means driving below the maximum speed in bad weather, in heavy traffic or in construction zones. School zones and construction zones often have lower speed limits to protect children and those who work on or near the road.
Where there are no posted speed limits, the maximum speed is 50 km/h in cities, towns and villages, and 80 km/h elsewhere.
Cruise control is a driver aid that can improve fuel economy and prevent you from inadvertently exceeding the speed limit. However, there are some circumstances in which cruise control should not be used, such as adverse driving conditions (wet, icy or slippery roads), in heavy traffic or when you are feeling fatigued.
Speed measuring warning devices are illegal. If you get caught driving with such a device, you will be fined and accumulate demerit points.
Obey police
When police officers are directing traffic, you must follow their directions, even if the directions are different from traffic lights or signs.
When a police officer signals you to pull your vehicle over, you must pull over as far to the right as you safely can and come to a complete stop. Stay in your vehicle and wait for the police officer. You must immediately, upon the police officer’s request, surrender your driver’s licence, vehicle permit (or copy) and insurance. Contrary to popular belief, you do not have 24 hours to present these documents. If you do not obey a police officer’s direction to pull over, you risk being fined, having your licence suspended or even serving time in prison.
Maintaining space
As a general rule, drive at the same speed as traffic around you without going over the speed limit. Leave a cushion of space around your vehicle to let other drivers see you and to avoid a collision.
Whenever you follow another vehicle, you need enough space to stop safely if the other vehicle brakes suddenly. A safe following distance is at least two seconds behind the vehicle in front of you. This lets you see around the vehicle ahead and gives you enough distance to stop suddenly.
Do not block the normal and reasonable movement of traffic.
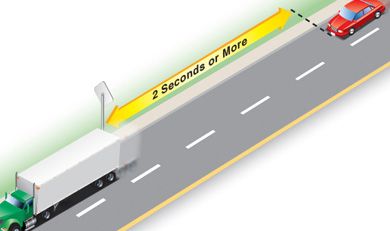
Diagram 2-9
To give yourself a two-second space, follow these steps:
- Pick a marker on the road ahead, such as a road sign or telephone pole.
- When the rear of the vehicle ahead passes the marker, count "one thousand and one, one thousand and two".
- When the front of your vehicle reaches the marker, stop counting. If you reach the marker before you count "one thousand and two," you are following too closely.
Remember that the two-second rule gives a minimum following distance. It applies only to ideal driving conditions. You will need extra space in certain situations, such as bad weather, when following motorcycles or large trucks, or when carrying a heavy load.
Summary
By the end of this section you should know:
- How to steer and use your vehicle’s signalling system and hand signals
- The importance of maintaining space and how to measure following distance
- Where to position your vehicle on the road and to obey speed limits and police
Sharing the road with other road users
Sharing the road with other road users tinachenOntario’s roads accommodate many road users, including pedestrians, motorcycles, bicycles, large trucks, buses and farm machinery. Be aware of other road users, the speed at which they travel and the space they occupy on the road.
Sharing the road with pedestrians
Road safety is a responsibility that is shared between pedestrians and drivers. Pedestrians must ensure that drivers have seen them and that drivers are stopped, or are about to stop, before entering the roadway. Drivers need to exercise due diligence in the care and operation of their vehicles, to properly respond to the presence of pedestrians. In most cases, that means yielding to the pedestrian.
Reminder: Eye contact between the pedestrian and driver is one of the keys to pedestrian safety.
Watch for children – Drive slowly and cautiously through school zones, residential areas and any other location where children may be walking or playing. A driver should not rely on a child's knowledge of traffic laws, so expect the unexpected. A child might dart out from between parked cars or try to cross a street without checking for traffic. Be extra cautious at twilight when children may still be playing outside, but are difficult to see.
Watch for all crosswalks – A crosswalk can be the portion of a roadway that:
- connects sidewalks on opposite sides of the roadway into a continuous path
- has signs, lines or other markings on the roadway for pedestrian crossing Do not pass a vehicle stopped at a crosswalk. A stopped vehicle may be a clue that a pedestrian is crossing.
Reminder: Not all crosswalks are marked, but nearly all intersections have crosswalks.
Watch for school crossings and guards – Drivers, including cyclists, must stop and yield the whole roadway at pedestrian crossovers, school crossings and other locations where there is a crossing guard.
Only when pedestrians and school crossing guards have crossed and are safely on the sidewalk can drivers and cyclists proceed.
Watch for community safety zones – Signs indicate areas where the community has identified that there is a special risk to pedestrians.
Watch for slow pedestrians – Many modern urban roads often do not allow sufficient time to cross for slow pedestrians during the normal traffic cycle. So be patient and allow all pedestrians time to cross.
Seniors or pedestrians with disabilities need extra caution and courtesy from drivers, as they may be slow in crossing the road.
Pedestrians who are blind or with a visual disability may use a white cane or guide dog to help them travel safely along sidewalks and across intersections.
Watch when driving quiet vehicles – Drivers of hybrid or electric vehicles should be aware that vision-impaired people often rely on the sound of an engine before entering an intersection. When you are slowing or stopping, your vehicle makes little or no discernible noise, so extra caution is required.
Watch for wheelchairs and medical scooters – People operating motorized wheelchair and medical scooters are pedestrians too.
Watch for streetcars – Some streetcar stops have a special safety island or zone for passengers getting on and off. Pass these safety islands and zones at a reasonable speed. Always be ready, in case pedestrians make sudden or unexpected moves.
Watch for texters – A no-texting rule isn’t only for drivers. Pedestrians are often distracted while using devices, including cell phones, ear buds, hand-held device, GPS, and music players. People using ear buds/headphones often can't hear car horn or other traffic noise.
Watch for dark clothing – Pedestrians in dark clothing, especially at night, are difficult to see. Extra care is needed when driving in low-light conditions. Twilight and dark clothing often initiate a collision.
Watch for new transport – New technology allows small motors on skateboards, scooters and even roller blades. These devices may reduce control and even propel users into the roadway. Many modern electric bikes are made to look like motor scooters.
Watch during turns – Safer, signaled crosswalks aren’t immune to vehicle-pedestrian collisions. Many more people get hit by cars turning left than by cars turning right, because both parties are looking elsewhere: The drivers are busy negotiating the intersection while street-crossers are looking straight ahead.
Sharing the road with cyclists
Bicycles and mopeds travelling at a lower speed than other traffic are expected to ride about one metre from the curb or parked cars, or as close as practical to the right-hand edge of the road when there is no curb. However, they can use any part of the lane if necessary for safety, such as to:
- Avoid obstacles such as puddles, ice, sand, debris, rutted or grooved pavement, potholes and sewer grates
- Cross railway or streetcar tracks at a 90° angle
- Discourage passing where the lane is too narrow to be shared safely
- A bike lane may exist adjacent to parking bays (See Diagram 2-10)
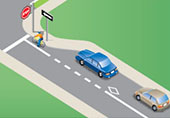
Diagram 2-10
Cyclists are not required to ride close to the right edge of the road when they are travelling at or faster than the normal speed of traffic at that time and place, or when they are turning left, or getting in position to turn left. (Cyclists are permitted to make a left turn from a left-turn lane, where one is available.)
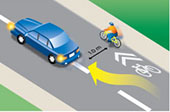
Diagram 2-11
When passing a cyclist, drivers of motor vehicles must maintain a minimum distance of one metre, where practical between their vehicle and the cyclist. (See Diagram 2-11.) Failure to do so may result in a fine and an additional two demerit points on the driver’s record. Whenever possible, you should change lanes to pass.
Do not follow too closely behind cyclists. They do not have brake lights to warn you when they are slowing or stopping.
Intersections – To avoid collisions with bicyclists at intersections, remember the following:
- When turning right, signal and check your mirrors and the blind spot to your right to make sure you do not cut off a cyclist.
- When turning left, you must stop and wait for oncoming bicycles to pass before turning.
- When driving through an intersection, be careful to scan for cyclists waiting to turn left.
Do not sound your horn unnecessarily when you are overtaking a cyclist. It may frighten them and cause them to lose control. If you feel that you must use your horn, tap it quickly and lightly while you are still some distance away from the cyclist.
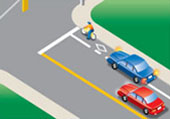
Diagram 2-12
Bike lanes are reserved for cyclists. They are typically marked by a solid white line. Sometimes you will need to enter or cross a bike lane to turn right at a corner or driveway. (See Diagram 2-12) Take extra care when you do this. Enter the bike lane only after ensuring that you can do so safely, and then make the turn.
Watch for cyclists' hand signals. A cyclist may indicate a right-hand turn by extending their right arm.
Try to make eye contact when possible with cyclists.
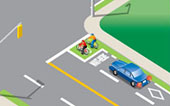
Diagram 2-13
Bike boxes help prevent collisions between motorists and bicycles at intersections. It is typically a painted box on the road with a white bicycle symbol inside. Bicycle lanes approaching and leaving the box may also be painted. As a driver, you must stop for a traffic signal behind the bike box. Do not stop in the box. See (Diagram 2-13)
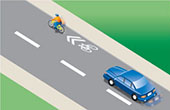
Diagram 2-14
Sharrows A bicycle sharrow, two chevrons painted above a bicycle symbol on the road, indicates the lane is shared. Vehicle or bicycle traffic may be in the lane. Although you should always keep on the lookout for bicyclists, this serves as an additional warning to watch for them in the lane. See (Diagram 2-14)
Children riding bicycles on the street may lack the necessary training and skills for safe cycling. They may not be aware of all the dangers or the rules of the road. Watch for children on oversized bicycles, as they may not have the ability to control it. When parked on the side of the roadway, look behind you and check your mirrors and blind spots for a passing cyclist before opening a door.
Sharing the road with motorcycles and limited-speed motorcycles
Motorcycles, limited-speed motorcycles, mopeds and bicycles are harder to see because of their size. Drivers of these vehicles may make sudden moves because of uneven road surfaces or poor weather conditions. Because they are less protected, they are more likely to be injured in a collision.
Motorcycles use a full lane; treat them like other vehicles when driving. Since many motorcycle turn signals do not automatically shut off, be careful when turning left in front of an oncoming motorcycle with its turn signal on. Make sure the motorcyclist is actually turning; he or she may have just forgotten to switch off the turn signal.
Sharing the road with large commercial vehicles
It is extremely important to know how to drive safely when sharing the road with large commercial vehicles such as tractor-trailers and buses. Recent data show that the majority of fatalities resulting from collisions involving large commercial trucks are not the result of the truck driver’s actions, but of the other driver’s actions. Therefore, sharing the road with large commercial vehicles means you must always be aware of a large vehicle’s capabilities and limitations, such as of the following:
1. Blind Spots - Large commercial vehicles have big blind spots on both sides. Avoid tailgating a large vehicle. The driver cannot see you if you are directly behind. If the vehicle stops suddenly, you have no place to go. Remember that if you can't see the driver’s face in the large vehicle’s side-view mirror, the driver cannot see you.
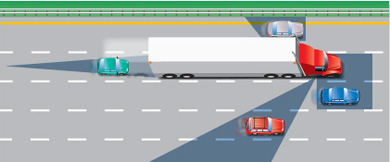
Diagram 2-15
2. Stopping Distance - Large commercial vehicles require a much longer distance to stop than smaller vehicles. When passing a large vehicle, do not cut in front closely. Not only is this discourteous, it is dangerous; it reduces the space cushion large vehicles require in order to stop safely. Allow more room when passing a large vehicle.
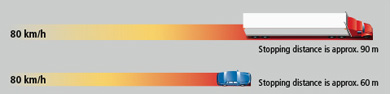
Diagram 2-16
3. Wide Turns - When making a right turn, a large vehicle may need to first swing wide to the left and around, in order to avoid hitting the right curb. If a large vehicle in front of you is making a right turn, do not move up into the space that opens up in the right lane; you are putting yourself into a very dangerous position. Once the front of the vehicle has cleared the corner, the rest will move partially back into the right lane. If you are in that lane, your vehicle will be squeezed between the trailer and the curb. Stay well back until the truck has completely cleared the lane.
This situation can occur on expressway off-ramps that have two left turning lanes. Do not drive up into the left lane when a large vehicle is making a left turn in front of you. Stay well back until the truck has cleared the left turn, or else you may get squeezed between the truck and the curb.
4. Rolling Back - Leave plenty of room if you are stopped behind a large vehicle. When the driver of a large vehicle releases the brakes after being stopped, the vehicle may roll back.
5. Spray - In bad weather, large vehicles are capable of spraying up large amounts of mud, snow and debris, which could land on your windshield and temporarily block your vision.
6. Turbulence - Due to various factors such as air pressure and airflow, a large vehicle can create heavy air turbulence. This may affect your ability to control your vehicle when passing a large one.
Sharing the road with municipal buses
Many municipal roadways have special indented stopping areas for municipal buses, called bus bays, where passengers can get on and off. There are three types of bus bays:
- Mid-block indented bays
- Indentations immediately before and after intersections
- Bus-stop areas between two designated parking areas
When a bus in a bus bay begins flashing its left-turn signals, indicating that it is ready to leave the bus bay, and you are approaching in the lane adjacent to the bus bay, you must allow the bus to re-enter traffic.
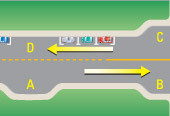
Diagram 2-17
- A: Mid-block indented bays
- B: An indentation before an intersection
- C: An indentation after an intersection
- D: Bus stops between legally parked cars
Sharing the road with farm machinery
Farm machinery moves quite slowly compared to other road users. Most tractors and combines have a maximum speed of 40 km/h, but travel at less than 40 km/h when towing implements or wagons. Farm machinery is often oversized, wide or long or both, making it difficult for the driver to see vehicles coming up from behind. Farmers often turn directly into fields rather than roads or lanes, or move from lane to lane. Remember that it is common for farmers to be on the roads after dark during peak planting and harvesting seasons.
Farm machinery on the road must display an orange and red slow-moving sign on the rear of the vehicle. The sign warns other drivers that the vehicle is travelling at 40 km/h or less. If you see one of these signs, slow down and be cautious. Stay well back and do not pass until it is safe to do so.
Sharing the road with horse-drawn vehicles
Horse-drawn vehicles are one of the slowest moving of all road users. These vehicles range from two-person carts to open or closed buggies carrying up to eight people, and large, wide farm wagons used to carry crops, equipment and other goods. These vehicles will travel primarily on the shoulder of roadways, but may straddle or enter the paved lane where shoulders are narrow or no shoulder exists – such as bridge crossings. Remember that it is common to see horse-drawn vehicles throughout southwestern Ontario and increasingly in eastern and northern Ontario.
Horse-drawn vehicles on the road must display an orange and red slow-moving sign on the rear of the buggy. In addition, many buggies have highly reflective tape affixed to the side and rear of the vehicle. The sign warns other drivers that this vehicle is travelling at 40 km/h or less, and the reflective tape illuminates as headlights hit the buggy. If you see a horse-drawn vehicle, slow down and be very cautious. Maintain a safe following distance and only pass when it is safe to do so. When approaching a horse-drawn vehicle travelling in the opposite direction, move to the far right of your lane. When passing, give as much distance between you and them as possible. Passing too closely could scare or startle the horse, causing it to change direction suddenly on the roadway.
Sharing the road with school buses
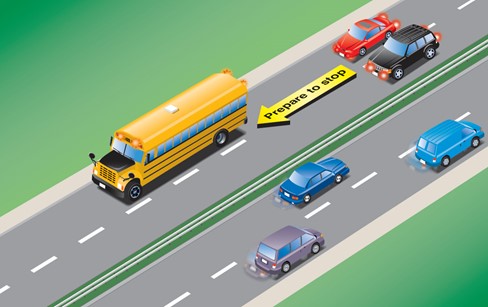
When you see a school bus with its overhead amber lights flashing:
- These signals indicate that the bus is coming to a stop to pick up or drop off passengers
- Slow down and prepare to stop whether you are behind or approaching the bus
- If you are on a road with a median strip, only vehicles approach from the rear of the bus should prepare to stop
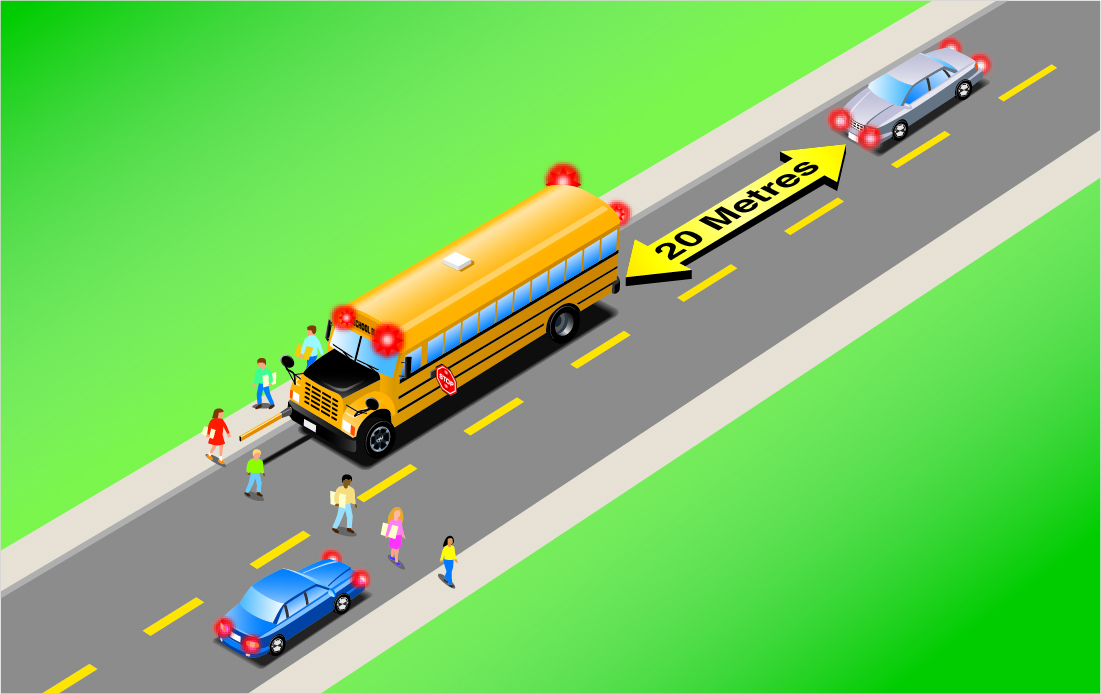
When you see a school bus with its overhead red lights flashing or its stop arm activated:
- You must stop whether you are behind or approaching the bus
- If you are on a roadway with a median strip, only vehicles approaching from the rear of the bus must stop
- If you are approaching from the rear of the vehicle, stop at least 20 meters away
- Do not proceed on your route until the bus moves, the overhead red lights have stopped flashing and its stop arm is no longer activated
- It is dangerous and illegal to fail to stop for a stopped school bus that has its overhead red lights flashing or its stop arm activated
Summary
By the end of this section, you should know:
- The importance of sharing the road with other road users, especially large vehicles, school buses, cyclists, and pedestrians
- How to share the road with other road users safely and appropriately
We've moved this content over from an older government website. We'll align this page with the ontario.ca style guide in future updates.
Driving through intersections
Driving through intersections tinachenBe alert as you come to intersections and look carefully for pedestrians, cyclists, other motor vehicles, yield signs, stop signs and traffic lights. Be sure to scan any sidewalks and paths/trails as well as the roadways. Bear in mind that children are often unaware of traffic laws and also that cycling on the sidewalk may be permitted by local bylaw.
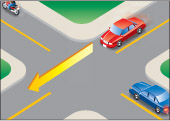
Diagram 2-18
There are two main types of intersections: controlled and uncontrolled.
Controlled intersections
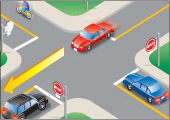
Diagram 2-19
Controlled intersections have traffic lights, yield signs or stop signs to control traffic (Diagram 2-19).
At a controlled intersection where you face a green light, drive carefully through the intersection at a steady speed. If the light has been green for a while, be prepared to stop when it turns yellow. However, if you are already so close that you cannot stop safely, drive through the intersection with caution. Where you face a red light, come to a complete stop and wait until the light turns green.
When you approach an intersection on a main road, and the intersection is blocked with traffic, stop before entering the intersection and wait until the traffic ahead moves on. This does not apply if you are turning left or right.
At a controlled intersection where you face a yield sign, slow down or stop if necessary and wait until the way is clear before driving through the intersection.
At a controlled intersection where you face a stop sign, come to a complete stop. Drive through the intersection only when the way is clear (Diagram 2-19).
Uncontrolled intersections
Uncontrolled intersections have no signs or traffic lights. They are usually found in areas where there is not much traffic. Be extra careful around these intersections. If two vehicles come to an uncontrolled intersection from different roads at the same time, the driver on the left must let the driver on the right go first. This is called yielding the right-of-way.
Yielding the right-of-way
There are times when you must yield the right-of-way. This means you must let another driver go first. Here are some rules about when you must yield the right-of-way.
Diagram 2-18
At an intersection without signs or lights, you must yield the right-of-way to a vehicle approaching the intersection before you, and if you arrive at the same time, the vehicle approaching from the right has the right-of-way (Diagram 2-18).
Diagram 2-19
At an intersection with stop signs at all corners, you must yield the right-of-way to the first vehicle to come to a complete stop. If two vehicles stop at the same time, the vehicle on the left must yield to the vehicle on the right (Diagram 2-19).
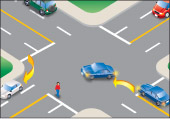
Diagram 2-20
At any intersection where you want to turn left or right, you must yield the right-of-way. If you are turning left, you must wait for approaching traffic to pass or turn and for pedestrians in or approaching your path to cross. If you are turning right, you must wait for pedestrians to cross if they are in or approaching your path (Diagram 2-20). You should also check your blind spot for cyclists approaching from behind, particularly in a bike lane to your right, on a sidewalk or a trail. A yield sign means you must slow down or stop if necessary and yield the right-of-way to traffic in the intersection or on the intersecting road.
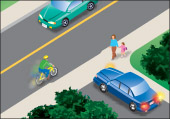
Diagram 2-21
When entering a road from a private road or driveway, you must yield to vehicles on the road and pedestrians on the sidewalk (Diagram 2-21).
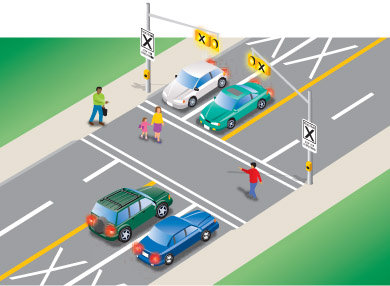
Diagram 2-22
You must yield the right-of-way and wait for pedestrians to completely cross the road at pedestrian crossovers (Diagram 2-22) and school crossings with crossing guards.
Remember, signalling does not give you the right-of-way. You must make sure the way is clear.
Summary
By the end of this section you should know:
- The difference between controlled and uncontrolled intersections and how to safely navigate them
- The concept of right-of-way and common situations where you must yield to other road users
Stopping
Stopping tinachenKnowing how to stop safely and properly is an important driving skill. Safe and responsible drivers see stops ahead, check their mirrors, begin braking early and stop smoothly. Braking is easier when you sit properly. Use your right foot for both brake and gas pedals so you won't step on both pedals at the same time or activate your brake lights unnecessarily. Press the brake pedal firmly and evenly.
In a vehicle with manual transmission, try shifting into a lower gear going down long, steep hills. This will help control your speed and you won't have to brake as sharply. Downshift before starting downhill since it may not be possible once you are going downhill. As a guide, you should be in the same gear going downhill as uphill.

Diagram 2-23
You must come to a complete stop for all stop signs and red traffic lights. Stop at the stop line if it is marked on the pavement (Diagram 2-23).
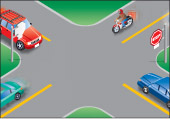
Diagram 2-24
If there is no stop line, stop at the crosswalk, marked or not. If there is no crosswalk, stop at the edge of the sidewalk. If there is no sidewalk, stop at the edge of the intersection (Diagram 2-24). Wait until the way is clear before entering the intersection.
Stopping at railway crossings
All railway crossings on public roads in Ontario are marked with large red and white “X” signs. Watch for these signs and be prepared to stop. You may also see yellow advance warning signs and large “X” pavement markings ahead of railway crossings. Some railway crossings have flashing signal lights and some use gates or barriers to keep drivers from crossing the tracks when a train is coming. Some less-travelled crossings have stop signs posted. Remember it can take up to two kilometres for a train to stop under full emergency braking. On private roads, railway crossings may not be marked, so watch carefully.
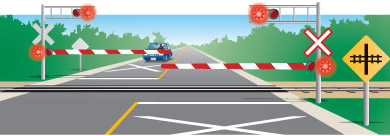
Diagram 2-25
When you come to a railway crossing, remember:
- Slow down, listen and look both ways to make sure the way is clear before crossing the tracks.
- If a train is coming, stop at least five metres from the nearest rail or gate. Do not cross the track until you are sure the train or trains have passed.
- Never race a train to a crossing.
- If there are signal lights, wait until they stop flashing and, if the crossing has a gate or barrier, wait until it rises before you cross the tracks.
- Never drive around, under or through a railway gate or barrier while it is down, being lowered or being raised. It is illegal and dangerous.
- Avoid stopping in the middle of railway tracks; for example, in heavy traffic, make sure you have enough room to cross the tracks completely before you begin.
- Avoid shifting gears while crossing tracks.
- If you get trapped on a crossing, immediately get everyone out and away from the vehicle. Move to a safe place and then contact authorities.
- Most buses and other public vehicles are required to stop at railway crossings that are not protected by gates, signal lights or a stop sign. School buses must stop at railway crossings whether or not they are protected by gates or signal lights. Watch for these buses and be prepared to stop behind them.
- If you are approaching a railway crossing with a stop sign, you must stop unless otherwise directed by a flagman.
Stopping at school crossings
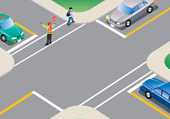
Diagram 2-26
Where a school-crossing guard displays a red and white stop sign, you must stop before reaching the crossing and remain stopped until all people, including the school crossing guard, have cleared the entire roadway and it is safe to proceed. If you have any doubts about when it is safe to drive forward, wait until all the children and the guard have cleared the crossing. Drivers who don't follow the stopping requirements may receive a substantial fine and get three demerit points.
Stopping for school buses
School buses in Ontario come in a range of sizes. All are chrome yellow and display the words “School Bus.”
You must stop whenever you approach a stopped school bus with its upper alternating red lights flashing, regardless of whether you are behind the bus or approaching it from the front. When approaching the bus from the front, stop at a safe distance for children to get off the bus and cross the road in front of you. If you are coming from behind the bus, stop at least 20 metres away. Do not go until the bus moves or the lights have stopped flashing.
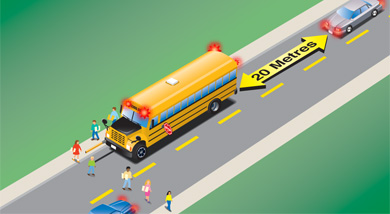
Diagram 2-27
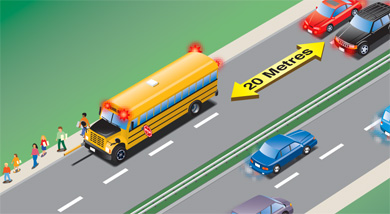
Diagram 2-28
If you are on a road with a median strip, only vehicles coming from behind the bus must stop. (A median is a physical barrier such as a raised, lowered, earth or paved strip constructed to separate traffic travelling in different directions. Vehicles cannot cross over a median strip.)
You must obey the school bus law on any road, no matter how many lanes or what the speed limit. Be prepared to stop for a school bus at any time, not just within school hours.
As well as the upper alternating red flashing lights, school buses use a stop sign arm on the driver’s side of the bus. This arm, a standard stop sign with alternating flashing red lights at top and bottom, swings out after the upper alternating red lights begin to flash. Remain stopped until the arm folds away and all lights stop flashing.
Note: It is illegal to fail to stop for a stopped school bus that has its red lights flashing. If you don't stop, you can be fined heavily and get six demerit points for a first offence. In Ontario, school bus drivers and other witnesses can report vehicles that have illegally passed a school bus. If you are the vehicle’s registered owner, these fines, but not demerit points or jail time, may be applied to you.
Watch for school buses near railway crossings. All school buses must stop at all railway crossings. The upper alternating red lights are not used for these stops, so be alert.
Stopping for pedestrian crossovers
Diagram 2-29
Pedestrian crossovers (Diagram 2-29) are designated areas that allow pedestrians to safely cross roads where there are no traffic lights. Always watch for pedestrians and people using wheelchairs at these crossings.
Pedestrians may push a button to make the overhead yellow lights flash to warn drivers that they will be crossing. Pedestrians should point or make an indication to drivers that they want to cross before entering the roadway (try making eye contact when possible). Drivers including cyclists must yield the right-of-way to pedestrians in the crossover. Only when pedestrians and school crossing guards have crossed and are safely on the sidewalk can drivers and cyclists proceed. You must not pass any vehicle within 30 metres of a pedestrian crossover.
For more information on pedestrian crossovers visit Driving near pedestrian crossovers and school crossings.
Summary
By the end of this section, you should know:
- Where to position your vehicle when stopping at stop lights and stop signs
- The importance of stopping at railway crossings and how to position your vehicle to stop for them
- How and when to stop for school crossings and school buses
- How and when to stop for pedestrian crossovers
We've moved this content over from an older government website. We'll align this page with the ontario.ca style guide in future updates.
Changing directions
Changing directions tinachenBefore you turn a corner, back up, change lanes or turn around, you need to know what is beside and behind you. Always check your mirrors and over your shoulder to make sure the way is clear and you have enough space to complete the move safely.
Turning a corner
To turn a corner, signal well before the turn. When the way is clear, move into the proper lane, either the far right lane for a right turn or the far left lane in your direction for a left turn. Signal your turn and look from side to side and check your blind spots to make sure the way is clear.
Slow down before you enter the turn; the sharper the turn, the slower you should go. To keep full control of the vehicle, finish braking before you turn the steering wheel.
For a sharp turn, turn the steering wheel with one hand and cross the other hand over it. Grip the wheel on the other side and continue turning. This is called “hand over hand steering.” When you have completed the turn, relax your grip on the steering wheel and let it slip or gently feed it through your hands to return to the straight-ahead position. Do not turn the steering wheel with one finger or the flat palm of your hand. Gradually increase speed as you complete the turn.
Remember, drivers often lose control of vehicles and skid because they try to do more than one thing at a time. Try not to brake and steer at the same time.
Right turns
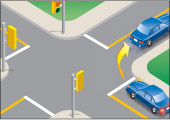
Diagram 2-30
Unless signs or pavement markings tell you not to, always begin and end a right turn close to the right side of the road.
To make a right turn, signal well before the turn and move into the right-hand lane when the way is clear. If the right-hand lane is not marked, keep as far to the right of the road as possible. Look ahead, left, right and left again before starting to turn. If you have not seen any smaller vehicles or pedestrians, check your right rear blind spot. Let cyclists, limited-speed motorcycles, or moped riders go through the intersection before you turn. When it is safe, complete your turn into the right-hand lane of the road you are entering.
Right turn on a red light
Unless a sign tells you not to, you may make a right turn facing a red light as long as you first come to a complete stop and wait until the way is clear. Remember to signal your turn and yield to pedestrians and others using the road.
Left turns
Unless signs or pavement markings tell you not to, always begin and end a left turn in the far left lane in your direction.
To make a left turn, signal well before the turn and move into the far left lane when the way is clear. Look ahead, behind, left, right and left again and check your blind spots. Make your turn when the way is clear.
When you are stopped at an intersection waiting for approaching traffic to clear, don't turn your steering wheel to the left until you can complete the turn. With your wheels turned to the left, your vehicle could be pushed into the path of oncoming traffic.
When two vehicles coming from opposite directions meet in an intersection waiting to turn left, each should turn to the left of the other after yielding the right-of-way to pedestrians and oncoming traffic.
Motorcycles, bicycles, limited-speed motorcycles and mopeds turn left at intersections in the same way as larger vehicles. If you are making a left turn behind one of these vehicles, do not pull up beside it to make your turn at the same time. Stay behind and turn when the way is clear. Wait for the smaller vehicle to move right before you pass.
The following diagrams show you the correct way to turn left on different types of roads:
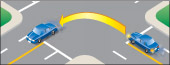
Diagram 2-31: Two-way road to a two-way road.
Turn from the lane closest to the centre line to the lane right of the centre line, following a smooth arc. Then, when you can, move into the right curb lane.

Diagram 2-32: Two-way road to a one-way road.
Turn from the lane closest to the centre line to the left curb lane.
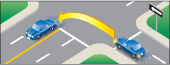
Diagram 2-33: One-way road to a two-way road.
Turn from the left curb lane to the lane just right of the centre line. Then, when you can, move into the right curb lane.
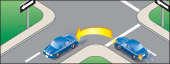
Diagram 2-34: One-way road to a one-way road.
Turn from the left curb lane to the left curb lane.
Left-turn lanes

Diagram 2-35
Some roads have special lanes for vehicles turning left (Diagram 2-35). At an intersection where left-turn lanes are marked on the pavement, make your turn from the marked lane. Keep this lane position as you turn onto the other road.
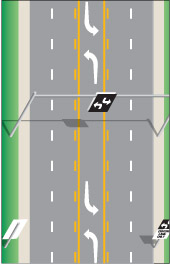
Diagram 2-36
The centre lane of some roads is used as a two-way left-turn lane (Diagram 2-36). This lets left-turning vehicles from both directions wait for a chance to turn without holding up traffic. To use a two-way, left-turn lane, follow these steps:
- Signal and move into the centre lane shortly before your turn. Slow down.
- Carefully move forward to a spot opposite the road or driveway where you want to turn.
- Make your turn when the way is clear.
Remember that vehicles from the opposite direction also use this lane to turn left. As they wait in front of you, it may be hard for you to see oncoming traffic. Only go when you are sure the way is clear. These left-turn lanes are not to be used for passing.
Left turn on a red light
You may turn left from a one-way road to a one-way road on a red light after coming to a complete stop and making sure the way is clear. Yield to pedestrians and traffic.
Driving through roundabouts
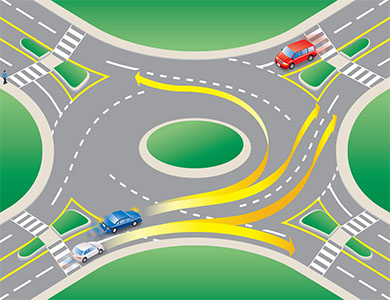
Diagram 2-37
Approaching:
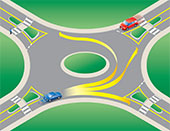
Diagram 2-38
- As you approach the roundabout, look for signage to choose your exit. Choose which lane to use as you would for any other intersection (See Diagram 2-37). Use the left lane to turn left or to go straight. Use the right lane to turn right or to go straight. (See Diagram 2-38). Do not enter a roundabout from the right lane if you want to turn left. Cyclists generally keep to the centre of the appropriate lane, or dismount and use the roundabout as a pedestrian would. (See Diagram 2-39.)
- Slow down and watch for pedestrians on the approach to the yield line at the entrance of the roundabout. Stay in your lane.
Entering:
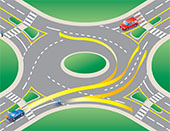
Diagram 2-39
- Visual checks: Do visual checks of all vehicles already in the roundabout and those waiting to enter (including cyclists).
- Look left: Traffic in the roundabout has the right-of-way. When preparing to enter the roundabout, pay special attention to the vehicles to your left. Adjust your speed or stop at the yield sign if necessary.
- Adequate gap: Watch for a safe opportunity to enter the roundabout. Enter when there is an adequate gap in the circulating traffic flow. Don't enter directly beside another already in the roundabout, as that may be exiting at the next exit.
- Travel counter-clockwise: Once in the roundabout, always keep to the right of the central island and travel in a counter-clockwise direction.
- Keep moving: Once you are in the roundabout, do not stop except to avoid a collision; you have the right-of-way over entering traffic. Do not change lanes while in the roundabout. If in the inside lane and you miss your exit, you must continue around until you meet your exit again.
Exiting:
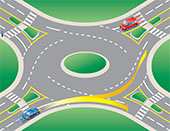
Diagram 2-40
- Signal: Be sure to signal your exit and watch for pedestrians.
- Maintain your lane: Stay to the left if you entered from the left lane, or stay to the right if you entered from the right lane.
- Maintain your position: Maintain your position relative to other vehicles.
- Signal intent to exit: Once you have passed the exit before the one you want, use your right-turn signal.
- Left lane exit: If exiting from the left lane, watch out for vehicles on the right that continue to circulate around the roundabout.
Dealing with particular situations at a roundabout
Consider large vehicles
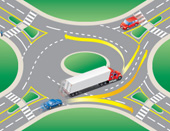
Diagram 2-41
Allow extra room alongside large vehicles (trucks and buses). Large vehicles may have to swing wide on the approach or within the roundabout. Give them plenty of room. See (Diagram 2-41)
Pull over for emergency vehicles
If you are in a roundabout when an emergency vehicle approaches, exit at your intended exit and proceed beyond the traffic island before pulling over. If you have not entered the roundabout yet, pull over to the right if possible and wait until the emergency vehicle has passed.
Driving a large vehicle in a roundabout
A driver negotiating a roundabout in a large vehicle (such as a truck or bus) may need to use the full width of the roadway, including the apron (a mountable portion of the centre island adjacent to the roadway) if provided. Prior to entering the roundabout, the vehicle may need to occupy both lanes. Give large vehicles plenty of room to manoeuvre.
Note: In some areas of Ontario, older “traffic circles” exist. They are larger than roundabouts, allowing higher speeds, and force traffic to merge and weave. Modern roundabouts have a smaller inscribed circle diameter and use splitter islands (to deflect traffic) at the entry points to slow traffic speeds, or to provide pedestrian refuge. The entry is also controlled by the “yield to the left” principle; for example, cars circulating within the roundabout have the right-of-way over entering vehicles.
Backing up
Take extra care and move slowly when backing up (reversing) your vehicle. Before you begin, check that the way is clear behind you. Be especially careful to look for children and cyclists.
While firmly holding the steering wheel, put the gear selector in reverse and turn sideways in your seat to look over your shoulder in the direction you are moving. If you are reversing straight back or to the right, turn your body and head to the right and look back over your right shoulder (Diagram 2-42).
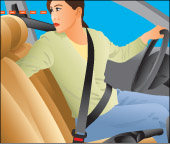
Diagram 2-42
If you are reversing to the left, turn your body and head to the left and look over your left shoulder (Diagram 2-43). Always check the opposite shoulder as well. If you are turning as you reverse, check that the front end of your vehicle does not hit anything.
You don't have to wear a seatbelt while backing up. If you need to remove your seatbelt to turn your body to see properly when reversing, do so. But don't forget to buckle up again before moving forward.
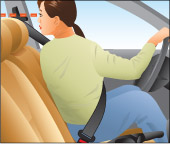
Diagram 2-43
It is illegal to drive in reverse on a divided road that has a speed limit of more than 80 km/h. This applies to the travelled section of the road and the shoulder. The only exception to this rule is if you are trying to help someone in trouble.
Turning around
You may need to turn around when driving if you miss a turn or go too far along a road. There are several ways to do this safely.
The simplest and safest way is to drive around the block, but there may be times when this is not possible. In such cases, a U-turn or a three-point turn may be necessary.
U-turn
Before you make a U-turn, check to make sure there is no sign saying not to.
To make a U-turn safely, you must be able to see well in both directions. It is illegal to make a U-turn on a curve in the road, on or near a railway crossing or hilltop, or near a bridge or tunnel that blocks your view. Never make a U-turn unless you can see at least 150 metres in both directions.
To make a U-turn, signal for a right turn, check your mirror and over your shoulder and pull over to the right side of the road. Stop. Signal a left turn and when traffic is clear in both directions, move forward and turn quickly and sharply into the opposite lane. Check for traffic as you turn.
Three-point turn
On narrow roads you need to make a three-point turn to change directions. As shown in Diagram 2-44, a three-point turn starts from the far right side of the road. Make sure you do not make a three-point turn on a curve in the road, on or near a railway crossing or hilltop, or near a bridge or tunnel that blocks your view.
Signal for a left turn. When the way is clear in both directions, move forward, turning the steering wheel sharply left towards the curb on the far side of the road. When you have reached the left side of the road, stop. Shift the vehicle into reverse. Signal a right turn. After checking that the way is still clear, turn the steering wheel sharply to the right, while backing up slowly to the other side of the road. Stop. Shift to forward gear and check traffic. When the way is clear, drive forward.
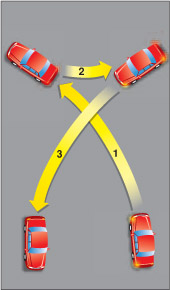
Diagram 2-44
Summary
By the end of this section, you should know:
- How to properly turn left or right at intersections
- The rules surrounding turns onto and from one way streets
- How to navigate a roundabout
- Where to look and how to manoeuvre your vehicle when backing up
- Methods of turning your vehicle around to travel back in the opposite direction (U-turns, three-point turns)
Changing positions
Changing positions tinachenChanging your position on the road involves changing lanes or overtaking and passing another vehicle. Before beginning, be sure you have enough space and time to complete the move safely.
Changing lanes
Changing lanes is a movement from one lane to another on roads with two or more lanes in the same direction. You may have to change lanes to overtake another vehicle, to avoid a parked vehicle or when the vehicle ahead slows to turn at an intersection.
Never change lanes without giving the proper signal and looking to make sure the move can be made safely.
Here are the steps for making a lane change:
- Check your mirrors for a space in traffic where you can enter safely.
- Check your blind spot by looking over your shoulder in the direction of the lane change. Be especially careful to check for bicycles and other small vehicles. Signal that you want to move left or right.
- Check again to make sure the way is clear and that no one is coming too fast from behind or from two lanes over on a multi-lane road.
- Steer gradually into the new lane. Do not slow down, maintain the same speed or gently increase it.
Never make sudden lane changes by cutting in front of another vehicle, including bicycles. Other drivers expect you to stay in the lane you are already in. Even if you signal, they expect you to yield the right-of-way.
Avoid unnecessary lane changes or weaving from lane to lane. You are more likely to cause a collision, especially in heavy traffic or bad weather. Don't change lanes in or near an intersection. Remember that spending a few seconds behind another vehicle is often safer than going around it.
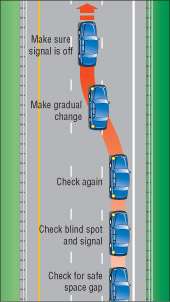
Diagram 2-45
Passing
Passing is changing lanes to move past a slower vehicle. While all public roads have speed limits, not all vehicles travel at the same speed. For example, cyclists, road service vehicles and drivers ahead that are preparing to turn are usually slower than the through traffic. You may want to pass some slow-moving vehicles when you are following them.
Never overtake and pass another vehicle unless you are sure you can do so without danger to yourself or others. Don't pass moving snow plows under any conditions. If in doubt, do not pass.
Here are the steps for passing a vehicle:
- Use your left-turn signal to show that you want to pass and check that the way is clear ahead and behind before moving into the passing lane.
- Watch for bicycles and small vehicles that may be hidden from view in front of the vehicle you are about to pass. Also watch for vehicles that may be turning left in front of you and vehicles or pedestrians entering the road from another road or driveway.
- Change lanes only after signalling. After overtaking, signal that you want to move back into the lane you started from, and when you can see the entire front of the vehicle you are passing in your inside mirror, make the lane change. Be careful not to cut off a vehicle by suddenly moving in front of it.
- If the vehicle you are passing speeds up, do not race. Go back to your original lane. And do not speed up when another driver is trying to pass you. It is unlawful and dangerous.
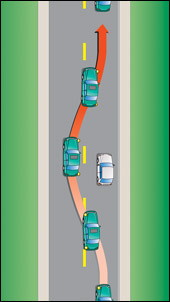
Diagram 2-46
Passing within 30 metres of a pedestrian crossover is not permitted. Passing left of a centreline is not permitted 30 metres from a bridge, viaduct or tunnel. Don't attempt to pass when approaching the crest of a hill or on a curve where your vision of oncoming traffic is obstructed and there is not enough clear distance ahead to pass in safety.
When passing parked vehicles, watch carefully for people suddenly opening doors or for doors opened to load and unload.
Motorcycles, bicycles, limited-speed motorcycles and mopeds often need to pull to the left or right side of their lane to avoid dangerous road conditions or to be seen by other drivers. Do not take this as an invitation to pass in the same lane. If you do want to pass these vehicles, do so by changing lanes.
When faster traffic wants to pass you, move to the right and let it pass in safety. When being passed on an undivided road where the passing driver has pulled into the opposite lane, pay attention to oncoming traffic and move closer to the right side of the lane. Be prepared to slow down to let the passing driver get in front of you more quickly to prevent a collision.
On many high-speed roads with three or more lanes in each direction, trucks are not allowed to drive in the far left-hand lane. This means that the lane next to it is the truck passing lane. If you are in this lane and a truck wants to pass, move into the right-hand lane as soon as you can.
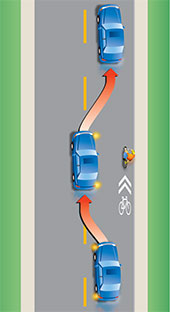
Diagram 2-47
Passing at night
Be very careful when you pass other vehicles at night. If you have to pass and the way is clear, follow these steps:
- Switch your headlights to low beams as you approach a vehicle from behind.
- Signal, check your mirrors and blind spot, and pull out to pass. As you move alongside the vehicle you are passing, switch on your high beams. This will let you see more of the road ahead.
- When you can see all of the front of the vehicle you are passing in your rear view mirror, you are far enough ahead to pull back into the right lane. Remember to signal.
Passing and climbing lanes

Diagram 2-48
Some roads have special passing or climbing lanes. These lanes let slower vehicles move into the right-hand lane so that faster ones can pass safely in the left lane.
An advance sign tells drivers they will soon have a chance to pass. Another sign warns when the lane is ending so drivers in the right-hand lane can begin to merge safely with traffic in the left-hand lane.
Passing on the shoulder
You may drive on the right shoulder only to pass a vehicle turning left and only if the shoulder is paved. You may not pass on the left shoulder, paved or not.
Passing on the right
Most passing is done on the left. You may pass on the right on multi-lane or one-way roads and when overtaking a streetcar or a left-turning vehicle.
Passing on the right can be more dangerous than passing on the left. If you are driving in the left most lane with a slower vehicle in front of you, wait for the vehicle to move to the right. Do not suddenly change lanes and pass on the right; the driver in front may realize you want to pass and move to the right at the same time you do.
Passing streetcars
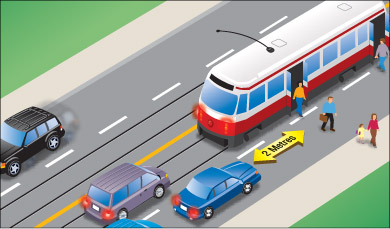
Diagram 2-49
You must pass streetcars on the right unless you are driving on a one-way road.
At streetcar stops, stay at least two metres behind the rear doors where passengers are getting off or on. This rule does not apply at stops where an area has been set aside for streetcar passengers. Always pass these areas at a reasonable speed and be prepared for pedestrians to make sudden or unexpected moves.
Summary
By the end of this section, you should know:
- The safety considerations and the sequence of steps to follow when changing lanes or passing
- How to deal with specific situations when passing (for example, at night, streetcars)
Parking along roadways
Parking along roadways tinachenSince parking rules change from road to road and place to place, always watch for and obey signs that say you may not stop or limit stopping, standing or parking. Be aware that not all parking by-laws are posted on signs.
Here are some basic parking rules:
- Never park on the travelled part of a road. Drive off the road onto the shoulder if you must stop for some reason.
- Never park on a curve, hill or anywhere you do not have a clear view for at least 125 metres in both directions.
- Do not park where you will block a vehicle already parked or where you will block a sidewalk, crosswalk, pedestrian crossing or road entrance.
- Do not park within three metres of a fire hydrant, on or within 100 metres of a bridge or within six metres of a public entrance to a hotel, theatre or public hall when it is open to the public.
- Do not park within nine metres of an intersection or within 15 metres if it is controlled by traffic lights.
- Do not park within 15 metres of the nearest rail of a level railway crossing.
- Do not park where you will get in the way of traffic or snow clearing.
- Never open the door of your parked vehicle without first making sure that you will not endanger any other person or vehicle or interfere with traffic. Generally, a good practice is to use the Dutch reach method, meaning you open the driver’s door with your right hand as this will force a shoulder check at the same time.. Take extra precautions to avoid opening a door in the path of cyclists, who often ride close to parked cars (Diagram 2-50). When you must open a door next to traffic, keep it open only long enough to load or unload passengers.
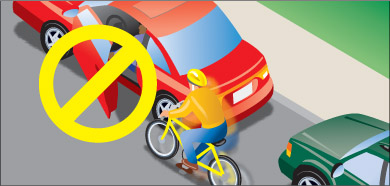
Diagram 2-50
After parking your vehicle, always turn off the ignition and the lights, remove the key and lock the door to deter theft. Do not leave children or animals in the vehicle.
Before moving from a parked position, always signal and check for traffic, pulling out only when it is safe to do so.
Parking for people with disabilities
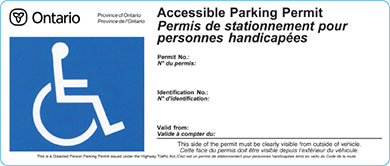
Diagram 2-51
The Accessible Parking Permit, formerly known as the Disabled Person Parking Permit, is a laminated card that may be displayed on the dashboard or turned-down sun visor of any vehicle in which a person with a disability is travelling. The permit entitles the vehicle in which the person named on the permit is travelling to park in designated disabled parking, standing and stopping areas. The permit is issued to the permit holder, not a specific vehicle.
People who have the old version of the permit, the Disabled Person Parking Permit, may continue to use this permit until it expires. Upon its expiry, any new permit issued will be the Accessible Parking Permit.
The Accessible Parking Permit is issued free of charge to qualified individuals. To qualify for an Accessible Parking Permit, a licensed physician, chiropractor, nurse practitioner (extended class) physiotherapist or occupational therapist must certify that the applicant has one or more of the conditions detailed on the Accessible Parking Permit application form.
There are four types of Accessible Parking Permits.
- A regular permit (blue) is issued to people with permanent disabilities and is valid for five years. Until 2011, all individuals will need to be re-certified before renewing their permit. After that date, only individuals whose condition is deemed “subject to change” will need to be re-certified before renewing their permit.
- A temporary permit (red) is issued when the disability is expected to last more than two months, but is not a permanent disability. The temporary permit is not renewable.
- A traveller permit (purple) is valid for up to one year and is issued upon request to individuals who hold a valid Accessible Parking Permit and plan to fly from any Ontario airport. The permit holder places the traveller permit on the dashboard or sun visor of their vehicle when leaving it parked at the airport. The person’s regular permit travels with them.
- A company permit (green) is valid for up to five years and is issued to companies and non-profit organizations that own or lease vehicles used to transport people with physical disabilities.
Misuse or abuse of an Accessible Parking Permit should be reported to the police. Misuse of an Accessible Parking Permit will result in fines and revoked privileges. Accessible Parking Permit applications are available at any Service Ontario Centre or by sending a request to the ministry at the following address:
Service Ontario
Licence Renewals Unit
P.O. Box 9800
Kingston, ON K7L 5N8
Never park in a space designated for people with disabilities unless you display an Accessible Parking Permit in the windshield of your vehicle. The permit must belong to you or one of your passengers. This also applies to standing or stopping at curb areas reserved for picking up and dropping off passengers with disabilities.
Parallel parking
Parallel parking means parking a vehicle with its wheels parallel and next to the curb or side of the road. Park parallel to the curb on roads where parking is allowed, unless there are signs saying that vehicles should be parked at an angle. Park on the right side of the road in the direction of traffic. Unless there are signs saying otherwise, you can parallel park on both sides of a one-way road.
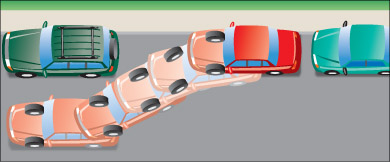
Diagram 2-52
To parallel park on the right-hand side of the road, find a space that is about one and one-half times longer than your vehicle. Check the traffic beside and behind and signal your wish to pull over and stop. Drive alongside, or parallel to, the vehicle ahead of the empty space, leaving about a metre between the vehicles. Stop when your rear bumper is in line with the other vehicle. Follow these steps:
- Slowly and carefully reverse into the space, turning the steering wheel fully toward the curb.
- When you can see the outside rear corner of the vehicle in front of your space, straighten your wheels as you continue to reverse.
- Turn the steering wheel fully toward the road to bring your vehicle in line with the curb.
- If your vehicle is not parallel to the curb, drive forward to straighten.
- When you are properly parked, set the parking brake and move the gear selector into park, or shift into first or reverse gear if your vehicle has a manual transmission.
- Turn off the engine. Remember to remove the key from the ignition. Check traffic before opening your door. Lock your vehicle.
Parking on a hill
When parking facing downhill, turn your front wheels towards the curb or right shoulder. This will keep the vehicle from rolling into traffic if the brakes become disengaged (Diagram 2-53 A).
Turn the steering wheel to the left so the wheels are turned towards the road if you are facing uphill with a curb. The tires will catch the curb if it rolls backward (Diagram 2-53 B).
When facing uphill without a curb, turn the wheels sharply to the right. If the vehicle rolls, it will go off the road rather than into traffic (Diagram 2-53 C).
When parking on a hill, always set the parking brake and move the gear selector into park, or shift into first or reverse gear if your vehicle has a manual transmission. Turn off the engine and remove the key. Check for traffic before opening the door and remember to lock your vehicle.
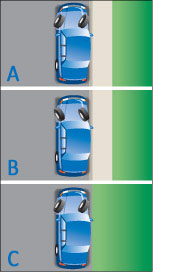
Diagram 2-53
Roadside stop
When you need to stop by the side of the road for a short time to check something outside your vehicle, or to look for directions on a map, for example, follow these directions:
- Before slowing down, check your mirrors and blind spot to see when the way is clear.
- Turn on your signal before slowing down unless there are vehicles waiting to enter the road from side roads or driveways between you and the point where you intend to stop. Wait until you have passed these entrances so that drivers will not think you are turning before the stopping point.
- Steer to the side of the road, steadily reducing speed, and stop parallel to the curb or edge of the road. You should not be more than about 30 centimetres away from it. Do not stop where you will block an entrance or other traffic.
- Turn off your signal and turn on your hazard lights.
If your vehicle has an automatic transmission, put the gear selector in park and set the parking brake. If your vehicle has a manual transmission, set the parking brake and shift into neutral if not turning off the engine, or shift into low or reverse if turning off the engine. When parking on a hill, set your wheels against the curb, in the appropriate direction to keep your vehicle from rolling.
Pulling out from a roadside stop
When pulling out from a roadside stop, do the following:
- Release the parking brake and move the gear selector to drive or shift into first gear.
- Turn off your flashers and turn on your left-turn signal.
- Just before pulling away from the stop, check your mirrors and blind spot to make sure the way is clear of vehicles and cyclists.
- Return to normal traffic speed by accelerating smoothly to blend with the traffic around you. In light traffic, accelerate moderately. In heavier traffic, you may have to accelerate more quickly. In a vehicle with manual transmission, shift gears as you increase speed.
- Turn off your left-turn signal as soon as you are back on the road.
Summary
By the end of this section, you should know:
- Basic parking rules that may not appear on posted street signs
- What an Accessible Parking Permit is, and who is eligible to park in spaces designated for people with disabilities
- What parallel parking is and what steps to follow to complete it successfully
- How to safely pull over your vehicle for a roadside stop and re-enter traffic
Freeway driving
Freeway driving tinachenA freeway - also called an expressway - is a high-speed, multi-lane road. On a freeway, traffic going in each direction is separated and ramps let vehicles enter and exit. Vehicle speed is higher on a freeway than on other roads, so driving can be more demanding and difficult. However, because there are no intersections, bicycles or pedestrians, freeway driving can be safer for experienced drivers.
New lanes called High Occupancy Vehicle (HOV) lanes are to be used for vehicles carrying a set minimum number of people. You will need to learn how to recognize markings and signs for these lanes, and the rules for using them.
New drivers need to learn how to drive with other vehicles around them at low speeds before trying freeway driving. Class G1 drivers may only drive on freeways with a licensed driving instructor.
Entering a freeway
There are usually two parts to a freeway entrance: an entrance ramp and an acceleration lane.
As you move along the freeway entrance ramp, look ahead and check your mirrors and blind spots to assess the traffic to see where you will move into the nearest freeway lane.
As you leave the ramp you enter the acceleration lane. In the acceleration lane, drivers increase their speed to the speed of traffic on the freeway before they merge with it. Signal and increase your speed to merge smoothly with traffic. Freeway drivers should move over, if it is safe to do so, leaving room for merging vehicles.
A few entrance ramps join the freeway on the left. This means you enter the fastest lane of traffic first. Use the acceleration lane to match your speed to the traffic, increasing your speed more quickly.
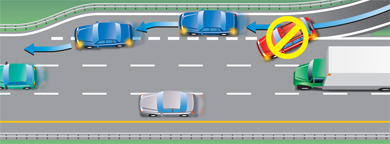
Diagram 2-54
Driving along a freeway
Once on the freeway, a safe driver travels at a steady speed, looking forward and anticipating what’s going to happen on the road ahead. Traffic should keep to the right, using the left lanes for passing.
As in city driving, your eyes should be constantly moving, scanning the road ahead, to each side and behind. Look ahead to where you are going to be in the next 15 to 20 seconds, or as far ahead as you can see, when you travel at faster speeds. Remember to keep scanning and check your mirrors frequently.
Stay clear of large vehicles. Because of their size, they block your view more than other vehicles. Leave space around your vehicle. This will let you see clearly in every direction and will give you time and space to react. Learn more about following distances.
Be careful not to cut off any vehicle, large or small, when making a lane change or joining the flow of traffic. It is dangerous and illegal for a slower moving vehicle to cut in front of a faster moving vehicle.
Use the far left lane of a multi-lane freeway to pass traffic moving slower than the speed limit, but don't stay there. Drive in the right-hand lane when possible. On many freeways with three or more lanes in each direction, large trucks cannot travel in the far left lane and must use the lane to the right for passing. Get into the habit of driving in the right lane, leaving the other lanes clear for passing.
Leaving a freeway
There are usually three parts to a freeway exit: a deceleration lane for slowing down that leads drivers out of the main flow of traffic, an exit ramp and an intersection with a stop sign, yield sign or traffic light. When leaving the freeway, signal that you want to move into the deceleration lane, but do not slow down. When you are in the lane, reduce your speed gradually to the speed shown for the exit ramp. Check your speedometer to make sure you are going slowly enough. You may not realize how fast you are going because you are used to the high speed of the freeway. Losing your ability to judge your speed accurately is sometimes called speed adaptation or velocitization. It is a special danger when leaving a freeway. Be prepared to stop at the end of the exit ramp.
Signs telling you that there are freeway exits ahead are far enough in advance for you to make any lane changes safely. If you miss an exit, do not stop or reverse on the freeway. Take the next exit.
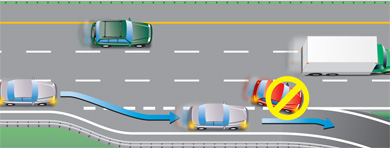
Diagram 2-55
High Occupancy Vehicle (HOV) Lane
A High-Occupancy Vehicle (HOV) lane is a specially designed lane that is designated for use by certain types of vehicles with a specified number of occupants. It can offer travel-time savings to those who choose to carpool or take transit. HOV lanes can move a greater number of people than a general traffic lane, and encourage carpooling and transit use by providing travel-time savings and a more reliable trip time. HOV lanes are open 24 hours a day, seven days a week.
HOV lanes benefit all drivers, not only those who carpool, in the following ways:
- Improves highway infrastructure by moving more people in fewer cars
- Reduces the number of vehicles on the road
- Reduces overall emissions and improves air quality
HOV lanes on provincial highways are reserved for vehicles carrying at least two people (for example, a driver plus at least one passenger in any of the following passenger vehicles: cars, minivans, motorcycles, pickup trucks and buses).
- The HOV lane is separated from the other general traffic lanes by a striped buffer zone. It is illegal and unsafe to cross the striped buffer pavement markings.
- Certain vehicles are exempt from the HOV lane rules. Buses can use an HOV lane at any time, regardless of the number of occupants. Emergency vehicles such as police, fire and ambulance are also exempt from the restrictions.
- If you use the HOV lanes improperly, you can be stopped and ticketed by a police officer. You will be required to re-enter the general lanes at the next entry/exit zone.
- Commercial motor vehicles must have two or more people in the vehicle and be less than 6.5 metres in total length to be in the HOV lane. Single-occupant taxis and airport limousines are permitted in the HOV lane. Vehicles with the “Green” licence plate are permitted in the HOV lane with any number of occupants. Green plates are available for eligible plug-in hybrid electric vehicles and full-battery electric vehicles. Please consult the Ministry of Transportation website for more details.
Summary
By the end of this section, you should know:
- What a freeway is and which road users can and cannot use them
- Safe practices to follow when entering, driving along or exiting a freeway
- What provincial freeway HOV lanes are and who can use them
Dealing with particular situations
Dealing with particular situations tinachenAggressive driving and road rage
Aggressive-driving behaviours, such as tailgating, speeding, failing to yield the right-of-way and cutting in front of someone too closely, may cause other drivers to become frustrated and angry and lead to a road-rage conflict between drivers. An angry driver may attempt dangerous retaliatory action. Avoid becoming angry on the road by following these tips:
- Know the warning signs of stress and combat them by getting fresh air, breathing deeply and slowly, and listening to relaxing music.
- Make a conscious decision not to take your problems with you when driving.
- If you are on a long trip, take a break from driving every few hours.
- Don't compete with another driver, or retaliate for what you believe to be inconsiderate behaviour.
- If someone else's driving annoys you, don't try to “educate” the person. Leave traffic enforcement to the police.
- Don't take other drivers' mistakes or behaviours personally.
- Avoid honking your horn at other drivers, unless absolutely necessary. A light tap on the horn is usually sufficient.
Remember that if you drive responsibly and courteously, you are less likely to spark a road rage situation.
- Plan your route in advance. Some of the most erratic and inconsiderate driving occurs when a driver is lost.
- Drive in a courteous and considerate manner.
- Yield the right-of-way when it is courteous to do so.
- Be polite and let other drivers in front of you when they are signalling that they would like to do so.
- If you make a mistake while driving, indicate that you are sorry. An apology can greatly reduce the risk of conflict.
- Don't return aggression. Avoid eye contact and do not gesture back. Keep away from erratic drivers.
If you are in a situation in which you feel threatened by another driver, do the following:
- Stay in your vehicle and lock the doors.
- If you have a cell phone, call police.
- Use your horn and signals to attract attention.
- If you believe you are being followed, do not drive home. Drive to a police station or a busy public place.
Street racing
Street racing is one of the most serious and reckless forms of aggressive driving. It shows a callous disregard for other drivers and road users, and it puts everyone on the road at serious risk of injury or death. Street racers run the risk of being charged under the Criminal Code of Canada.
Drowsy driving
Drowsiness has been identified as a causal factor in a growing number of collisions resulting in injury and fatality. Tired drivers can be as impaired as drunk drivers. They have a slower reaction time and are less alert.
Studies have shown that collisions involving drowsiness tend to occur during late night/early morning hours (between 2 a.m. and 6 a.m.) or late afternoon (between 2 p.m. and 4 p.m.). Studies also indicate that shift workers, people with undiagnosed or untreated sleep disorders, and commercial-vehicle operators, are at greater risk for such collisions.
Always avoid driving when you are feeling drowsy. Scientific research confirms that you can fall asleep without actually being aware of it. Here are eight important warning signs that your drowsiness is serious enough to place you at risk:
- You have difficulty keeping your eyes open.
- Your head keeps tilting forward despite your efforts to keep your eyes on the road.
- Your mind keeps wandering and you can't seem to concentrate.
- You yawn frequently.
- You can't remember details about the last few kilometres you have travelled.
- You are missing traffic lights and signals.
- Your vehicle drifts into the next lane and you have to jerk it back into your lane.
- You have drifted off the road and narrowly avoided a crash.
If you have one of these symptoms, you may be in danger of falling asleep. Pull off the road and park your vehicle in a safe, secure place. Use well-lit rest stops or truck stops on busy roads. Lock your doors, roll up your windows and take a nap.
Stimulants are never a substitute for sleep. Drinks containing caffeine can help you feel more alert but, if you are sleep deprived, the effects wear off quickly. The same is true of turning up the volume of your radio or CD player and opening the window. You cannot trick your body into staying awake; you need to sleep. Remember, the only safe driver is a well-rested, alert driver.
Workers on the road
Be extra careful when driving through construction zones and areas where people are working on or near the road.
When approaching a construction zone, proceed with caution and obey all warning signs, people and/or devices that are directing traffic through the area. Often, lower speed limits are posted to increase worker safety and reflect increased road hazards, such as construction vehicles in the area, uneven or gravel surfaces, narrowed lanes and so on. In the construction zone, drive carefully and adjust your driving to suit the conditions, do not change lanes, be ready for sudden stops and watch for workers and related construction vehicles and equipment on the road.
Other types of workers and vehicles may also be present on the road and pose a hazard, such as roadside assistance and disable vehicles, surveyors, road maintenance or utility workers. Always slow down and pass with caution to prevent a collision. If safe to do so, move over a lane to increase the space between your vehicle and the hazard.
Traffic-control workers direct vehicle traffic in work zones and prevent conflicts between construction activity and traffic. Whether you are driving during the day or at night, watch for traffic-control people and follow their instructions.
Treat people working on roads with respect, and be patient if traffic is delayed. Sometimes traffic in one direction must wait while vehicles from the other direction pass through a detour. If your lane is blocked and no one is directing traffic, yield to the driver coming from the opposite direction. When the way is clear, move slowly and carefully around the obstacle.
Recent changes to the Highway Traffic Act have resulted in doubled fines for speeding in a construction zone when workers are present. It is also an offence to disobey STOP or SLOW signs displayed by a traffic-control person or firefighter.
Animals on the road
Crashes involving animals (mainly moose and deer) are a growing problem. Motor vehicle/wild animal collisions increased from 8,964 in 1999 to 12,791 collisions in 2008. This represents an increase of 43 per cent over a 10-year period. Many of these collisions go unreported.
You may encounter domestic, farm or wild animals on the road anywhere in Ontario. Scan the road ahead from shoulder to shoulder. If you see an animal on or near the road, slow down and pass carefully as they may suddenly bolt onto the road. Many areas of the province have animal crossing signs which warn drivers of the danger of large animals (such as moose, deer or cattle) crossing the road. Be cautious when you see these signs, especially during dusk-to-dawn hours when wild animals are most active.
To reduce your chances of hitting an animal:
- Reduce speed in darkness, rain and fog. These conditions can reduce your ability to see an animal on or near the road.
- Travel at a safe speed and stay alert. Driver inattention and speed are common factors in animal-vehicle crashes.
- Watch for shining eyes at the roadside. If you do see shining eyes, slow down and be ready to stop.
- Keep your windshield clean and headlights properly adjusted.
- Use high beams whenever possible and safe to do so, and scan both sides of the road ahead.
If you see an animal:
- Slow down and sound your horn.
- Be alert for other animals that may be with the one you've seen.
- Don't try to drive around the animal. Animal movements are unpredictable.
- If you wish to watch an animal, find a safe place to pull completely off the road and park first. Do not park on the shoulder of the road, as other drivers may be distracted by the animal and hit your vehicle.
- Stay in your vehicle; getting out increases your chance of being hit by another vehicle.
- If you hit a deer or moose, report it to the local police service or the Ministry of Natural Resources. Do not try to move an injured animal.
Distracted driving
Driving is a job that requires your full attention every time you get behind the wheel, even if your vehicle has driver-assistance features. Any secondary activity will detract from your ability to drive properly and safely. You must reduce distractions and focus on your driving.
Ontario’s distracted driving laws apply to the use of hand-held communication/entertainment devices and certain display screens.
While you are driving, including when you are stopped in traffic or at a red light, it is illegal to:
- use a phone or other hand-held wireless communication device to text or dial, except to call 911 in an emergency
- use a hand-held electronic entertainment device, such as a tablet or portable gaming console
- view display screens unrelated to driving, such as watching a video
- program a GPS device, except by voice commands
You are allowed to use hands-free wireless communications devices with an earpiece, lapel button or Bluetooth. You can view GPS display screens as long as they are built into your vehicle’s dashboard or securely mounted.
Other actions such as eating, drinking, grooming, smoking, reading and reaching for objects are not part of Ontario’s distracted driving law. However, you can still be charged with careless or dangerous driving.
Learn more about distracted driving.
Careless driving
You could face charges for careless driving if you endanger other people because of any kind of distraction. This includes distraction caused by both hand-held (e.g., phone) or hands-free (e.g., Bluetooth) devices.
You could even be charged with dangerous driving – a criminal offence that carries heavier penalties, including long jail terms.
Tips to avoid distracted driving
Use any of these tips to avoid distracted driving and its penalties:
- turn off your phone or switch it to silent mode before you get in the car
- put it in the glove compartment (lock it, if you have to) or in a bag on the back seat
- before you leave the house, record an outgoing message that tells callers you’re driving and you’ll get back to them when you’re off the road
- some apps can block incoming calls and texts, or send automatic replies to people trying to call or text you
- ask a passenger to take a call or respond to a text for you
- if you must respond, or have to make a call or send a text, carefully pull over to a safe area
- silence notifications that tempt you to check your phone
How dangerous is distracted driving?
About 100 people are killed and 16,000 are injured by distracted drivers every year in Ontario. About one in four of those deaths are vulnerable road users such as pedestrians and cyclists.
Research shows that young people 16-25 are more likely to drive distracted than any age group and are the most likely to be killed or injured in a distracted driving collision.
- Texting or browsing on your phone takes your eyes off the road and increases your risk of crashing by 10 times. In fact, a recent study found that drivers who were texting or changing music on their phones traveled 28 metres further (nearly half a hockey rink) before responding to a hazard than drivers who were paying attention. It can be a matter of life and death for a child who runs out on the street unexpectedly, or a family crossing at a crosswalk. For every 10-year increase in the driver’s age, drivers were 44% less likely to text, 38% less likely to use a handheld phone, and 28% less likely to use a hands-free phone.
Emergency vehicles
Emergency vehicles – police, fire, ambulance and special public-utility vehicles – are easily identified through their use of flashing red or blue lights, a siren or bell, or alternating flashes of white light from their headlamp high beams. Also, be aware that police, fire and ambulance services use many different types of vehicles, such as bicycles, snowmobiles, all-terrain vehicles, motorcycles, buses and trucks.
Reacting to an approaching emergency vehicle
When an emergency vehicle is approaching your vehicle from any direction with its flashing red or red and blue lights, or siren or bell sounding, you are required to bring your vehicle to an immediate stop.
When bringing your vehicle to a stop, you are required to bring your vehicle as near as is practical to the right-hand curb or edge of the roadway. When on a one-way road or divided highway having more than two lanes of traffic, move to the closest curb or edge of the roadway. Your vehicle should be parallel to the roadway and clear of any intersections, including highway on/off ramps. Do not move onto or stop on the shoulder of the roadway, as emergency vehicles may be travelling along it.
Use extreme caution when stopping your vehicle because other drivers may not yet be aware of or are already reacting to the approaching emergency vehicle. Look to the front, both sides and toward the rear of your vehicle, signal your intention to pull over well in advance and begin to adjust your vehicle's speed to merge with any traffic to the side you are pulling to. Once you have moved your vehicle to the side, brake gradually as required and bring your vehicle to a safe stop. Avoid any sudden changes in direction or excessive braking and be aware of any vehicles approaching fast to the rear of your vehicle.
If you are in an intersection and preparing to make a turn when an emergency vehicle is approaching, you should abandon the turn and clear the intersection by proceeding straight when safe to do so, then pull to the right and stop. This will clear the intersection and minimize the possibility of a collision with the emergency vehicle should it be passing you on the side you intended to turn towards.
When the emergency vehicle has passed, check to make sure the way is clear and signal before merging back into traffic. Remain vigilant for additional emergency vehicles, and remember it is illegal to follow within 150 metres of a fire vehicle responding to an alarm.
Note: Some firefighters and volunteer medical responders may display a flashing green light when using their own vehicles to respond to a fire or medical emergency. Please yield the right-of-way to help them respond to an emergency call quickly and safely.
Police or other enforcement officers may require you to pull over and bring your vehicle to an immediate stop. Typically, the officer may signal this requirement by driving their vehicle with its emergency lights flashing and/or siren on behind your vehicle or by using hand gestures from the side of the road. When stopping your vehicle, follow the previous procedures, except that you should bring your vehicle to a stop outside of traffic lanes and onto the shoulder of the roadway where possible, or turn and stop on a side street with less traffic if in the immediate vicinity. If the officer gives direction as to where to stop, follow the officer's directions.
Stay alert
When you see an approaching emergency vehicle with its lights or siren on, prepare to clear the way.
- React quickly but calmly. Don't slam on the brakes or pull over suddenly. Use your signals to alert other drivers you intend to pull over.
- Check your rearview mirrors. Look in front and on both sides of your vehicle. Allow other vehicles to also pull over. Pull to the right and gradually come to a stop.
- Wait for the emergency vehicle to pass and watch for other emergency vehicles that may be responding to the same call. Check to make sure the way is clear and signal before merging back into traffic.
- Don't drive on or block the shoulder on freeways. Emergency vehicles will use the shoulder of the road if all lanes are blocked.
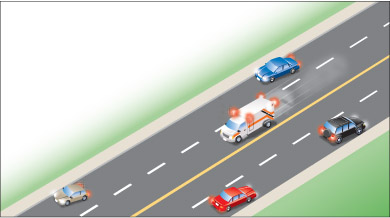
Diagram 2-56
Reacting to a stopped emergency vehicle or tow truck
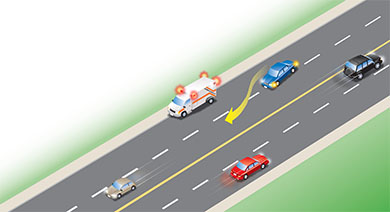
Diagram 2-57
When approaching any emergency vehicle that is stopped with its red, or red and blue, lights flashing or a tow truck with its amber lights flashing in the same direction of your travel, you are required to reduce the speed of your vehicle and proceed with caution. When reducing your speed, you are required to assess the speed of the surrounding traffic and the condition of the roadway (such as fog, rain, snow). To ensure safety, brake early and gradually to allow surrounding traffic to better adjust to a reduced speed and to ensure you have full control of your vehicle when braking.
If your vehicle has a manual transmission, it is recommended that you use your brakes, versus shifting down to a lower gear, in order to activate your rear brake lights and indicate to other drivers that you are slowing down.
When the roadway has two or more lanes of traffic in the same direction of your travel, you are required to move into a lane away from the emergency vehicle or tow truck, if safe to do so, in addition to reducing the speed of your vehicle and proceeding with caution. Similar to the procedures noted above, when slowing down and moving over, look in front and on both sides of your vehicle, and check your rearview mirrors, to determine the speed of the traffic around you and condition of the roadway. Proceed to decrease your speed similar to surrounding traffic speed, use your turn signal prior to making the lane change, and double check your rearview mirrors and shoulder check your blind spots to ensure no other vehicles are moving into or approaching that lane too fast. When safe to do so, change lanes well in advance of an emergency vehicle or a stopped tow truck with its flashing amber lights. Once in the lane, brake gradually and continue to reduce the speed of your vehicle when safe to do so. Be aware of any vehicles approaching fast to the rear of your vehicle.
Tips to remember
- Stay alert. Avoid distractions. Keep the noise level down in your vehicle.
- Remain calm, and do not make sudden lane changes or brake excessively.
- Before changing direction or speed, consider road conditions, check surrounding traffic, use your mirrors, look to blind spots, and signal and brake early.
- Keep roadway shoulders, intersections and highway ramps clear for emergency-vehicle use.
- If your vehicle is being pulled over, in this instance, bring it to a safe stop on the shoulder of the roadway, away from traffic, following any directions from the officer.
Failing to respond to an emergency vehicle
Take emergency flashing lights and sirens seriously. Proceed with caution, clear the way and bring your vehicle to a stop, where required. It's the law. If you don’t stop, you can be fined and get three demerit points for a first offence. For additional offences, fines increase and you could also go to jail for up to six months.
Please note the above law, fines and penalties are also applicable to a tow truck with its lamp producing intermittent flashes of amber light that is stopped on a highway.
Summary
By the end of this section, you should know:
- How to manoeuvre your vehicle through construction zones
- What to do if you encounter animals on the road
- Things that may distract you when driving and how to minimize those distractions
- What to do when you encounter an emergency vehicle
We've moved this content over from an older government website. We'll align this page with the ontario.ca style guide in future updates.
Driving at night and in bad weather
Driving at night and in bad weather tinachenAt night and in weather conditions such as rain, snow or fog, you cannot see as far ahead, even with headlights. Slow down when driving at night, especially on unlit roads and whenever weather conditions reduce your visibility.
Overdriving your headlights
You are overdriving your headlights when you go so fast that your stopping distance is farther than you can see with your headlights. This is a dangerous thing to do, because you may not give yourself enough room to make a safe stop. Reflective road signs can mislead you as well, making you believe you can see farther than you really can. This may cause you to over-drive your headlights if you are not careful (Diagram 2-58).
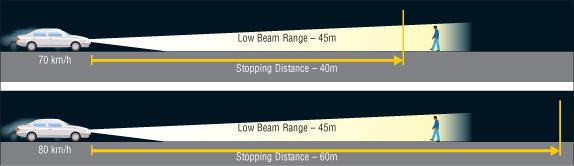
Diagram 2-58
Glare
Glare is dazzling light that makes it hard for you to see and be aware what others around you are doing. It can be a problem on both sunny and overcast days, depending on the angle of the sun’s rays and your surroundings. Glare can also be a problem at night when you face bright headlights or see them reflected in your rear view mirror.
When meeting oncoming vehicles with bright headlights at night, look up and beyond and slightly to the right of the oncoming lights. In daytime glare, use your sun visor or keep a pair of good quality sunglasses in your vehicle. When you enter a tunnel on a bright day, slow down to let your eyes adjust to the reduced light. Remove your sunglasses and turn on your headlights.
Cut down glare at night by following the rules of the road for vehicle lights. Use your low-beam headlights within 150 metres of an oncoming vehicle or when following a vehicle within 60 metres. On country roads, switch to low beams when you come to a curve or hilltop so you can see oncoming headlights and won't blind oncoming drivers. If you can't see any headlights, switch back to high beams.
Fog
Fog is a thin layer of cloud resting on the ground. Fog can reduce visibility for drivers, resulting in difficult driving conditions.
The best thing to do is to avoid driving in fog. Check weather forecasts and if there is a fog warning, delay your trip until it clears. If that is not possible or you get caught driving in fog, there are a number of safe driving tips you should follow. If visibility is decreasing rapidly, move off the road and into a safe parking area to wait for the fog to lift.
Tips for driving safely in fog
Before you drive - and during your trip - check weather forecasts. If there is a fog warning, delay your trip until it clears. If you are caught driving in fog, follow these safe-driving tips:
DO:
- Slow down gradually and drive at a speed that suits the conditions.
- Make sure the full lighting system of your vehicle is turned on.
- Use your low-beam headlights. High beams reflect off the moisture droplets in the fog, making it harder to see.
- If you have fog lights on your vehicle, use them, in addition to your low beams.
- Be patient. Avoid passing, changing lanes and crossing traffic.
- Use pavement markings to help guide you. Use the right edge of the road as a guide, rather than the centre line.
- Increase your following distance. You will need extra distance to brake safely.
- Look and listen for any hazards that may be ahead.
- Reduce the distractions in your vehicle. For example, turn off the cell phone. Your full attention is required.
- Watch for any electronically operated warning signs.
- Keep looking as far ahead as possible.
- Keep your windows and mirrors clean. Use your defroster and wipers to maximize your vision.
- If the fog is too dense to continue, pull completely off the road and try to position your vehicle in a safe parking area. Turn on your emergency flashers, in addition to keeping on your low-beam headlights.
Don’t:
- Don't stop on the travelled portion of the road. You could become the first link in a chain-reaction collision.
- Don't speed up suddenly, even if the fog seems to be clearing. You could find yourself suddenly back in fog.
- Don't speed up to pass a vehicle moving slowly or to get away from a vehicle that is following too closely.
REMEMBER:
- Watch your speed. You may be going faster than you think. If so, reduce speed gradually.
- Leave a safe braking distance between you and the vehicle ahead.
- Remain calm and patient. Don't pass other vehicles or speed up suddenly.
- Don't stop on the road. If visibility is decreasing rapidly, pull off the road into a safe parking area and wait for the fog to lift.
- Use your low-beam lights.
Rain
Rain makes road surfaces slippery, especially as the first drops fall. With more rain, tires make less contact with the road. If there is too much water or if you are going too fast, your tires may ride on top of the water, like water skis. This is called hydroplaning. When this happens, control becomes very difficult. Make sure you have good tires with deep tread, and slow down when the road is wet.
Rain also reduces visibility. Drive slowly enough to be able to stop within the distance you can see. Make sure your windshield wipers are in good condition. If your wiper blades do not clean the windshield without streaking, replace them.
In rain, try to drive on clear sections of road. Look ahead and plan your movements. Smooth steering, braking and accelerating will reduce the chance of skids Leave more space between you and the vehicle ahead in case you have to stop. This will also help you to avoid spray from the vehicle ahead that can make it even harder to see.
Avoid driving in puddles. A puddle can hide a large pothole that could damage your vehicle or its suspension, or flatten a tire. The spray of water could obstruct the vision of adjacent motorists and result in a collision, cause harm to nearby pedestrians or drown your engine, causing it to stall. Water can also make your brakes less effective.
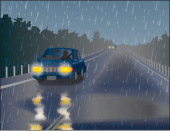
Diagram 2-59
Flooded roads
Avoid driving on flooded roads, water may prevent your brakes from working. If you must drive through a flooded stretch of road, test your brakes afterward to dry them out. Test your brakes when it is safe to do so by stopping quickly and firmly at 50 km/h. Make sure the vehicle stops in a straight line, without pulling to one side. The brake pedal should feel firm and secure, not spongy, that’s a sign of trouble. If you still feel a pulling to one side or a spongy brake pedal even after the brakes are dry, you should take the vehicle in for repair immediately.
Skids
A skid may happen when one or more tires lose their grip with the road’s surface. Skids most often happen on a slippery surface, such as a road that is wet, icy or covered with snow, gravel or some other loose material. Most skids result from driving too fast for road conditions. Hard braking and overly aggressive turning or accelerating can cause your vehicle to skid and possibly go out of control.
To avoid a skid on a slippery road, drive at a reduced speed and operate the vehicle’s controls in a smooth and constrained manner. Increasing tire forces, such as by braking or accelerating while steering may push tires even closer to a skid condition. It’s essential that the vehicle’s speed be maintained at a safe level and that turns be made gently.
If your vehicle begins to skid, try not to panic - it is possible to maintain control of your vehicle, even in a skid. Ease off on the accelerator or brake and on a very slippery surface slip the transmission into neutral if you can. Continue to steer in the direction you wish to go. Be careful not to oversteer. Once you regain control, you can brake as needed, but very gently and smoothly.
Anti-lock braking systems (ABS)
If your vehicle is equipped with anti-lock brakes, practise emergency braking to understand how your vehicle will react. It is a good idea to practise doing this under controlled conditions with a qualified driving instructor.
ABS is designed to sense the speed of the wheels on a vehicle during braking. An abnormal drop in wheel speed, which indicates potential wheel lock, causes the brake force to be reduced to that wheel. This is how ABS prevents tire skid and the accompanying loss of steering control. This improves vehicle safety during heavy brake use or when braking with poor traction.
Although anti-lock braking systems help to prevent wheel lock, you should not expect the stopping distance for your vehicle to be shortened.
Drivers unfamiliar with anti-lock braking may be surprised by the pulsations that they may feel in the brake pedal when they brake hard. Make sure you know what to expect so you will not be distracted by the pulsation or tempted to release the pedal during emergency braking manoeuvres.
Threshold braking
Threshold braking should bring you to a reasonably quick controlled stop in your own lane, even in slippery conditions. This technique is generally practised in a vehicle that is not equipped with ABS. Brake as hard as you can until a wheel begins to lock up, then release pressure on the pedal slightly to release the wheel. Press down on the brake pedal, applying as much braking force as possible without inducing a skid. If you feel any of the wheels begin to lock up, release the brake pressure slightly and re-apply. Don't pump the brakes. Continue braking this way until you have slowed the vehicle to the desired speed.
Vehicles equipped with ABS should provide controlled braking on slippery surfaces automatically. Press the brake pedal hard and allow the system to control wheel lock-up.
Snow
Snow may be hard-packed and slippery as ice; rutted, full of hard tracks and gullies; or smooth and soft. Look ahead and anticipate what you must do based on the conditions. Slow down on rutted, snowy roads. Avoid sudden steering, braking or accelerating that could cause a skid. Do not use cruise control during times of snow and other inclement weather.
Whiteouts
Blowing snow may create whiteouts where snow completely blocks your view of the road. When blowing snow is forecast, drive only if necessary and with extreme caution.
Tips for driving in blowing snow and whiteout conditions
Before you drive - and during your trip - check weather forecasts and road reports. If there is a weather warning, or reports of poor visibility and driving conditions, delay your trip until conditions improve, if possible. If you get caught driving in blowing snow or a whiteout, follow these safe driving tips:
DO:
- Slow down gradually and drive at a speed that suits the conditions.
- Make sure the full lighting system of your vehicle is turned on.
- Use your low-beam headlights. High beams reflect off the ice particles in the snow, making it harder to see. If you have fog lights on your vehicle, use them, in addition to your low beams.
- Be patient. Avoid passing, changing lanes and crossing traffic.
- Increase your following distance. You will need extra space to brake safely.
- Stay alert. Keep looking as far ahead as possible.
- Reduce the distractions in your vehicle. Your full attention is required.
- Keep your windows and mirrors clean. Use defroster and wipers to maximize your vision.
- Try to get off the road when visibility is near zero. Pull into a safe parking area if possible.
DON'T:
- Don't stop on the travelled portion of the road. You could become the first link in a chain-reaction collision.
- Don't attempt to pass a vehicle moving slowly or speed up to get away from a vehicle that is following too closely.
REMEMBER:
- Watch your speed. You may be going faster than you think. If so, reduce speed gradually.
- Leave a safe braking distance between you and the vehicle ahead.
- Stay alert, remain calm and be patient.
- If visibility is decreasing rapidly, do not stop on the road. Look for an opportunity to pull off the road into a safe parking area and wait for conditions to improve.
- If you become stuck or stranded in severe weather, stay with your vehicle for warmth and safety until help arrives. Open a window slightly for ventilation. Run your motor sparingly. Use your emergency flashers.
- Be prepared and carry a winter driving survival kit that includes items such as warm clothing, non-perishable energy foods, flashlight, shovel and blanket.
- It is important to look ahead and watch for clues that indicate you need to slow down and anticipate slippery road conditions.
Ice
As temperatures drop below freezing, wet roads become icy. Sections of road in shaded areas or on bridges and overpasses freeze first. It is important to look ahead, slow down and anticipate ice. If the road ahead looks like black and shiny asphalt, be suspicious. It may be covered by a thin layer of ice known as black ice. Generally, asphalt in the winter should look gray-white in colour. If you think there may be black ice ahead, slow down and be careful.
Snow plows
Snow-removal vehicles on public roadways are equipped with flashing blue lights that can be seen from 150 metres.
Flashing blue lights warn you of wide and slow-moving vehicles: some snow plows have a wing that extends as far as three metres to the right of the vehicle. On freeways, several snow plows may be staggered across the road, clearing all lanes at the same time by passing a ridge of snow from plow to plow. Do not try to pass between them. This is extremely dangerous because there is not enough room to pass safely, and the ridge of wet snow can throw your vehicle out of control.
Summary
By the end of this section, you should know:
- How to identify and manage situations where your visibility may be reduced
- How weather conditions such as rain, flooded roads, snow and ice may affect your vehicle and your ability to control it
- What to do if your vehicle skids or if you encounter heavy snow, whiteouts or black ice
- How to recognize and share the road with snow removal vehicles
Dealing with emergencies
Dealing with emergencies tinachenIf you drive often or travel alone, you need to be ready to deal with emergencies. Here are some suggestions for coping with some common road emergencies.
If your brakes fail
Try pumping the brake pedal to temporarily restore hydraulic brake pressure. If this does not work, apply the parking brake gently but firmly while holding the release button. It is a good idea for new drivers to practice a parking-brake emergency stop under controlled conditions with a qualified driving instructor. Total brake failure is very rare on modern vehicles. If your brakes do fail and you manage to stop, do not drive away. Call for help.
If your gas pedal sticks
First try to lift the pedal by slipping your foot under it. Do not reach down with your hands while the vehicle is moving. If this does not work, turn on your hazard lights, shift to neutral and stop as soon as you safely can, preferably off the road. Turn off the ignition and do not drive away. Call for help.
If your headlights go out
Check the switch immediately. If the lights stay out, turn on your hazard lights and bring your vehicle to a safe stop off the road. Call for help. It is dangerous and illegal to drive at night without lights.
If you have trouble on a freeway
At the first sign of trouble, begin to pull over. Do not wait for your vehicle to stall on the freeway. Check your mirrors, put on your hazard lights, take your foot off the gas pedal and pull over to the nearest shoulder as quickly as possible. Never stop in the driving lanes.
Be careful getting out of your vehicle. If possible, leave through the door away from traffic. Do not raise the hood.
While you wait for help, stay in your vehicle with the doors locked. If someone stops to help, ask them to call the police or automobile club for you. If you have a cellular phone, call for help yourself.
The Queen Elizabeth Way, the 400-series freeways and many other high-speed roads are patrolled by the Ontario Provincial Police. Stay with your vehicle, and help will arrive shortly.
If your wheels go off the pavement
Don't panic. Grip the steering wheel firmly. Take your foot off the gas pedal to slow down. Avoid heavy braking. When the vehicle is under control, steer toward the pavement. Be prepared to correct your steering and increase speed when your wheels are fully back on the pavement.
If a tire blows out
Blowouts can cause tremendous steering and wheel vibration, but don't be alarmed. Take your foot off the gas pedal to slow down and steer the vehicle firmly in the direction you want to go. Bring the vehicle to a stop off the road.
In a collision where someone is injured
St. John Ambulance recommends that all drivers carry a well-stocked first-aid kit and know how to use it. Consider reading a book about first aid or sign up for a first-aid course. It could mean the difference between life and death in a collision.
Every driver involved in a collision must stay at the scene or return to it immediately and give all possible assistance. If you are not personally involved in a collision, you should stop to offer help if police or other officials have not arrived.
In a collision with injuries, possible fuel leaks or serious vehicle damage, stay calm and follow these steps:
- Call for help or have someone else call. By law, you must report any collision to the police when there are injuries or damage to vehicles or other property exceeding $2,000.
- Turn off all engines and turn on emergency flashers. Set up warning signals or flares, or have someone warn approaching drivers.
- Do not let anyone smoke, light a match or put flares near any vehicle, in case of a fuel leak. If a vehicle is on fire, get the people out and make sure everyone is well out of the way. If there is no danger of fire or explosion, leave injured people where they are until trained medical help arrives.
- If you are trained in first aid, treat injuries in the order of urgency, within the level of your training. For example, clear the person's airway to restore breathing, give rescue breathing or stop bleeding by applying pressure with a clean cloth.
- If you are not trained in first aid, use common sense. For example, people in collisions often go into shock. Cover the person with a jacket or blanket to reduce the effects of shock.
- Stay with injured people until help arrives.
- Disabled vehicles on the road may be a danger to you and other drivers. Do what you can to make sure everyone involved in a collision is kept safe.
In a collision where no one is injured
Follow these steps in a collision where there are no injuries:
- If the vehicles are drivable, move them as far off the road as possible as this should not affect the police officer's investigation. This is especially important on busy or high-speed roads where it may be dangerous to leave vehicles in the driving lanes. So in a minor collision with no injuries, if you can “Steer it, Clear it”. If you cannot move the vehicles off the road, set up warning signals or flares far enough away to give other traffic time to slow down or stop.
- Call police (provincial or local, depending on where the collision takes place). By law, you must report any collision to the police when there are injuries or damage to vehicles or property exceeding $2,000.
- Give all possible help to police or anyone whose vehicle has been damaged. This includes giving police your name and address, the name and address of the registered owner of the vehicle, the vehicle plate and permit number and the liability insurance card.
- Get the names, addresses and phone numbers of all witnesses.
- If damage is less than $2,000, you are still required by law to exchange information with anyone whose vehicle has been damaged. However, the collision does not have to be reported to the police.
- If you have a camera or cell phone with a camera and it is safe to do so, take photos of the collision scene.
- If your vehicle must be towed, get the name and licence number of the tow truck operator and/or company. Make sure you understand where your vehicle is being towed.
- Contact your insurance company as soon as possible if you intend to make a claim.
Summary
By the end of this section, you should know:
- What to do in emergency situations such as vehicle component failure, driving off the pavement or vehicle trouble on a freeway
- The steps to take if you are involved in a collision with or without injuries
Driving efficiently
Driving efficiently tinachenVehicles powered by gasoline and diesel give off air pollutants and gases such as oxides of carbon, nitrogen and sulphur, hydrocarbons and soot. These pollutants affect the quality of the air we breathe, our health, crop yields and even the global climate.
Hydrocarbons and oxides of nitrogen react in sunlight to form ground-level ozone, better known as smog. Smog is a major health hazard responsible for respiratory ailments and other illnesses. Oxides of sulphur and nitrogen combine with water vapour to form acid rain, which damages our lakes, forests and crops.
Global warming is the result of too much carbon dioxide and other gases trapping heat in our atmosphere. Global warming could cause average temperatures to rise, causing droughts, crop failures, lower water levels and more frequent and severe storms.
A car gives off less carbon dioxide than a larger vehicle, such as an airplane, truck, bus or train, does. However, because so many people own cars and drive them so often, cars are responsible for nearly half the carbon dioxide produced by all forms of transportation. Vehicles that carry large numbers of passengers, such as buses, produce less carbon dioxide per passenger than cars.
As a driver, you can help to protect the environment from the harmful effects of driving by following these suggestions. Many of them can also save you money. For further information visit the Fleetsmart website.
Before you drive
- Plan ahead. Combine several errands into one trip.
- Avoid driving during rush hours. Driving in off-peak times takes less time, uses less fuel and releases fewer emissions.
- Pay attention to smog alerts. It is especially important to follow these suggestions on days when smog is bad.
- For short trips, consider walking or cycling.
- For longer trips, public transit is an environmentally friendly alternative to driving alone.
- Carpool whenever possible. If you want to meet at a central location, there are free carpool lots in many parts of the province.
While driving
- Avoid starting your vehicle unnecessarily. A large burst of pollutants is emitted when a cold engine is started.
- Turn off your vehicle if parked more than 10 seconds. Even in cold weather, vehicle engines warm up within 30 seconds.
- Obey the speed limits. Driving at high speed uses more fuel and increases your chances of a serious collision.
- On the freeway, use your vehicle’s overdrive gear and cruise control for better fuel efficiency.
- Remove unnecessary weight from your vehicle, such as heavy baggage, wet snow and winter sand or salt.
- Maintain your vehicle’s aerodynamics. Remove roof racks and compartments when not in use. At high speeds, use your vents instead of opening the windows.
- Use your vehicle’s air conditioning wisely. Use your windows and vents in city and stop-and-go traffic. At high speeds, using your air conditioning is usually more fuel efficient than opening your windows and reducing the vehicle’s aerodynamics.
- Don't “top-off” the tank when refueling. Spilled fuel releases harmful vapours.
At the garage
- Regular maintenance will keep your vehicle running at maximum efficiency, reducing the fuel you need to buy and the pollutants your vehicle emits.
- Keep your vehicle’s engine well tuned. Worn spark plugs, dragging brakes, low transmission fluid or a transmission not going into high gear can increase fuel consumption substantially.
- Follow the recommended maintenance schedule in your vehicle owner’s manual to maximize fuel efficiency.
- Have any fluid leaks checked by a specialist to avoid engine damage and harming the environment.
- Keep your tires properly inflated to reduce your fuel bill, emissions and tire wear.
- Have your vehicle’s alignment checked regularly to reduce uneven tire wear and fuel consumption.
(For more information on driving efficiently, see the section on maintaining your vehicle).
Drivers are reminded that many collisions occur when the driving environment is less than optimal. Whether driving at night, during times of reduced visibility or when road conditions are wet and slippery, drivers are encouraged to use the appropriate safe-driving tips provided in this handbook.
10 ways you can help make Ontario’s roads the safest in North America
- Don't drink and drive. Don't drive when you're taking medication that will affect your driving.
- Always wear your seatbelt and make sure passengers are using the appropriate child car seat,booster seat or seatbelt.
- Obey the speed limits. Slow down when road and weather conditions are poor.
- Don't take risks: don't cut people off in traffic, make sudden lane changes or run yellow lights.
- Don't drive when you're tired, upset or sick.
- If you're in doubt, let the other driver go first - yield the right-of-way.
- Keep at least a two-second space between your vehicle and the one ahead. To check your distance: start counting when the vehicle ahead passes a fixed object, stop counting when your vehicle reaches the same spot.
- Cut the distractions: don't overcrowd the vehicle or play loud music.
- Always check your blind spot: look in your mirror and over your shoulder before you change lanes.
- Check traffic in all directions, including any sidewalks and paths/trails, before entering an intersection.
Summary
By the end of this section, you should know:
- How passenger vehicles affect the environment
- Ways to reduce the amount you drive
- Ways to conserve fuel and reduce emissions when you drive
We've moved this content over from an older government website. We'll align this page with the ontario.ca style guide in future updates.