Driving techniques
Steering (forward) and off-track
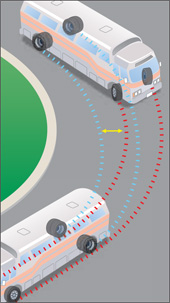
The rear wheels of the vehicle do not pivot and so will not follow the same path as the front wheels. In a curve, the greater the distance (wheel base) between the front wheels and the rear wheels of the vehicle, the greater the amount of “off-track.” The off-track path of the rear wheels is closer to the curb than the path of the front wheels.
On the highway, you must lead your turning arc of the front wheels according to the sharpness of the curve and your vehicle’s off-track.
On a curve to the right, keep the front wheels close to the left side of the lane to prevent dropping the rear wheels off the pavement.
On a curve to the left, keep the front wheels closer to the right edge of the pavement to prevent the rear wheels from crossing into the other traffic lane.
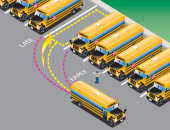
Whenever possible, make turns from the proper lanes. When you must use portions of another lane to make sharp turns, it is your responsibility to be sure that such a move can be made safely, without interfering with other road users (Diagram 2-1).
Right turns
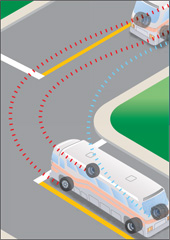
Right turns with vehicles that have a lot of off-track require the driver to lead the turning arc according to the amount of off-track. Running the rear wheels of the vehicle over curbs and sidewalks is dangerous and may cause damage to the suspension, wheels and tires. You must be careful not to hit objects such as power poles, sign posts or lamp standards mounted close to the curb. Generally, it is better to use more space from the road you are entering than from the road you are leaving.
In narrow streets, proceed well into the intersection before turning the steering wheel. You may need to travel partially over the centre line of the street entered or into the second traffic lane. If so, you must yield to traffic, signal the turn and ensure a safe manoeuvre. When you have to partially block off another lane in this manner, make sure that smaller vehicles such as motorcycles and bicycles are not moving up on your right side. Remember, your ability to see is restricted when you are in the middle of a turn (Diagram 2-2).
Left turns
Be aware of any off-tracking when making a left turn. Unless you use your left outside mirror to monitor the path of the rear wheels, those wheels may hit a vehicle or a sign post on an island. You must turn the vehicle in a wide arc before bringing it back to its proper position after a left turn, just right of the centre line. Then as you speed up, you can move, when it is safe, to the right lane (Diagram 2-3).
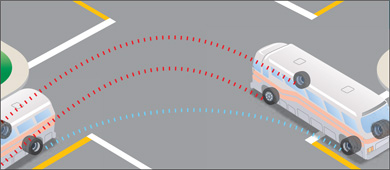
Note: School buses, especially larger buses, have their rear axles well ahead of the end of the bus causing the rear of the bus to swing out of its normal path.
Backing
Planning your route in advance may eliminate the need for backing. If necessary, drive around the block if it will help you to avoid backing around a corner. Drive out into traffic rather than backing into traffic. Avoid entering the path of a reversing vehicle and do not stop or park behind a vehicle that may soon be reversed. As the driver, you are responsible for ensuring all precautions are taken when attempting to back into a driveway from the road.
- Prior to backing: Turn off phone/radio, open windows, activate four-way flashers and sound horn.
- Exit the vehicle and walk around to examine the area into which you must back. Look for overhead obstacles or wires, side clearances, pedestrians or objects in your path of travel.
- Remember to use both rearview mirrors. Keep in mind the blind spot on the rear, as vision is limited.
Straight backing
The easiest and safest backing manoeuvre is straight backing. Whenever possible use this approach.
- Pull ahead and position the bus in line with the direction you want it to take.
- Ensure front and rear wheels are straight and centred.
- Watch both mirrors while backing slowly in a straight line.
- If the bus shifts left or right from the parking spot, align the vehicle accordingly.

Alley dock backing (drivers's side)
When performing an alley dock, backing from the driver’s side is recommended.
- Position your bus to the angled direction you want it to take.
- Turn steering wheel to the left while backing slowly.
- Look out driver’s window to monitor the rear while checking mirrors.
- If the turn is too early or sharp, turn wheels slightly to the right accordingly. If the turn is too late or wide, adjust wheels by turning it to the left.
Offset backing (driver’s side)
There are two types of offset backing: driver side, where you offset back to the left; and passenger side, where you offset back to the right.
- Drive straight forward until the vehicle is in a straight line.
- Turn the wheel all the way to the left angling the bus toward the destination.
- Back up while watching the mirrors to frame the destination parking spot.
- Back up the bus until the rear is aligned with the centre of the parking spot.
- Stop and turn the wheel to the right as far as possible and backup until the rear is positioned to enter the parking spot.
- Straighten the wheels. Look out both mirrors while slowly backing toward the destination.
Guide
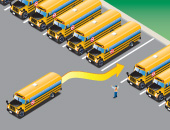
A responsible guide can help you by watching the area into which you are backing and by keeping an eye on your blind-spot zone. The guide should stand in a position to see you and the area to the rear of your vehicle clearly. They should also be prepared to warn you if pedestrians or vehicles move into your path as you back. This can help you make an easy and safe approach to the dock. Remember that back-up alarm devices do not absolve the driver’s responsibility when reversing.
Brake inspection
While you are not expected to be able to repair your brakes, you should be able to tell when there is a problem. Use the following inspection routine as part of your daily trip inspection.
- Hydraulic brakes (without power assist):
- Apply brakes moderately and hold.
- If the pedal shows a steady drop, the vehicle should be taken out of service and the system inspected professionally.
- Hydraulic brakes (with power assist):
- With the engine stopped, pump the brake pedal several times to eliminate power assist.
- Apply brakes moderately and hold.
- Start the engine (the pedal should drop slightly) and stop.
- If the pedal continues to drop or does not drop (no power assist), stop the engine. The vehicle should be taken out of service and the system inspected professionally.
Use of brakes
Apply brakes with steady pressure at the beginning of a stop, then ease off as the vehicle slows. Just before the vehicle comes to a complete stop, release brakes to avoid jerk and rebound, then brake again to hold the vehicle while stopped.
Hydraulic brakes or air brakes should not be fanned (alternately applied and released) except on slippery pavement where this type of braking may give better control, reduce the danger of skidding and give a shorter stop. However, fanning air brakes may sharply reduce air pressure. Fanning serves no useful purpose on dry pavement and, on a long downhill grade, may reduce air pressure below the minimum needed for stopping the vehicle.
Avoid excessive use of brakes on long downgrades, because overheated brakes are dangerously inefficient. Gear down to use engine compression as the principal means of controlling speed on long grades. You should use the same gear going down a long grade as you would to climb it. Choose the lower gear before you begin going downhill.
If the low air-pressure warning device operates at any time, stop immediately in the safest available place and have the problem corrected before you proceed.
If your brakes fail on a level road, down-shift (manual or automatic) and use engine compression to slow the vehicle. In an emergency, it may be necessary to use the emergency brake. Do not drive the vehicle again until repairs have been made.
Take care when braking on a wet or slippery surface or on a curve. Late or over-braking in these circumstances could cause skidding. To stop a skid, release the brakes, look and steer in the direction you want to go.
Retarders have become a popular option on motor coaches. They augment braking and help reduce service brake wear and brake fade, and are useful on long downhill grades.
There are three types of brake retarders: exhaust brakes, engine brakes and driveline (transmission) retarders. Activation of the retarder is usually controlled by the driver by means of an “on-off” or variable setting switch. In some buses, the retarder activates automatically when the service brakes are applied. Exhaust and engine brake retarders typically increase engine noise and many communities prohibit their use.
Always respect signs advising against the use of engine or exhaust brakes. Drive line retarders don’t increase engine noise. However, prolonged use increases transmission heat to the point that it could shut down the coach to protect the transmission from damage.
Warning: Because the retarder applies brake force only to the drive axle, activating the retarder while driving on a slippery surface can cause a loss of control and a collision. Do not use the retarder on wet, slippery or icy roads. During inclement weather, turn off the retarder using the maters (on-off) switch. Drivers who ignore this warning and experience a retarder-induced wheel lock-up or spin should immediately turn off the retarder to allow the drive wheels to roll freely and regain steering control.
Note: If you plan to operate a vehicle equipped with air brakes, refer to the Official MTO Air Brake Handbook for more information.
Following distance
Commercial motor vehicles must keep a minimum distance of at least 60 metres (200 ft.) between themselves and other vehicles when on a highway at a speed over 60 km/h (40 mph), except when overtaking and passing another vehicle.
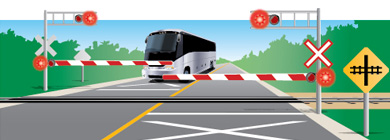
Stopping at railway crossings
All railway crossings on public roads in Ontario are marked with red and white “X” signs. Watch for these signs and be prepared to stop. You may also see yellow advance warning signs and pavement markings of a large X at approaches to railwaycrossings. Some railway crossings have flashing signal lights while some use gates or barriers to keep motorists from crossing the tracks when a train is coming.
Most buses and other public vehicles are required to stop at railway crossings that do not have automatic warning devices such as barriers and signal lights. School buses must stop at all railway crossings whether or not they have automatic warning devices. Motorists must be prepared to stop behind these vehicles. Obey all signs and signals. Remember — it can take up to two kilometres for a train to stop under full emergency braking.
When you come to a railway crossing, remember:
- Slow down, listen and look both ways to make sure the way is clear before crossing the tracks.
- If a train is coming, stop at least five metres from the nearest rail. Do not cross the track until you are sure the train or trains have passed.
- Never race a train to a crossing.
- If there are signal lights, wait until they stop flashing and, if the crossing has a gate or barrier, wait until it rises, before you cross the tracks.
- Never drive around, under or through a railway gate or barrier while it is down, being lowered or being raised. It is illegal and dangerous.
- Never stop on railway tracks. For example, in heavy traffic, make sure you have enough room to cross the tracks completely before you begin to cross.
- Don’t shift gears while crossing tracks.
- If you get trapped on a crossing, immediately get everyone out and away from the vehicle. Move to a safe place and then contact authorities.
- Buses and other public vehicles are required to stop at railway crossings that are not protected by gates, signal lights, or a stop sign. School buses must stop at railway crossings whether or not they are protected by gates or signal lights. Watch for these buses and be prepared to stop behind them.
- If you are approaching a railway crossing with a stop sign, you must stop unless otherwise directed by a flagman.