Know your vehicle
The first step in learning to drive a motorcycle or moped is to learn where the controls are and what they do. Motorcycles and mopeds are designed so that all the controls are within quick reach of your hands and feet. However, the same control may not be in the same place on all vehicles. Also, some types of mopeds have different controls than motorcycles. Become familiar with your vehicle’s controls. Check the owner’s manual for the exact location and precise method of operation of all controls.
You need to know the controls well enough that you can reach them without taking your eyes off the road. With practice, you will be able to operate all controls by reflex. This automatic response is required before you can begin to drive in traffic.
Primary controls
The following six controls are the most important controls you will use to operate your motorcycle or moped:
- Handlebars
- Throttle
- Front brake lever
- Rear brake lever
- Clutch lever
- Shift lever
This illustration is intended only as a guide. Controls and their positions may be different on your vehicle. Some motorcycles and mopeds do not have clutch or shift levers.
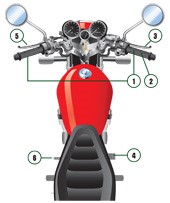
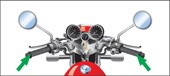
1. Handlebars
These are the two bars you hold to control the motorcycle’s direction. Many of the other controls are grouped on or around the handlebars.
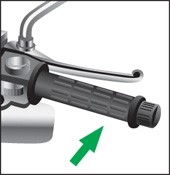
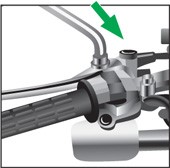
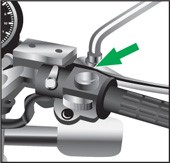
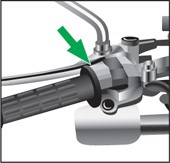
2. Throttle
Twist the right handgrip to operate the throttle. This controls the motorcycle’s speed by controlling the flow of fuel to the engine. To speed up, twist the throttle toward you. To slow down, twist it away from you. The throttle should spring back completely to the idle position when you let go.
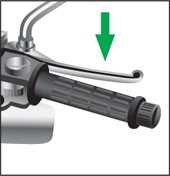
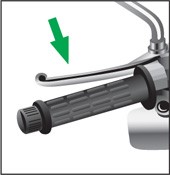
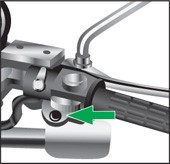
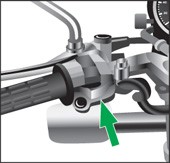
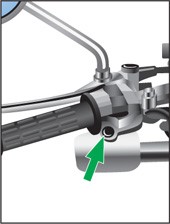
3. Front brake lever
The front brake lever is on the right handlebar in front of the throttle. You squeeze the lever toward the handgrip to apply the brake to the front wheel. Use the front and rear brakes together.
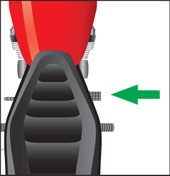
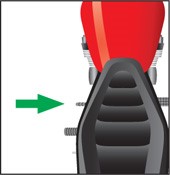
4. Rear brake lever
The rear brake lever is near the right foot rest. Press your foot on the lever to apply the brake to the rear wheel. Use the front and rear brakes together. If your motorcycle has a clutch and gears, remember that although the engine will act as a brake when you gear down or reduce throttle, your brake lights will not turn on and other drivers may not know you are slowing down. Always apply your brakes as a signal to others that you are slowing down.
5. Clutch lever
The clutch lever is on the left handlebar. It controls the clutch and is used to help shift gears. Squeeze the lever toward the handgrip to disengage the clutch; release it to engage the clutch. Whenever you change gears, you must first disengage the clutch. Try to co-ordinate the movements of clutch and throttle to change gears smoothly. Most limited-speed motorcycles and mopeds have an automatic clutch lever.
6. Shift lever
The shift lever is near the left footrest. It shifts the transmission’s gears. The shift lever should only be used when the clutch is disengaged. Select the gear you need by lifting or pressing the lever with your foot. Most motorcycles have five or six forward gears and a neutral position.
Secondary controls
There are a number of secondary controls that you will need to use to operate a motorcycle or moped effectively. Here are some of the most important ones:
- Speedometer
- Tachometer
- Indicator lights
- Ignition switch
- Starter
- Choke
- Engine kill switch
- Fuel-supply valve
- Turn signals switch
- Horn button
- Light switches
- Stands
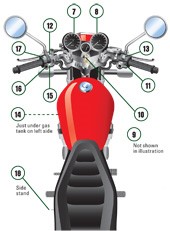
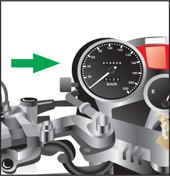
7. Speedometer
The speedometer shows the speed you are driving in kilometres per hour or miles per hour.
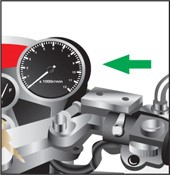
8. Tachometer
The tachometer shows the number of revolutions your engine is turning per minute (). A red line shows the maximum rpm that is safe for the engine.
9. Indicator lights
The high-beam light glows red or blue when the highbeam headlight is on. The neutral light glows green when the transmission is in neutral gear. And the turn signal light flashes yellow when the left or right turn signal is on.
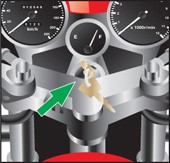
10. Ignition switch
The ignition switch turns the ignition system on and off. The ignition switch is separate from the starter; you do not turn the key to start a motorcycle like you do a car. Ignition switches have “on” and “off” positions and some also have “lights,” “lock” and “park” positions.
11. Starter
Most motorcycles have electric starters. To start, make sure your motorcycle is in neutral and that the clutch is depressed. Push the starter button on the right handlebar near the throttle. Some motorcycles have a kick-start lever, usually above the right footrest. It must be unfolded and kicked downward to start the motorcycle.
Most mopeds require you to pedal in order to start the engine.
12. Choke
This is a lever or knob, usually on the handlebars, that is used to help start the motorcycle by adjusting the mixture of gasoline and air supplied to the engine. It is used when starting a cold engine.
13. Engine kill switch
The engine kill switch is used in an emergency to stop the engine quickly. It may also be used to turn off the engine after a normal stop, but be sure to turn off the ignition switch as well. The engine will not start when the kill switch is in the “off” position. Some older model motorcycles and mopeds do not have a kill switch.
14. Fuel supply valve
The fuel supply may be controlled by a manually operated valve, or petcock, which controls the flow of gasoline to the engine. When the vehicle is not in use, this valve should be turned off to avoid a fire hazard. The fuel tank may also have a manually selected reserve supply in case the main section runs dry. To release the reserve fuel, you must turn the valve to reserve. Many newer model motorcycles do not have manual fuel-control valves.
15. Turn signals switch
Many motorcycle and moped turn signals do not automatically switch off after a turn is completed. You must manually switch off the signal after each turn or lane change. Forgetting to turn off your signal is as dangerous as not signalling in the first place, because it may cause other drivers to pull out or turn in front of you.
16. Horn button
Your motorcycle or moped must have a horn that works. Most horns are operated by pushing a button with your thumb.
17. Light switches
On most modern motorcycles and mopeds, the headlight and tail light come on automatically when the ignition is switched on and the engine is running. The switch to turn the headlight from low beam to high beam is usually on the left handlebar and operated by the thumb.
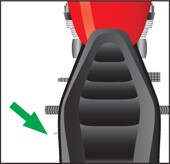
18. Stands
A kickstand or centre stand holds a motorcycle or moped upright when it is parked. Some larger motorcycles have both a kickstand and a centre stand. A kickstand extends from the left side of the vehicle and the vehicle leans against it. A centre stand is attached underneath the centre of the frame and holds the vehicle upright. Stands are operated by spring mechanisms and should only be used on a hard surface. Always make sure to completely raise your stands before driving away.