The Level Two Road Test
Statistics show that new drivers of all ages are far more likely than experienced drivers to be involved in serious or fatal collisions.
To help new drivers develop better, safer driving habits, Ontario introduced graduated licensing in 1994 for all drivers applying for their first car or motorcycle licence. Graduated licensing lets you gain driving skills and experience gradually, in lower-risk environments. The two-step licensing system takes at least 20 months to complete and includes two road tests. Passing the Level Two (G2) road test gives you full Class G driving privileges.
While the Level One road test deals with basic driving skills, the Level Two deals with advanced knowledge and skills that are generally gained with driving experience. When you take the test, the examiner will give you directions. As you complete the driving tasks, the examiner will watch to make sure you successfully perform the actions associated with them.
The G2 road test includes a component of expressway driving. To proceed, you must complete and sign a “Declaration of Highway Driving Experience” to ensure that you have sufficient expressway driving experience to complete this component. On the form, you will indicates how many times in the three months before the road test you have driven on a freeway and/or a highway with a speed limit of at least 80 km/h. You are required to indicate what was the average length of these trips (for example, under 5 kilometres, between 5 and 15 kilometres, over 15 kilometres). Freeways include: 400, 401, 402, 403, 404, 405, 406, 407, 409, 410, 416, 417, 420, 427, Queen Elizabeth Way, Don Valley Parkway, Gardiner Expressway, E. C. Row Expressway and the Conestoga Parkway. If you do not have sufficient highway driving experience, the examiner must declare the road test “out-of-order” and cancel it. You will lose 50 per cent of your prepaid road-test fee. In order to reschedule, you will have to pay the 50 per cent of the road-test fee lost through the out-of-order. Make sure you obtain the required highway driving experience before rescheduling your test.
To help you prepare, this chapter tells you the various tasks and actions that you will be expected to perform in your Level Two road test. This is only a guide. For more information on the driving tasks, you should review chapters 2 and 3.
To help clear the backlog of in-vehicle passenger road tests resulting from COVID-19 restrictions and closures, the G road test has been temporarily modified.
Until further notice, the G road test will not include these elements that are already covered in the G2 road test:
- parallel parking
- roadside stops
- 3-point turn
- driving in residential neighbourhoods
The test will still include all of the fundamental elements such as:
- driving on major roads and expressways including merging on and off, maintaining appropriate speed and space, signalling and more
- turns, curves and lane changes
- intersections
- driving in business areas
Learn more about what’s included in the G road test.
Left and right turns
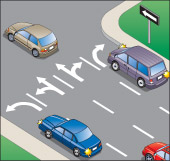
Diagram 6-1-1
The approach
This driving task begins when the examiner tells you to make a left or right turn, and ends at the point just before you enter the intersection. Make sure you take the following actions:
Traffic check
Before slowing down, look all around you. Use your rearview and side mirrors to check traffic behind you. If you change lanes, remember to check your blind spot by looking over your shoulder.
Lane
Move into the far left or far right lane as soon as the way is clear.
Signal
Turn on your signal before slowing down for the turn, unless there are vehicles waiting to enter the road from side roads or driveways between you and the intersection. Wait until you have passed these entrances so that drivers will not think you are turning before the intersection.
Speed
Steadily reduce speed as you approach the turn. In a vehicle with manual transmission, you may downshift into a lower gear as you slow down. Do not coast with your foot on the clutch pedal.
Space
While slowing down, keep at least a two to three-second distance behind the vehicle in front of you.
If stopped
You will need to do this driving task if you cannot complete your turn without stopping, either because the way is not clear or you face a stop sign or red traffic light. Remember to follow these actions:
Stop
Come to a complete stop. Do not let your vehicle roll forward or backward. When traffic conditions allow, move forward to check that the way is clear or to start the turn. If you have to stop after you have passed the stop line, do not back up.
Space
When stopped behind another vehicle at an intersection, leave enough space to pull out and pass without having to back up. Leaving this space protects you in three ways: it lets you pull around the vehicle in front if it stalls; it helps prevent you from being pushed into the vehicle ahead if you are hit from behind; and it reduces the risk of collision if the vehicle ahead rolls backward or backs up.
Stop line
If you are the first vehicle approaching an intersection with a red light or stop sign, stop behind the stop line if it is marked on the pavement. If there is no stop line, stop at the crosswalk, marked or not. If there is no crosswalk, stop at the edge of the sidewalk. If there is no sidewalk, stop at the edge of the intersection.
Wheels
When waiting to make a left turn, keep your front wheels straight. With your wheels turned left, your vehicle could be pushed into oncoming traffic. When waiting to turn right, keep the wheels straight if there is a risk of being pushed into pedestrians crossing the intersection. At a large intersection with curved sidewalks where you are turning right, angle your vehicle to follow the curb so that no other vehicle can fit between you and the curb.
Making the turn
The driving task involves your actions as you make the turn. Remember to do the following:
Traffic check
If you are stopped, waiting for a green light or for the way to be clear, keep checking traffic all around you. Just before entering the intersection, look left, ahead and right to check that the way is clear. If there is any doubt about the right-of-way, try to make eye contact with nearby drivers or pedestrians. If it is possible for another vehicle to overtake you while you are turning, check your blind spot before starting to turn. You have not properly checked traffic if another vehicle or pedestrian has the right-of-way and must take action to avoid your vehicle.
Both hands
Use both hands to turn the steering wheel throughout the turn. You are most at risk from other traffic when turning. Using both hands on the wheel gives you maximum steering control when you need it most. An exception to this is if you have a disability that prevents you from using both hands.
Gears
In a vehicle with manual transmission, do not shift gears during the turn. If you need to, you may shift gears immediately after the vehicle is moving but before it is well into the turn. You may also shift gears in an intersection wider than four lanes if not doing so would slow down other traffic. Generally, not changing gears gives you more control over your vehicle when turning.
Speed
Move ahead within four to five seconds after it is safe to start. Make the turn at a steady speed, increasing speed as you complete the turn. Drive slowly enough to keep full control of your vehicle without slowing down other traffic.
Wide/short
Turn into the corresponding lane on the intersecting road without going over any lane markings or curbs.
Completing the turn
This driving task completes the turn. It begins when you enter the intersecting road and ends when you return to normal traffic speed. Take the following actions:
Lane
End your turn in the lane that corresponds to the lane you turned from. If you are turning left onto a multi-lane road, return to normal traffic speed and move into the curb lane when it is safe to do so. If you are turning right onto a road where the right lane is blocked with parked vehicles or cannot be used for other reasons, move directly to the next available lane.
Traffic check
As you return to normal traffic speed, check your mirrors to become aware of the traffic situation on the new road.
Speed
Return to normal traffic speed by accelerating smoothly to blend with the traffic around you. In light traffic, accelerate moderately. In heavier traffic, you may have to accelerate more quickly. In a vehicle with manual transmission, shift gears as you increase speed.
Stop intersection
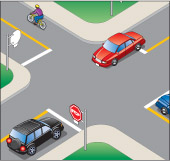
Diagram 6-2-1
The approach
This driving task is done at intersections where you must come to a stop. It begins at the point where you can see the intersection and ends just before you enter the intersection. Be sure to follow these actions:
Traffic check
Before slowing down, look all around you. Use your mirrors to check traffic behind you.
Speed
Steadily reduce speed as you approach the intersection. In a vehicle with manual transmission, you may downshift into a lower gear as you slow down. Do not coast with your foot on the clutch pedal.
Space
While slowing down, keep at least a two to three-second distance behind the vehicle in front of you.
The stop
This driving task includes the actions you take while stopped and waiting to move through the intersection. Remember these points:
Stop
Come to a complete stop. Do not let your vehicle roll forward or backward. When traffic conditions allow, move forward to check that the way is clear or start across the intersection. If you have to stop after you have passed the stop line, do not back up.
Space
When stopped behind another vehicle at the intersection, leave enough space to pull out and pass without having to back up. Leaving this space protects you in three ways: it lets you pull around the vehicle in front if it stalls; it helps prevent you from being pushed into the ahead if you are hit from behind; and it reduces the risk of collision if the vehicle ahead rolls backward or backs up.
Stop line
If you are the first vehicle approaching an intersection with a red light or stop sign, stop behind the stop line if it is marked on the pavement. If there is no stop line, stop at the crosswalk, marked or not. If there is no crosswalk, stop at the edge of the sidewalk. If there is no sidewalk, stop at the edge of the intersection.
Driving through
This task includes the actions you take as you drive through the intersection and return to normal traffic speed. Make sure to follow these actions:
Traffic check
If you are stopped, waiting for a green light or for the way to be clear, keep checking traffic all around you. Just before entering the intersection, look left, ahead and right to check that the way is clear. If there is any doubt about the right-of-way, try to make eye contact with nearby drivers or pedestrians. You have not properly checked traffic if another vehicle or pedestrian has the right-of-way and must take action to avoid your vehicle.
Both hands
Keep both hands on the steering wheel as you drive through the intersection. You are most at risk from other traffic when you are crossing the intersection. Using both hands on the wheel gives you maximum steering control when you need it most. An exception to this is if you have a disability that prevents you from using both hands.
Gears
In a vehicle with manual transmission, do not shift gears crossing the intersection. If you need to, you may shift gears immediately after the vehicle is moving but before it is well into the intersection. You may also shift gears in an intersection wider than four lanes if not doing so would slow down other traffic. Generally, not changing gears gives you more control over your vehicle.
Traffic check
As you return to normal traffic speed, check your mirrors to become aware of the traffic situation after you have gone through the intersection.
Speed
Move ahead within four to five seconds after it is safe to start. Return to normal traffic speed by accelerating smoothly to blend with the traffic around you. In light traffic, accelerate moderately. In heavier traffic, you may have to accelerate more quickly. In a vehicle with manual transmission, shift gears as you increase speed.
Through intersection
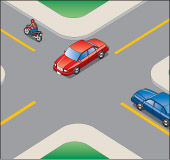
Diagram 6-3-1
The approach
This driving task is done at intersections where you may not need to stop. It begins at the point where you can see the intersection and ends just before the entrance to the intersection. Remember to do the following:
Traffic check
As you approach the intersection, look left and right for traffic on the intersecting road. If you have to slow down for the intersection, check your mirrors for traffic behind you.
Speed
Keep at the same speed as you go through the intersection unless there is a chance traffic may cross the intersection in front of you. If so, slow down or hold your foot over the brake, ready to slow down or stop. Watch for pedestrians about to cross the intersection and vehicles edging into the intersection or approaching at higher speeds.
Space
Keep at least a two- to three-second distance behind the vehicle in front of you.
Driving through
This driving task includes your actions from the time you enter the intersection until you have crossed it and are returning to normal traffic speed. Remember these points:
Lane
Do not go over lane markings or change lanes in the intersection. If your lane is blocked by a vehicle turning left or a vehicle edging into the intersection from the right, slow down or stop instead of pulling out to go around the vehicle.
Both hands
Keep both hands on the steering wheel as you drive through the intersection. You are most at risk from other traffic when you are crossing the intersection. Using both hands on the wheel givesyou maximum steering control when you need it most. An exception to this is if you have a disability that prevents you from using both hands.
Gears
In a vehicle with manual transmission, do not shift gears while crossing the intersection. If you need to, you may shift gears immediately after the is moving but before it is well into the intersection. You may also shift gears in an intersection wider than four lanes if not doing so would slow down other traffic. Generally, not changing gears gives you more control over your vehicle.
Traffic check
If you slowed down for the intersection, check your mirrors again before returning to normal traffic speed.
Freeway
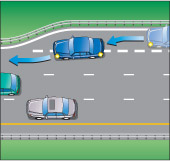
Diagram 6-4-1
Entering
This driving task begins on the entrance ramp to a freeway and ends when you have reached the speed of the traffic on the freeway. Remember to do the following:
Traffic check
While on the ramp, as soon as you can see freeway traffic approaching from behind, check your mirrors and blind spot for a space to merge safely. At the same time, watch any vehicles in front of you on the ramp and keep back a safe distance. Continue to divide your attention between watching in front, checking your mirrors and looking over your shoulder to check your blind spot until you can merge safely with traffic.
Signal
If you have not done so already, turn on your signal as soon as traffic on the freeway is able to see your vehicle on the ramp.
Space
While on the ramp and merging with freeway traffic, keep at least a two- to three-second distance behind the vehicle in front of you. Time your merge so you do not move in beside another vehicle or into the blind spot of another vehicle. If traffic is heavy or moving at such a high speed that it is difficult to keep an ideal following distance, adjust your speed to get the best spacing possible. While on the ramp and in the acceleration lane, keep inside the lane markings.
Speed
On the curve of the entrance ramp, keep your speed slow enough so that objects and people inside your vehicle are not pushed from the force created by turning the curve. While in the acceleration lane, increase your speed to match that of freeway traffic. While merging, control your speed to blend smoothly with freeway traffic.
Merge
Merge with freeway traffic in a smooth, gradual movement to the centre of the nearest freeway lane.
Cancel signal
Turn off your signal as soon as you have merged with freeway traffic.
Driving along
This driving task checks your actions driving along the freeway (but not merging, changing lanes or exiting). Be sure to remember the following points:
Traffic check
While driving along, keep checking traffic all around you and look in your mirrors every five to 10 seconds.
Speed
Avoid exceeding the speed limit or driving unreasonably slowly. Whenever possible, drive at a steady speed. Look ahead to where you are going to be in the next 12 to 15 seconds for dangerous situations or obstacles that you can avoid by changing your speed.
Space
Always keep at least a two- to three-second distance behind the vehicle in front of you. If another vehicle follows too closely behind you, give yourself even more room in front or change lanes. Try to keep a space on both sides of your vehicle, and try not to drive in the blind spots of other vehicles. Avoid driving behind large vehicles. Because of their size, they block your view of traffic more than other vehicles.
Exiting
This driving task begins when you are driving in the far right lane of the freeway and can see the exit you want to take. It ends when you reach the end of the exit ramp. Remember to do the following:
Traffic check
Before moving into the exit lane, look left and right and check your mirrors. If there is a lane of traffic on your right, such as an acceleration lane from an entrance ramp or a paved shoulder, remember also to check your right blind spot.
Signal
Turn on your signal before you reach the exit lane.
Exit lane
Enter the exit lane at the beginning of the lane with a smooth, gradual movement. Stay inside the lane markings. If there are two or more exit lanes, do not cross solid lines on the pavement to change lanes.
Speed
Do not slow down before you are completely in the exit lane. Once you are in the lane, slow gradually without causing traffic to pile up behind you. On the curve of the exit ramp, keep your speed slow enough so that objects and people inside your vehicle are not pushed from the force created by turning the curve. In a vehicle with manual transmission, downshift as you reduce speed.
Space
Keep at least a two- to three-second distance behind the vehicle in front of you.
Cancel signal
Turn off your signal once you are on the exit ramp.
Lane change
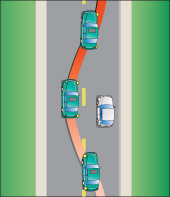
Diagram 6-5-1
This driving task begins as you look for a space to change lanes and ends when you have completed the lane change. Remember to follow these actions:
Traffic check
While waiting to change lanes safely, look all around you. Divide your attention between watching in front, watching the mirrors and checking your blind spot. If there is another lane beside the one you are moving into, check traffic in that lane to avoid colliding with a vehicle moving into the lane at the same time as you do.
Signal
Turn on your signal when there is enough space for you to change lanes. After signalling, check your blind spot one more time before starting to move into the other lane. Your signal should be on soon enough to give traffic behind you time to react to the signal. If traffic in the lane you are moving into is heavy, you may turn on your signal before there is enough space to change lanes. This will let traffic behind you know that you are looking for a space to change lanes.
Space
Keep at least a two- to three-second distance behind the vehicle in front of you. If there is another lane beside the one you are moving into, be careful not to move in beside another vehicle or into the blind spot of another vehicle.
Speed
Adjust your speed to match the speed of traffic in the new lane.
Change
Change lanes with a smooth, gradual movement into the centre of the new lane.
Both hands
Keep both hands on the steering wheel as you change lanes. Using both hands on the wheel gives you maximum steering control. An exception to this is if you have a disability that prevents you from using both hands.
Cancel signal
Turn off your signal as soon as you have changed lanes.
Roadside stop
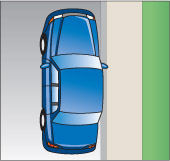
Diagram 6-6-1
The approach
This driving task begins when the examiner tells you to stop and ends once you have come to a stop. Make sure you take these actions:
Traffic check
Before slowing down, check your mirrors and scan to see if it is legal (look for signs) to make the roadside stop. Then scan the road for traffic approaching from the front and rear of your of your vehicle. A 150-metre gap in both directions provides enough space to perform the move safely. If there is a chance of traffic or pedestrians overtaking you on the right, check your right blind spot just before pulling over.
Signal
Turn on your signal before slowing down unless there are vehicles waiting to enter the road from side roads or driveways between you and the point where you intend to stop. Wait until you have passed these entrances so that drivers will not think you are turning before the stopping point.
Speed
Steadily reduce speed as you approach the stop. In a vehicle with manual transmission, you may downshift into a lower gear as you slow down. Do not coast with your foot on the clutch pedal.
Position
Stop parallel to the curb and not more than about 30 centimetres away from it. If there is no curb,stop as far as possible off the travelled part of the road. Do not stop where you will block an entrance or other traffic.
The stop
This driving task includes the actions you take after stopping. Remember to do the following:
Signal
Turn off your signal and turn on your hazard lights.
Park
If your vehicle has an automatic transmission, put the gear selector in park and set the parking brake. If your has a manual transmission, set the parking brake and shift into neutral if not turning off the engine, or shift into low or reverse if turning off the engine. When parking on a hill, set your wheels against the curb, in the appropriate direction to keep your vehicle from rolling.
Resume
This driving task begins when the examiner tells you to move back onto the road and ends when you have returned to normal traffic speed. Take the following actions:
Start
Turn on the engine. Release the parking brake and select the correct gear to move back onto the road.
Signal
Turn off your hazard lights and turn on your left turn signal.
Traffic check
Just before pulling away from the stop, check your mirrors and your left blind spot.
Speed
Return to normal traffic speed by accelerating smoothly to blend with the traffic around you. In light traffic, accelerate moderately. In heavier traffic, you may have to accelerate more quickly. In a vehicle with manual transmission, shift gears as you increase speed.
Cancel signal
Turn off your signal as soon as you are back on the road.
Curve
This driving task begins when the curve comes into sight and ends when you have gone completely around it. Follow these actions:
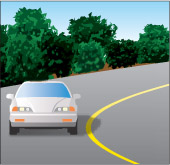
Diagram 6-7-1
Speed
As you approach the curve, try to determine the safe speed for it. To do this, look for clues such as a sign that shows the safe speed, the shape of the curve and the type of road you are driving on. Slow down to the safe speed for the curve by the time you are 30 metres into it. In a blind curve where you cannot see all the way around it, drive more slowly in case oncoming traffic wanders into your lane or the curve is tighter than you expected. Slow down before the start of the curve to avoid braking in it. While in the curve, keep your speed steady and slow enough so that objects and people inside your vehicle are not pushed from the force created by turning on the curve. Near the end of the curve, begin accelerating to return to normal speed. In a vehicle with manual transmission, do not shift gears in the curve. Not changing gears gives you more control over your vehicle and reduces the risk of your wheels locking while downshifting.
Lane
As you enter the curve, look across or as far around it as possible. This helps you stay in a smooth line and centred in the lane throughout the curve. If you look only at the road directly in front of you, you are likely to wander back and forth across the lane, forcing you to constantly correct your steering.
Business section
This driving task is done on straight sections of road where a number of businesses are located. Be sure to do the following actions:
Diagram 6-8-1
Traffic check
In a business area, there are many places other than intersections where vehicles or pedestrians are likely to enter the road. These include entrances to businesses, institutions and construction sites, as well as pedestrian and railway crossings. At all these locations, look left and right to check for vehicles or pedestrians about to enter the road.
Mirror check
While driving along, check your mirrors every five to 10 seconds. Check your mirrors more often in heavy traffic or where vehicles are moving at different speeds.
Lane
Drive in the safest lane for through traffic. This is usually the curb lane. However, if the curb lane is blocked by traffic or there are many curbside hazards, the centre lane may be a safer choice. Keep to the centre of the lane and within the lane markings. Look ahead to where you will be in the next 12 to 15 seconds for dangerous situations or obstacles that you can avoid by changing lanes.
Speed
Avoid exceeding the speed limit or driving unreasonably slowly. Whenever possible, drive at a steady speed. Look ahead to where you will be in the next 12 to 15 seconds for dangerous situations or obstacles that you can avoid by changing your speed.
Space
Keep at least a two- to three-second distance behind the vehicle in front of you. Increase the distance if another vehicle follows too closely behind you. On a multi-lane road, try to keep a space on both sides of your vehicle, and try not to drive in the blind spots of other vehicles. In slow traffic, avoid driving behind large vehicles that block your view of traffic ahead of you. When you stop behind another vehicle, leave enough space to see its rear wheels or to pull around it without having to back up.
Residential section
This driving task is done on straight sections of residential or rural road. Remember these points:
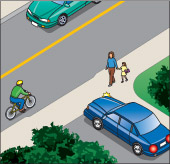
Diagram 6-9-1
Traffic check
On a residential road, watch out for entrances to schools, pedestrian crossings, driveways, sidewalks and any other locations where there might be traffic hazards. On a rural road, watch for entrances to residences, farms, businesses and industrial sites. At all these locations, look left and right to check for vehicles or pedestrians about to enter the road.
Mirror check
While driving along, check your mirrors every five to 10 seconds. Check your mirrors more often in heavy traffic or where vehicles are moving at different speeds.
Lane
Keep to the centre of the lane. If there are no lane markings, keep to the centre of the travelled part of the road, away from parked vehicles or pedestrians. Where you cannot see far ahead on the road because of a curve or a hill, move right to avoid colliding with an oncoming vehicle that is over the centre line. Look ahead to where you will be in the next 12 to 15 seconds for dangerous situations or obstacles that you can avoid by changing lanes.
Speed
Avoid exceeding the speed limit or driving unreasonably slowly. Whenever possible, drive at a steady speed. Look ahead to where you will be in the next 12 to 15 seconds for dangerous situations or obstacles that you can avoid by changing your speed.
Space
Keep at least a two- to three-second distance behind the vehicle in front of you. Increase the distance if another vehicle follows too closely behind you. In slow traffic, avoid driving behind large vehicles that block your view of traffic ahead. When you stop behind another vehicle, leave enough space to see its rear wheels or to pull around it without having to back up.
Parallel park
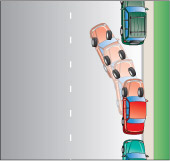
Diagram 6-10-1
The approach
This driving task begins when the examiner tells you to park and ends when you have come to a stop, ready to back into the parking space. Remember these points:
Traffic check
Before slowing down, check your mirror for traffic behind you. Before pulling into position to back up, check your blind spot.
Signal
Turn on your signal before slowing down unless there are vehicles waiting to enter the road from side roads or driveways between you and your stopping point. Wait until you have passed these entrances so that drivers will not think you are turning before your parallel parking position.
Speed
Steadily reduce speed. In a vehicle with manual transmission, you may downshift into a lower gear as you slow down. Do not coast with your foot on the clutch pedal.
Stop
Stop beside, or parallel to, the parked vehicle (real or imaginary) in front of the empty parking space. Leave at least 60 centimetres between your vehicle and the parked vehicle. Stop when your vehicle is completely in front of the empty parking space.
Park
This driving task includes the actions you take to park in a parallel parking space. Remember to do the following:
Traffic check
Before backing up, look all around the vehicle and check your mirrors and both blind spots. Do not start reversing until the way is clear or traffic has stopped to let you park.
Back up
Begin reversing into the space, turning the steering wheel toward the curb. When your vehicle is about halfway into the space, steer to bring your vehicle in line with the curb. Once you are in the parking space, move forward or backward to fit within the pavement markings or to allow room for the vehicle in front or behind you to pull out. Do not hit the curb or touch another vehicle while entering your parking space. Where there is no curb, park off the travelled part of the road.
Park
If your vehicle has automatic transmission, put the gear selector in park and set the parking brake. If your vehicle has manual transmission, set the parking brake and shift into neutral if not turning off the engine, or shift into low or reverse if turning off the engine. When parking on a hill, turn your wheels in the appropriate direction to keep your vehicle from rolling.
Resume
This driving task begins when the examiner tells you to move from the parking space and ends when you have returned to normal traffic speed. Remember these points:
Start
Turn on the engine. Release the parking brake and select the correct gear to move back onto the road.
Signal
Turn on your signal.
Traffic check
Just before pulling out of the parking spot, check your mirrors and your blind spot.
Speed
Return to normal traffic speed by accelerating smoothly to blend with the traffic around you. In light traffic, accelerate moderately. In heavier traffic, you may have to accelerate more quickly. In a vehicle with manual transmission, shift gears as you increase speed.
Cancel signal
Turn off your signal after you leave the parking space.
Three-point turn
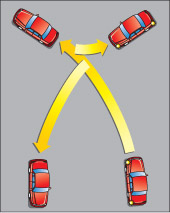
Diagram 6-11-1
The approach
This driving task begins when the examiner tells you to stop and turn your vehicle around. It ends when you have almost stopped, ready to start the turn. Be sure to do the following:
Traffic check
Before slowing down, check traffic in front and behind you. If necessary, check your blind spot before pulling over to the right side of the road to stop.
Signal
Turn on your signal before slowing down unless there are vehicles waiting to enter the road from sideroads or driveways between you and your stopping point. Wait until you have passed these entrances so that drivers will not think you are turning.
Speed
Steadily reduce speed. In a vehicle with manual transmission, you may downshift into a lower gear as you slow down. Do not coast with your foot on the clutch pedal.
Position
Stop so you are parallel to the curb and not more than 30 centimetres away. Where there is no curb, stop as far as possible off the travelled part of the road. Do not stop where you will block an entrance or other traffic.
Turn around
This driving task includes the actions you take to turn around and ends when you are ready to drive away in the opposite direction. Remember these points:
Traffic check
Check your mirrors and your blind spot just before starting the turn. Wait until the way is clear or traffic has stopped to let you turn. Each time you stop while turning, check traffic in both directions.
Signal
Turn on your left signal before starting to turn.
Turn around
With the steering wheel turned sharply left, move slowly and smoothly across the road. When you have reached the far left side of the road, stop and put your vehicle in reverse. With the steering wheel turned sharply right, reverse so the vehicle is facing in the new direction. Stop and shift into forward gear to move ahead. Use the whole road to make your turn, reversing only once. Do not reverse over the edge or shoulder of the road or into the curb.
Resume
This driving task begins when you are turned around, ready to move ahead and ends when you have returned to normal traffic speed. Make sure you take these actions:
Traffic check
Check your mirrors before increasing speed.
Speed
Return to normal traffic speed by accelerating smoothly to blend with the traffic around you. In light traffic, accelerate moderately. In heavier traffic, you may have to accelerate more quickly. In a vehicle with manual transmission, shift gears as you increase speed.