On-farm bin composting of deadstock
Learn about bin composting for on-farm deadstock according to the Nutrient Management Act, 2002. This is technical information for Ontario livestock and poultry producers.
ISSN 1198-712X, Published October 2023
Introduction
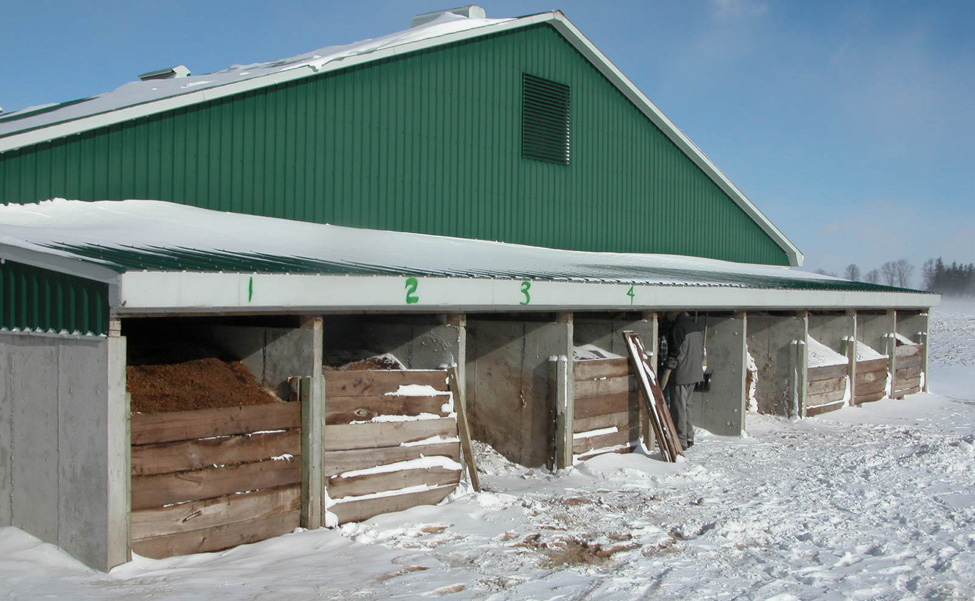
This fact sheet provides an overview of bin composting for on-farm deadstock. While there are other composting options, bin composting is a popular method with Ontario farmers (Figure 1).
The proper disposal of deadstock is critical for preventing environmental contamination and the spread of disease. In Ontario, the Nutrient Management Act, 2002 (NMA) regulates the on-farm disposal of dead farm animals.
Under the NMA, producers are required to properly dispose of on-farm dead animals in a safe and environmentally friendly manner within 48 hours of death. The regulation permits the following disposal methods:
- collector service
- composting
- disposal vessel
- incineration
- burial
- delivery to an approved anaerobic digester
- delivery to an approved waste disposal site
- delivery to a licensed disposal facility under the Food Safety and Quality Act, 2001 (FSQA)
- delivery to a veterinarian for post-mortem and disposal
What is composting
Composting is a natural process where micro-organisms such as bacteria and fungi break down organic materials. Compost is a stable, dark-brown, soil-like material that can be applied to land.
Successful composting of organic matter will not occur unless the micro-organisms are provided with the correct recipe of carbon, nitrogen, oxygen and moisture.
Carbon and nitrogen
The proper carbon-to-nitrogen (C:N) ratio is critical for micro-organisms. They use carbon for cell growth and as their major energy source. The carbon is used, then respired as carbon dioxide (CO2). Since carbon serves these two purposes, it must be present in a higher proportion than nitrogen.
Ideally, the C:N ratio of the mixture of materials to be composted should be between 20:1 and 30:1. Table 1 shows the C:N ratio and density of common farm organic materials used as substrates.
| Substrate | C:N ratio |
Typical % dry matter |
Bulk density (kg/m3) |
Comments |
|---|---|---|---|---|
| Deadstock | 5:1 | 50% | 775 | Variable characteristics |
| Corn silage | 38:1–43:1 | 30%–40% | 495 | Must not be too wet |
| Wheat straw | 100:1–150:1 | 86%–90% | 135 | May need moisture |
| Coarse sawdust | 200:1–750:1 | 40%–60% | 200–267 | Excellent substrate; lots of bark will decrease C:N ratio |
| Wood shavings (hardwood) | 451:1–819:1 | 40%–60% | 260–368 | Excellent substrate; lots of bark will decrease C:N ratio |
| Wood shavings (softwood) | 212:1–1,313:1 | 40%–60% | 260–368 | Excellent substrate; lots of bark will decrease C:N ratio |
| Dry hay/grass | 32:1 | 86%–90% | 200 | May need moisture |
| Bedded horse manure | 22:1–50:1 | 20%–40% | 721–962 | Manure must contain lots of bedding (carbon) |
| Broiler poultry litter | 12:1–15:1 | 54%–75% | 449–609 | Manure must contain lots of bedding (carbon) |
| Turkey litter | 16 | 70%–74% | 465 | Manure must contain lots of bedding (carbon) |
Source: On-Farm Composting Handbook NRAES 54
If deadstock has a C:N ratio of 5:1 and the target ratio of the blended mixture is 25:1, a substrate material with a C:N ratio higher than 25:1 is required to dilute the high level of nitrogen in the deadstock.
Too low a C:N ratio in the blended mixture may cause odours from the compost pile. Too high a C:N ratio in the mixture may limit microbial activity, resulting in lower temperatures and slow decomposition.
Oxygen
Oxygen must be available in the pile to support microbial activity. The desired micro-organisms for breaking down carcasses are aerobic (oxygen-dependent). Without oxygen, these organisms cease to function.
The substrate not only adds carbon to the mixture, it is a bulking agent creating voids or spaces that trap air. The type and size of the substrate particles will affect these air spaces. The substrate also provides insulation for the pile and absorbs liquid produced by decomposing deadstock.
The effectiveness of a substrate material can be tested by checking its bulk density. The ideal bulk density is in the 150–300 kg/m3 (10–20 lb/ft3) range.
If the bulk density is too low (such as fluffy or porous like ground corn cobs), the substrate might allow too much oxygen into the pile and dry out the material too much. If the bulk density is too high (dense or packed like wet grass clippings), the substrate might allow too little oxygen in and the pile might become anaerobic and cause odours.
Low density might mean the substrate is simply too dry and needs some added moisture (such as dry chopped straw), while a high density might mean the substrate is simply too wet (such as fresh corn silage) which will work better if it has dried out a bit.
Substrates such as powdery sawdust can be tricky if they have a bulk density in the correct range, but also have particle sizes so small oxygen has difficulty getting through it.
Calculating substrate bulk density
- Record the weight of an empty 20-L pail.
- Fill pail one-third full with substrate from different areas of the pile. Pack the substrate by dropping the pail squarely on a hard ground surface 10 times from a height of 0.3 m (1 ft).
- Continue filling to two-thirds full, then fill to exactly the 20-L mark, repeating this packing procedure.
- Determine the weight of the substrate by subtracting the weight of the empty pail from the weight of the full pail.
- Multiply this weight by 50 to give the bulk density in kg/m3.
- Repeat the procedure, to check the accuracy.
Example: An empty 20-L pail weighs 1 kg, and the full pail of substrate weighs 10 kg, so the substrate weighs 9 kg. The bulk density is 9 × 50 = 450 kg/m3.
Moisture
To ensure proper microbial activity in the compost pile, there must be adequate moisture in the substrate. The ideal moisture content ranges from 50–60% but 40–65% will work. To check for adequate moisture quickly, dig into the pile, grab a handful of substrate and squeeze it in your hand. If it forms a ball that stays together and you can't squeeze more than a few drops of water from it, then the moisture level is acceptable.
Low moisture levels can reduce microbial action, while high moisture levels inhibit the flow of oxygen and can lead to anaerobic conditions that result in odour problems. The presence or absence of a roof, weather conditions, substrate type, animal species and the number and size of deadstock in the bin can influence moisture levels.
Choosing substrate materials
Substrate materials may be sourced on or off-farm. Many will work, but experience has shown that some are better than others. Cost, availability throughout the year and physical characteristics are important factors to consider.
Ensure substrate particles are large enough for adequate airflow, but small enough to decompose. Substrates may need chopping to particle sizes of 0.6–2.5 cm (¼–1 in.).
Planning your composting unit
Consider the following factors in the planning and design:
- regulatory requirements
- site selection
- sizing
- construction
Regulatory requirements
The NMA specifies several requirements for on-farm composting of deadstock. These include:
- Only the following materials can be used as substrates for composting deadstock:
- sawdust, shavings or chips from clean, uncontaminated, untreated wood
- straw from grain, corn or beans
- hay or silage
- livestock bedding with at least 30% dry matter and containing only allowable composting materials
- poultry litter
- The final mixture in the compost pile must not contain more than 25% dead animals, and no less than 75% substrate by volume.
- Piles must be covered with at least 0.6 m (2 ft) of substrate or a non-compostable, retractable covering that minimizes odours and prevents scavenging. Allowable substrate materials for cover include clean wood chips and hay or straw. Covering with poultry litter is also acceptable if composting takes place in a fully enclosed structure that has a concrete floor.
- Composting must continue until there is no soft animal tissue left, no bone fragments greater than 15 cm (6 in.), no other animal matter larger than 25 mm (1 in.) and no offensive odour.
- Compost systems may not be placed directly on organic soil or soil in hydrologic soil group categories AA or A. If placing the compost system directly on soil, there must be 0.9 m (3 ft) of soil depth between the compost material and underlying bedrock/aquifers or the compost pile must be placed on an impervious pad. Compost piles cannot be placed on a flood plain.
- A number of regulatory setback distances from compost piles also apply. These include:
- 15 m (50 ft) to drilled wells, 100 m (328 ft) to municipal wells, and 30 m (98 ft) to any other well
- 50 m (164 ft) flowpath to surface water or tile inlets
- 6 m (20 ft) to perforated drainage tiles
- 100 m (328 ft) from neighbouring livestock facilities
- 100 m (328 ft) from a neighbouring home, parkland or industrial areas
- 100 m (328 ft) from another compost disposal site, unless in a fully enclosed structure with a concrete floor
- 200 m (656 ft) from commercial, community, institutional or residential areas
- 30 m (98 ft) from nearest road allowance, 15 m (50 ft) from lot line
- Finished compost material generated from on-farm deadstock composting may only be applied to crop land owned or controlled by the site operator. The compost may not be sold or given to another individual.
- The site operator must keep paper or electronic records of the composting site and information about the type, size and date animals were added to the compost bin. The site operator must also keep records of the land where deadstock compost was applied.
Site selection
- Select a location out of view of neighbours and the public.
- Choose a southern exposure where possible.
- Allow space for handling deadstock, substrate and finished compost. Ensure easy access to manage and monitor the unit.
- Ensure convenient access to a water supply so you can add water to composting bins as needed.
Sizing
The size of composting bins depends on:
- the projected annual number, size and weight of deadstock (Appendix A)
- the type of substrate used in the composting mixture
- if you expect the amount of deadstock to vary over time
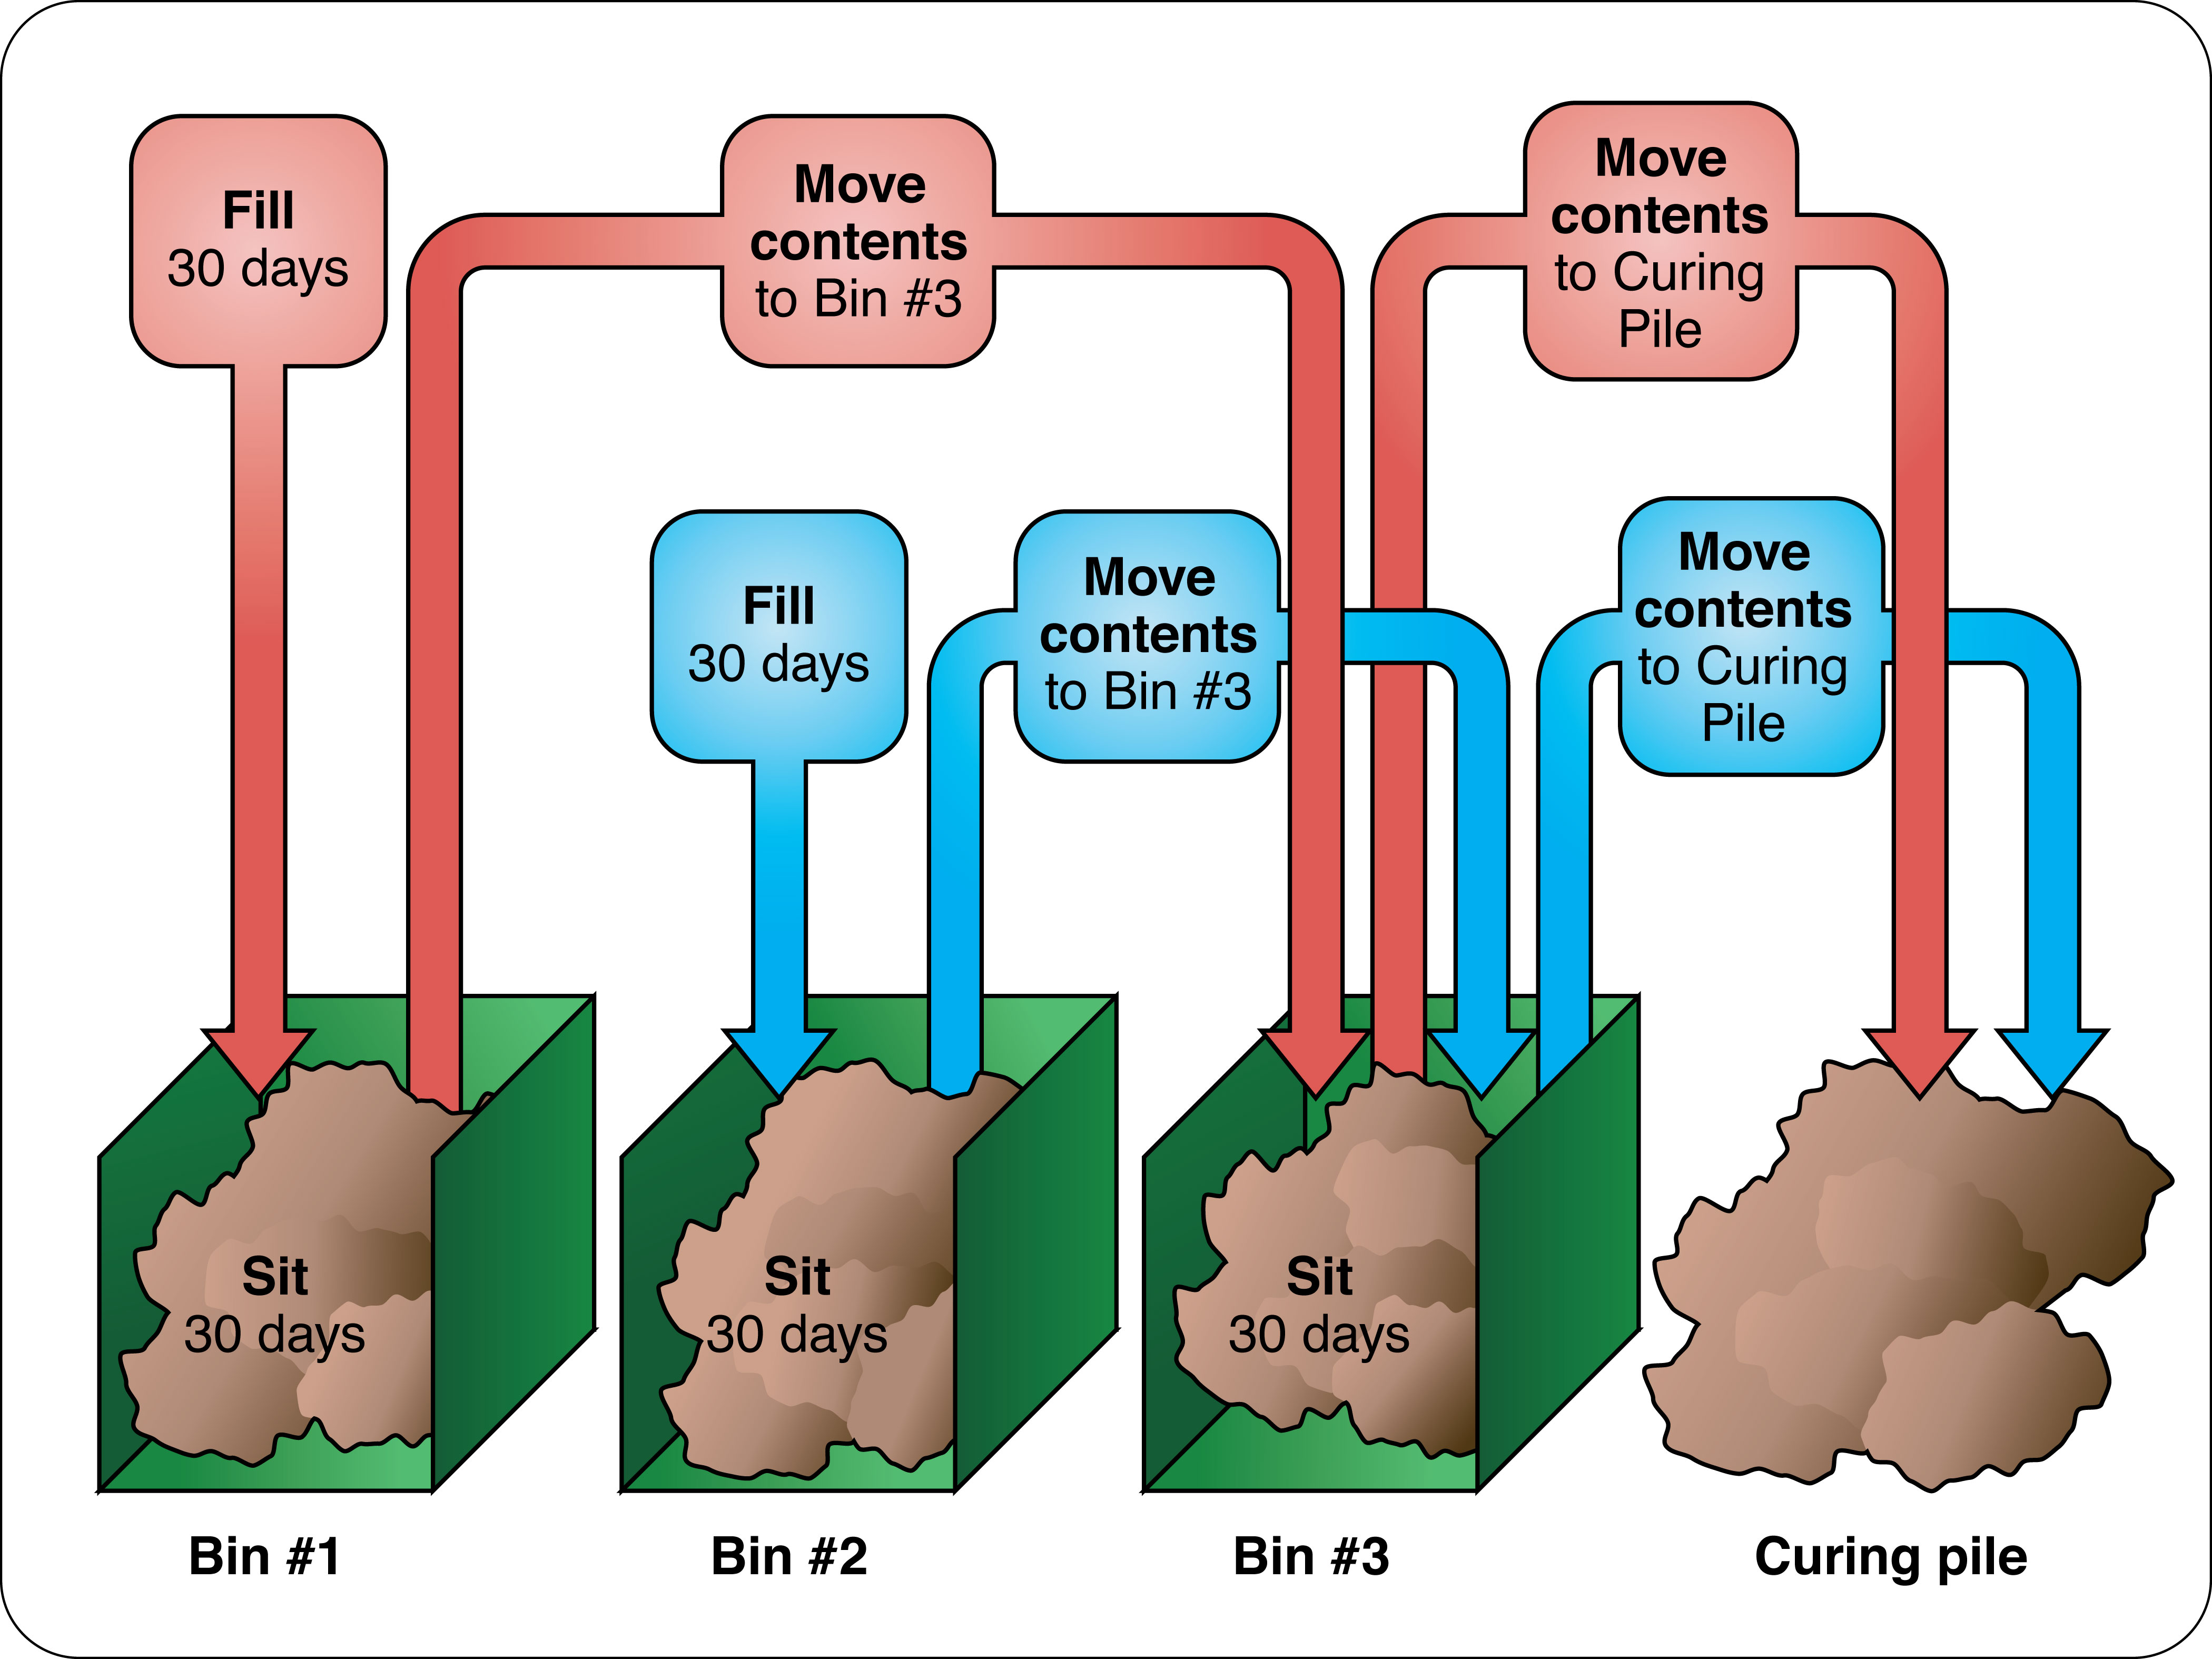
Most systems should include a minimum of 3 equally sized composting bins; 2 called primary bins for both filling and the first heating stage, and 1 called a secondary bin for the second heating stage. It is a good idea to build a fourth bin for storing finished compost, and a fifth and sixth bin for storing substrate nearby (Figure 2).
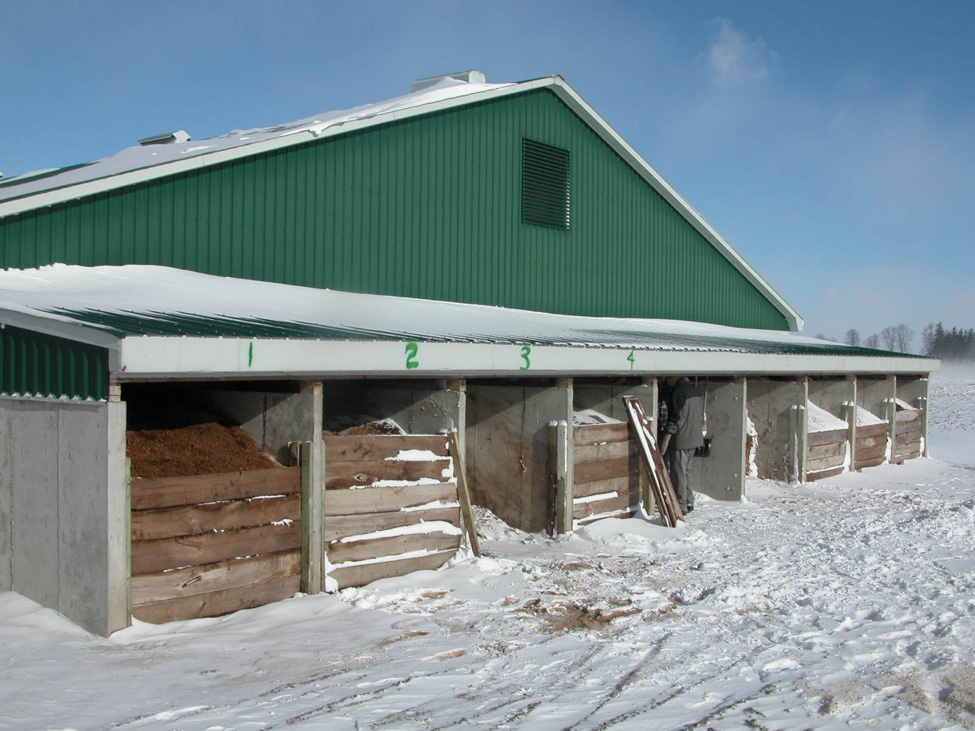
Appendix B shows examples for sizing bins. Bins are generally built the same size so they can all be used for any purpose. They are usually three-sided, open at the front for easy access.
Construction
There are many different ways to construct bin compost systems. They can be new, stand-alone units or add-ons to existing buildings. However, every system has the common components of a floor and walls, and possibly a roof.
Floor
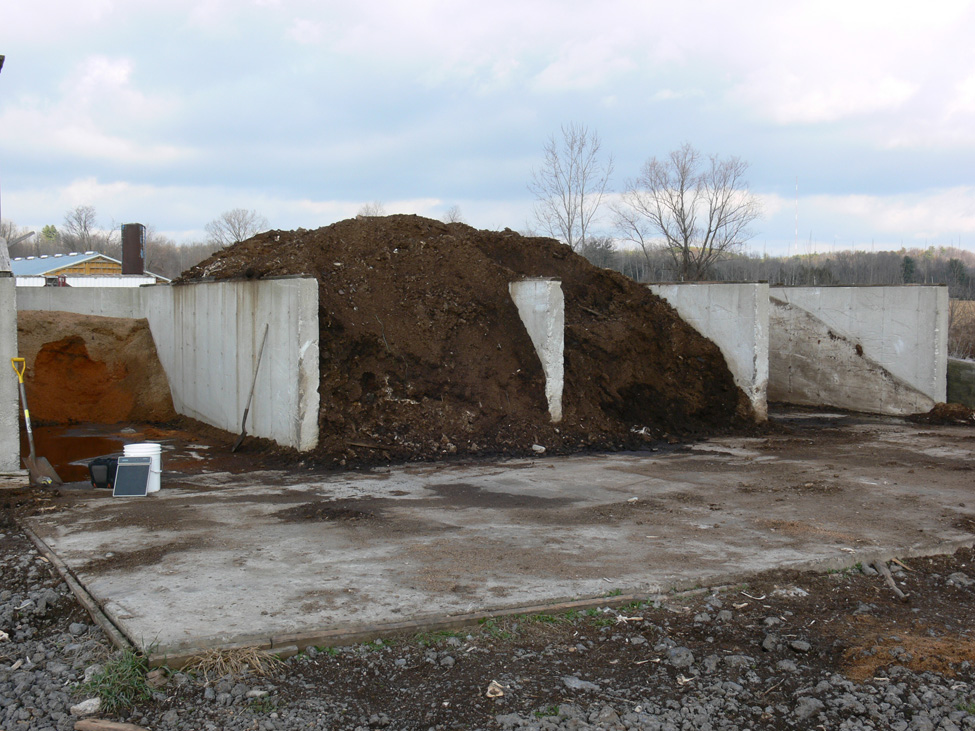
Depending on soil type, such as clay, the NMA may not require an impervious floor such as concrete. However, concrete is much easier to scrape and clean and is recommended for long-term use. The floor should prevent leachate (liquid from the pile) and run-off (from rainfall) from affecting the environment (Figure 3). Normally, the floor is constructed flat, with no grade whatsoever, but with a watertight connection at the floor/wall interface.
Bins are not normally filled to overflowing. The apron floor area out front encourages clean-up and is sloped away from the bins in all directions. Bin floors are sloped slightly to the back. The operator said he would make the apron area bigger if doing it again.
The bin and apron area will be subjected to severe weather conditions and machine traffic, so the concrete selected for this floor application should be at least 32 MPa air-entrained concrete. The floor slab should be a minimum 12.7 cm (5 in.) thick to withstand machine traffic. It is advisable to add reinforcing mesh.
Walls
Walls should be at least about 1.2 m (4 ft) high, to allow for a pile large enough to generate enough heat during winter months. Do not pile material more than 1.8 m (6 ft) high, otherwise oxygen will have difficulty penetrating into the inner part of the pile.
Deeper bins might need a more costly under-the-pile forced-air system. The deeper the pile, the greater the danger of material compacting in the bin and possible spontaneous combustion due to a chimney effect in the pile. This is rarely a problem with the size of most bin compost systems.
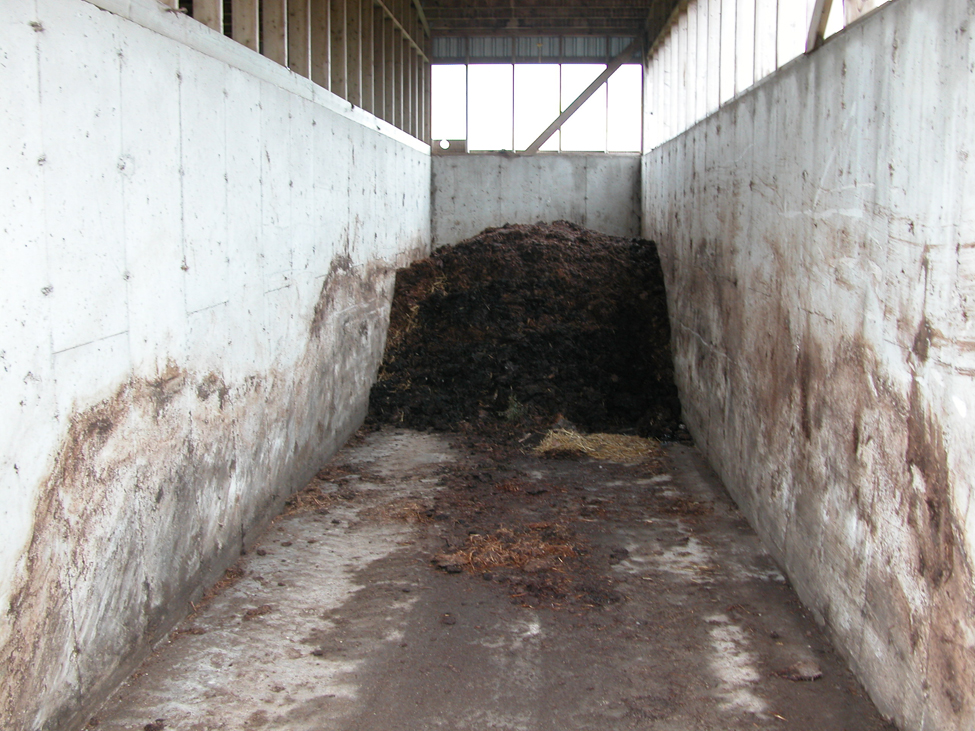
Design walls to keep out scavengers, including vermin, and to withstand the demands of turning the composting piles with large equipment and loaders. Concrete walls are recommended (Figure 4), although wood is often used.
Build three-sided bins to allow accessibility for the equipment you will use to manage the pile. Size bins so they can be filled within a few weeks, so the primary stage of sitting/composting can commence without disturbing the pile. The front access should be at least 0.6 m (2 ft) wider than the loader or turning equipment used, but never less than 1.8 m (6 ft) wide. Installing a mostly solid gate at the open front of each bin helps discourage animals from scavenging. Another method is to install removable planks at the front, as in Figure 1, so bottom ones can be left in place when deadstock are added.
Roof
There is much debate about the need for a roof. Having a roof or cover helps control moisture levels in the bins by protecting the composting pile from rain and snow. Excessive moisture increases the risk of leachate and run-off. It also interferes with the composting process and may increase the risk of odours if the pile becomes anaerobic.
However, constructing a roof will cost money, and water may have to be added to the compost bins during warmer times of the year. If a roof is installed over the compost bins, ensure there is good ventilation of the structure to prevent structural damage. By-products of composting include moisture vapour and ammonia gas, which can degrade surfaces such as galvanized metal or wood, if allowed to condense on these surfaces.
Bin composting cycle
A complete composting cycle has 4 main stages:
- bin filling
- primary heating stage
- secondary heating stage
- curing stage
Successful composting requires management and monitoring throughout this cycle.
To simplify the process into a standard routine, each of the 4 stages in the cycle is normally the same length of time, based on the minimum time required for a proper primary heating stage. The primary heating stage is very important to minimize the spread of infection and allow for the breakdown of soft tissues.
Bin filling
Fill one primary bin over a period of time with deadstock and substrate. The number of days to fill is based on the average weight of deadstock and the minimum time required for primary heating shown in Table 2.
| Primary heating stage | Heaviest carcass (kg) | Typical animals |
|---|---|---|
| 30 days | 16.3 kg (36 lb) | All poultry, mink |
| 60 days | 65.4 kg (144 lb) | Goats, most sheep, weaner pigs |
| 90 days | 147 kg (335 lb) | Veal calves, finishing pigs |
| 120 days | 261 kg (574 lb) | Beef backgrounders sows/boars |
| 180 days | 588 kg (1,294 lb) | Cattle, horses |
The number of days to fill the bin is less for smaller deadstock than larger ones because smaller deadstock do not require as much time in the primary heating stage. However, on some operations there can be a very broad range of deadstock sizes such as in a farrow to finish swine operation with tiny weaners only 2.5 kg in size to large boars one-hundred-fold larger at 250 kg. In this case, a compromise on filling time might be necessary. One option is to simply fill the primary bin over whatever time it takes regardless of deadstock size, then allow the primary heating stage to last as long as necessary for the largest carcasses placed. Another option is to create 2 parallel composting systems, one for smaller deadstock, the other system for larger deadstock.
Primary heating stage
The primary heating stage should be an undisturbed period; this is crucial for minimizing the spread of infection and allowing for the breakdown of soft tissue
Time (days) = 7.42 × weight (kg) of the heaviest carcass0.5
(Minimum primary heating time must exceed 10 days)
Based on the size of typical farm animals, this time could range from 10 days for 1.8 kg (4 lb) poultry to 200 days for 725 kg (1,600 lb) dairy cows.
Table 2 shows the maximum weight of individual carcasses based on typical primary heating stage periods and makes some recommendations about the types of animals that might be considered in each range.
After the primary bin has been filled over a 30-day period (in the case of poultry), leave the deadstock in this same bin to compost during the primary heating stage for an additional 30 days. If conditions are right for the micro-organisms, the pile should heat to temperatures ranging from 55–65°C. Ideally, the pile temperature should remain in this range for at least 7 days. While one primary bin is composting, you can be filling another.
The more consistent and uniform mortality rates are throughout the year, the smaller the primary heating stage bin can be. However, farm animals rarely die uniformly throughout the year. If there might be spikes in losses through heat stress in summer, more losses at various stages of growth, if you are considering expanding your herd in the future, or you are on an all-in/all-out barn filling system, the primary bin may need to be larger to accommodate the extra deadstock over a shorter period of time.
To account for this, a "safety factor" has been added to the bin sizing calculation to enlarge the primary bin. A safety factor of 1.5 is recommended for farms with relatively continuous losses through the year, and a safety factor of 2.0 is recommended for farms where losses are not continuous (all-in/all-out production facilities). Examples shown in Appendix B show how the safety factors are used in the sizing of bin systems for different farms. Oversizing the primary heating stage bin is never a problem, but undersizing it is.
At the end of the primary heating stage, the time elapsed (for poultry) has been:
30 days filling + 30 days sitting during the primary heating stage = 60 days.
Secondary heating stage
After the deadstock have undergone the primary heating phase in the first bin, move the entire contents of that bin into the secondary bin. By now, the temperature should have dropped to below 48°C. The secondary bin is usually adjacent to the primary bin to make unloading and loading faster. So, if the primary bin was filled over 30 days, as in the case of poultry, it will be emptied every 60 days (filling for 30, sitting for 30 days).
Ensure any deadstock protruding from the freshly turned material is covered with at least 0.6 m (2 ft) of substrate. Let this mixture sit for another 30 days (in the case of poultry) during this secondary heating stage. The mixing and movement of these materials reintroduces oxygen to the pile, and the active composting process will speed up again. Pile temperatures are likely to rise again, ranging from 55–65°C and remain there for at least 7 days to ensure the composting is effective. In this heat cycle, the pile will reach the same high temperature observed during the primary heating stage, but it may not remain high for as long. The main composting process is complete after the secondary heating stage has occurred and the temperature has dropped to below 48°C.
At the end of the secondary heating stage, the time elapsed for poultry has been:
30 days filling + 30 days sitting during the primary heating stage + 30 days sitting during the secondary heating stage = 90 days.
Curing stage
Remove the compost mixture from the secondary bin and screen or grind the contents if visible bone fragments greater than 15 cm (6 in.) or other animal matter greater than 25 mm (1 in.) remain in the mixture. This is most likely from deadstock weighing more than 200 kg (440 lb). Reintroduce these larger materials back to the primary bin for more decomposition. Compost should cure for at least another 30 days (in the case of poultry). Figure 5 shows a schematic of the entire process for poultry. It's the same for larger deadstock, just longer cycle periods.
At the end of the curing stage, the time elapsed (for poultry) has been:
30 days filling + 30 days sitting during the primary heating stage + 30 days sitting during the secondary heating stage + 30 days curing = 120 days.
Management details
The most important stage in the entire process is filling the primary bin. Figure 6 shows the progression of how a bin might be filled with poultry over a 30-day filling period (Days 1–10, 11–20, 21–30).
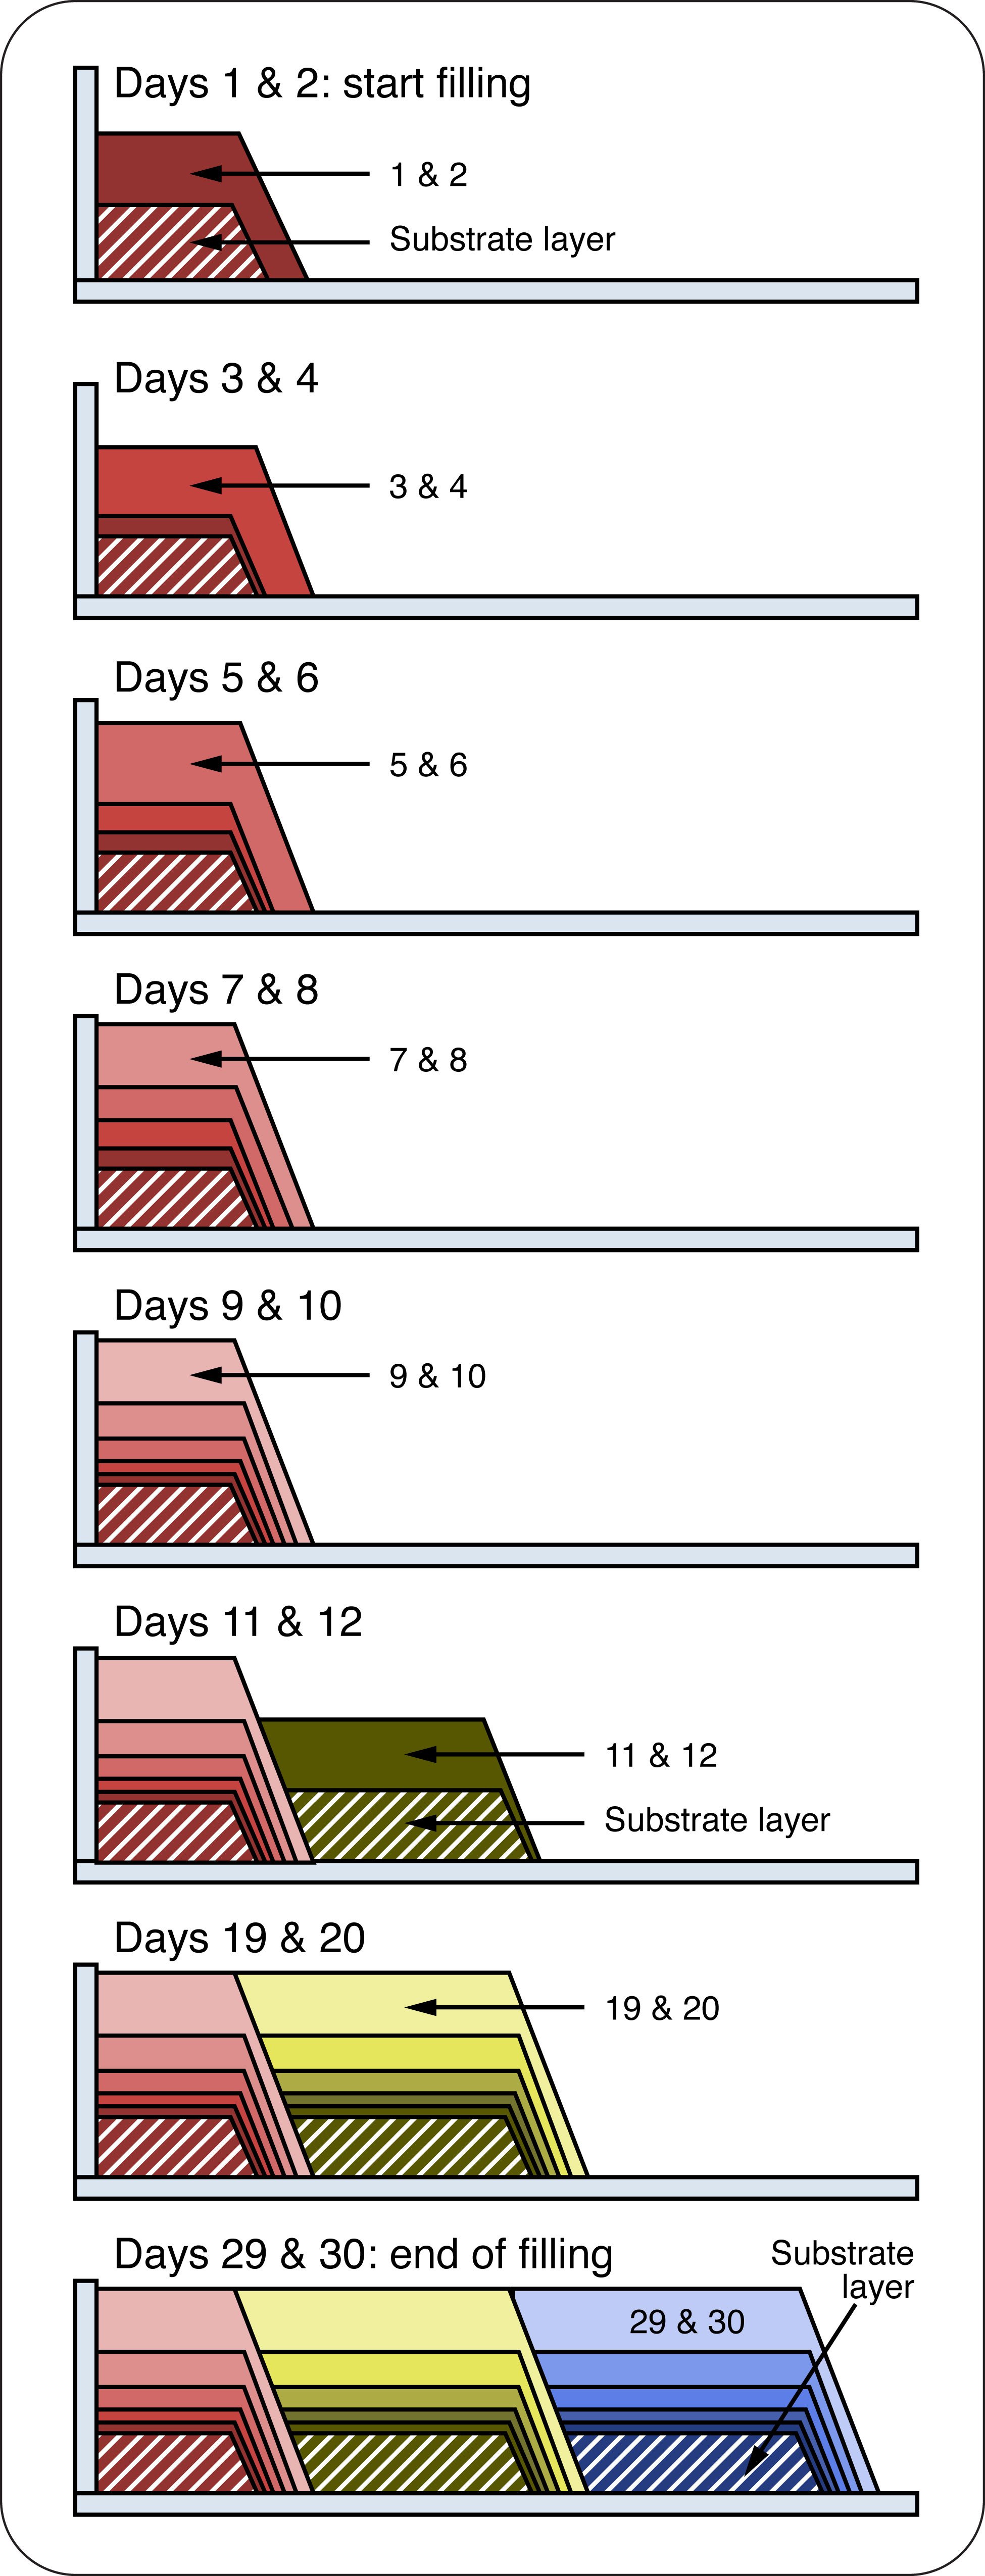
Step 1: Make a base
Spread substrate on the floor of a primary bin covering the far third of its length. It should be 0.6 m (2 ft) deep at all locations where deadstock are added, but tapered to no depth at about the halfway point.
Step 2: Add a deadstock layer
Place deadstock evenly on the substrate at least 0.3 m (1 ft) from the back wall and sidewalls of bin. Where practical, try not to have them touching each other. For large deadstock, place them on their sides, and if necessary cut ligaments and tendons in the legs and fold them down to ensure they do not stick out of the pile. Cutting open large, animal body cavities reduces bloating and rising out of the pile, although it does not appear to speed composting much.
Step 3: Cover deadstock with substrate
Moisten substrate as needed to measure from 40–65%, bearing in mind that deadstock will add moisture to the mix. Immediately cover deadstock with at least 0.6 m (2 ft) of substrate. Ensure all parts of deadstock are covered with 0.6 m of substrate at all times, taking into account that there is likely to be a lot of settling as deadstock decompose and body cavities collapse.
Step 4: Add more deadstock
Skim off a portion of the top layer/front face of the compost pile leaving 0.2–0.3 m (8–12 in.) of substrate on top of the formerly added deadstock. Add new deadstock to the pile following steps 2 to 3 above, until compost pile reaches the desired bin height of 1.5–1.8 m (5–6 ft) on Day 9–10. Try to maintain a relatively flat or even concave (saucer-shaped) top surface area, as this promotes rainfall soaking directly into the pile and not running off. Spread substrate on floor in middle third of bin to form base, and repeat steps 2 and 3 for filling bin.
Step 5: Stop filling and start the primary heating stage
Once the bin is completely full, It is important to let the pile sit for an additional 30 days (in the case of poultry) without disturbing the pile for the entire period. This promotes heat build-up.
Monitoring the compost process
If you're not monitoring, you're not managing your composting system. Check the pile daily to monitor the substrate cover, temperature and moisture, and record the information. Watch for and take steps to prevent scavenging by animals and excessive leachate and runoff.
Temperature
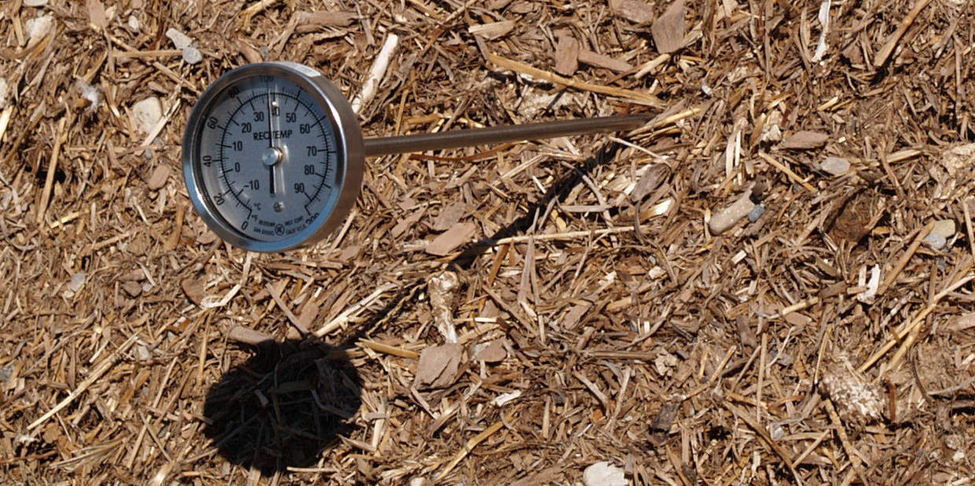
Monitoring the internal temperature of deadstock compost piles is the quickest and simplest way to determine if the process is working properly. Composting thermometers constructed of stainless steel with a 6-mm (¼-in.) diameter shaft and measuring at least 1 m (3 ft) in length are a necessary purchase (Figure 7).
If the micro-organisms are working properly, bin temperatures should increase rapidly after pile formation and remain between 55°C and 65°C for at least seven consecutive days in the primary and secondary bins. If temperatures fall below 48°C, the composting process stalls, as one or more of the required elements is not in the proper range. Temperatures over 71°C will destroy the composting micro-organisms and may lead to a fire in the pile (refer to the troubleshooting guide in Appendix C).
Composting in winter is challenging, with low outside air temperatures causing excessive heat loss from the compost bin. When a new pile is started during winter, use partially finished compost material for up to half the substrate in the recipe – this material is already warm and actively composting. Avoid adding frozen deadstock to compost piles as it will decrease pile temperature.
Moisture
If the compost pile is heating adequately, and there are no runoff or odour issues, it is unnecessary to check the moisture content of the pile. Otherwise, refer to the troubleshooting guide in Appendix C.
Recording important information
In addition to meeting the regulatory requirement to record the dates, number, species and weight of deadstock added, set up a simple system to record pile temperatures, general observations about the composting process, problems and the corrective actions you take. This will help you learn what works or doesn't work on your farm so you can solve any problems quickly.
Biosecurity
To reduce the risk of scavengers or vermin spreading disease, the management of the compost site is critical. Always cover carcasses in the compost bins with adequate substrate. Keep the area in front of the bins clear after turning the compost, so that no partially decomposed carcasses are strewn around the pad in front of the bins to attract scavengers. Keep the vegetation around the site mowed and minimize the number of places for scavengers and vermin to hide in the immediate area. Some producers install rodent bait stations around their compost site.
Finished compost
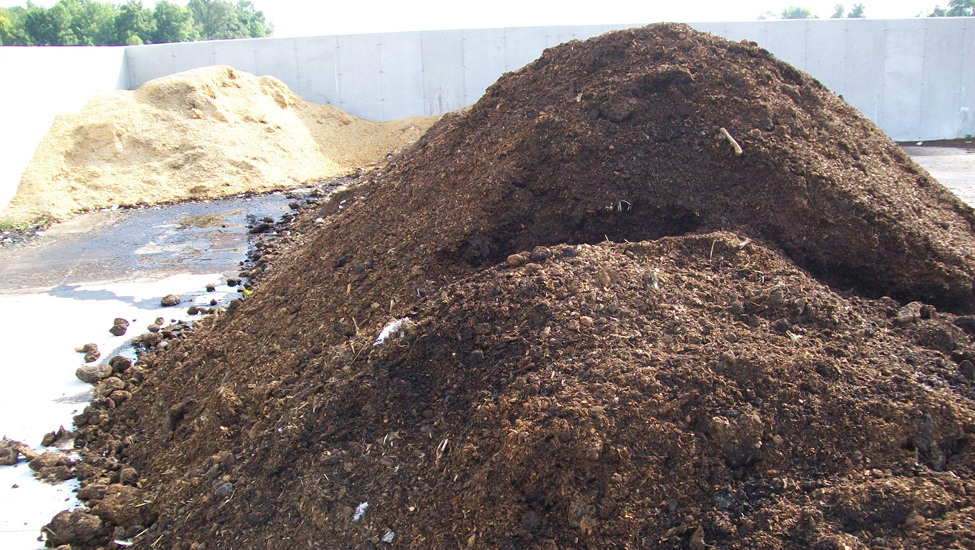
Properly finished compost has a slight earthy odour and resembles humus, or potting soil, in colour and texture (Figure 8). There may be some tiny portions of bones remaining after the curing stage, but these will normally break down easily, especially if they were reintroduced to the primary bin at an earlier time. The compost should then be ready for on-farm land application.
Summary
With good planning and management, on-farm composting is an effective and environmentally friendly way of disposing of livestock and poultry deadstock. As with most things, there is a learning curve, but over time, most bin compost systems take less and less time to manage properly.
Learn more about the regulatory requirements for deadstock management of farm animals in Ontario.
Appendix A. Estimated death losses for typical farm operations in Ontario
100footnote d Beef cow-calf
| Operations and sizes |
Number in herd or flock | Weight range (kg) | Average |
Dead/year | Carcass weights (kg) |
|---|---|---|---|---|---|
| Cows, plus 4% bulls | 104 | 500–700 | 590 | 3 | 1,770 |
| Stillborn to week-old calves | 0 | 40 | 40 | 4 | 160 |
| Calves (week old–7 months) | 90 | 40–260 | 113 | 4 | 453 |
| Replacement heifers (7 months–fresh) | 15 | 250–500 | 333 | 2 | 667 |
Total dead/year: 13 dead
Total carcass weight/year: 3,050 kg
Total kg/unit/year: 30.5 kg/cow
1,000 Beef feeders (1 cycle/year)
| Operations and sizes |
Number in herd or flock | Weight range (kg) | Average |
Dead/year | Carcass weights (kg) |
|---|---|---|---|---|---|
| Feeders placed/cycle (7–16 months) | 1,000 | 260–568 | 363 | 20 | 7,253 |
Total kg/unit/year: 7.25 kg/feeder
100 Dairy cows (large-frame Holsteins)
| Operations and sizes |
Number in herd or flock | Weight range (kg) | Average |
Dead/year | Carcass weights (kg) |
|---|---|---|---|---|---|
| Milking-age cows | 100 | 522–860 | 635 | 3 | 1,904 |
| Calves (week old–5 months) | 20 | 45–182 | 91 | 3 | 272 |
| Stillborn to week-old calves | 0 | 45 | 45 | 7 | 315 |
| Heifers (5 months– fresh) | 80 | 182–522 | 295 | 1 | 295 |
Total dead/year: 14 dead
Total carcass weight/year: 2,786 kg
Total kg/unit/year: 27.86 kg/cow
100 Dairy goat does
| Operations and sizes |
Number in herd or flock | Weight range (kg) | Average |
Dead/year | Carcass weights (kg) |
|---|---|---|---|---|---|
| Milking age does, plus 4% bucks | 104 | 60–70 | 63 | 4 | 253 |
| Kids born/year (includes stillborns) | 175 | 5–25 | 12 | 15 | 175 |
| Replacement doelings (2 months–fresh) | 13 | 14–60 | 29 | 1 | 29 |
Total dead/year: 20 dead
Total warcass weight/wear: 458 kg
Total kg/unit/year: 4.58 kg/doe
10 Riding horses (note low losses on a small operation)
| Operations and sizes |
Number in herd or flock | Weight range (kg) | Average |
Dead/year | Carcass weights (kg) |
|---|---|---|---|---|---|
| Medium-framed (1–10 years, 50% mares) | 10 | 364–635 | 454 | 0.2 | 91 |
| Colts/fillies (birth–12 months) | 2 | 82–364 | 176 | 0.2 | 35 |
Total dead/year: 0.4 dead
Total carcass weight/year: 126 kg
Total kg/unit/year: 12.61 kg/horse
1,000 Breeding female mink (not including pelting losses)
| Operations and sizes |
Number in herd or flock | Weight range (kg) | Average |
Dead/year | Carcass weights (kg) |
|---|---|---|---|---|---|
| Breeding females, plus 20% males | 1,200 | 1.6–2.2 | 1.8 | 24 | 43 |
| Kits/year (5 born/litter) | 5,000 | 0.01–2.2 | 0.74 | 375 | 278 |
Total dead/year: 399 dead
Total Carcass weight/year: 321 kg
Total kg/unit/year: 0.32 kg/female
100 Breeding rabbits (does)
| Operations and sizes |
Number in herd or flock | Weight Range (kg) | Average |
Dead/year | Carcass weights (kg) |
|---|---|---|---|---|---|
| Breeding does, plus 5% males | 105 | 4.0–5.4 | 4.5 | 5 | 22 |
| Replacements – 30% (12–22 weeks) | 32 | 2.3–5.4 | 3.33 | 1 | 3 |
| Kits/year (8/litter × 7 litres/year × 80% conception) | 4,480 | 0.01–2.2 | 0.74 | 672 | 497 |
Total dead/year: 678 dead
Total Carcass weightyear: 523 kg
Total kg/unit/year: 5.23 kg/doe
100,000 Chicken broilers (6 cycles/year)footnote g
| Operations and sizes |
Number in herd or flock | Weight range (kg) | Average |
Dead/year | Carcass weights (kg) |
|---|---|---|---|---|---|
| Broilers placed/40-day growing cycle | 100,000 | 0.04–2.2 | 0.76 | 24,000 | 18,240 kg |
Total kg/unit/year: 0.03 kg/broiler
10,000 Broiler-breeder hens
| Operations and sizes |
Number in herd or flock | Weight range (kg) | Average |
Dead/year | Carcass weights (kg) |
|---|---|---|---|---|---|
| Hens | 10,000 | 2.2–3.5 | 2.63 | 800 | 2107 |
| Roosters (10% of hens) |
1,000 | 2.8–4.9 | 3.50 | 100 | 350 |
Total dead/year: 900 dead
Total carcass weight/year: 2,457 kg
Total kg/unit/year: 0.25 kg/broiler-breeder hen
10,000 Layer hens
| Operations and sizes |
Number in herd or flock | Weight range (kg) | Average |
Dead/year | Carcass weights (kg) |
|---|---|---|---|---|---|
| Hens (not including spent hens, end of cycle) | 10,000 | 1.3–1.7 | 1.43 | 550 | 788 |
Total kg/unit/year: 0.08 kg/hen
10,000 Turkey hens (4 cycles/year)
| Operations and sizes |
Number in herd or flock | Weight range (kg) | Average |
Dead/year | Carcass weights (kg) |
|---|---|---|---|---|---|
| Hens placed/cycle (day old–market) | 10,000 | 0.06–7.87 | 2.66 | 2,400 | 6,392 |
Total kg/unit/year: 0.16 kg/hen
10,000 Turkey toms (3 cycles/year)
| Operations and sizes |
Number in herd or flock | Weight range (kg) | Average |
Dead/year | Carcass weights (kg) |
|---|---|---|---|---|---|
| Toms placed/cycle (day old–market) | 10,000 | 0.06–14.8 | 4.97 | 3,000 | 14,920 |
Total kg/unit/year: 0.50 kg/tom
1,000 Sow segregated early weaning (SEW)
| Operations and sizes |
Number in herd or flock | Weight range (kg) | Average |
Dead/year | Carcass weights (kg) |
|---|---|---|---|---|---|
| Sows and gilts | 1,000 | 136–227 | 166 | 72 | 11,976 |
| Born/year (12 born/litter, 2.3 litters/sow) | 27,600 | 1.1–5.5 | 2.6 | 4,140 | 10,626 |
Total dead/year: 4,212 dead
Total carcass weight/year: 22,602 kg
Total kg/unit/year: 22.6 kg/sow
1,000 SEW weaners (6.5 cycles/year)
| Operations and sizes |
Number in herd or flock | Weight range (kg) | Average |
Dead/year | Carcass weights (kg) |
|---|---|---|---|---|---|
| Weaners placed/cycle | 1,000 | 5.5–26.5 | 12.5 | 150 | 1,875 |
Total kg/unit/year: 0.29 kg/weaner
1,000 Grower/finishers (3 cycles/year)
| Operations and sizes |
Number in herd or flock | Weight range (kg) | Average |
Dead/year | Carcass weights (kg) |
|---|---|---|---|---|---|
| Grower/finishers placed/cycle | 1,000 | 26.5–20 | 58 | 60 | 3,460 |
Total kg/unit/year: 1.15 kg/finisher
100 Meat ewes
| Operations and sizes |
Number in herd or flock | Weight range (kg) | Average |
Dead/year | Carcass weights (kg) |
|---|---|---|---|---|---|
| Ewes, plus 4 rams, and replacements | 120 | 69–100 | 79 | 5 | 397 |
| Lambs born/year (includes stillborns) | 175 | 5–25 | 12 | 17 | 198 |
| Feeder lambs (born over the year) | 140 | 25–55 | 35 | 3 | 105 |
Total dead/year: 25 dead
Total carcass weight/year: 700 kg
Total kg/unit/year: 7.0 kg/meat ewe
1,000 Grain-fed veal calves (1 cycle/year)
| Operations and sizes |
Number in herd or flock | Weight range (kg) | Average |
Dead/year | Carcass weights (kg) |
|---|---|---|---|---|---|
| Calves placed/cycle (week old-market) | 1,000 | 45–313 | 134 | 70 | 9,403 |
Total kg/unit/year: 9.4 kg/calf
1,000 Milk-fed veal calves (2.5 cycles/year)
| Operations and sizes |
Number in herd or flock | Weight range (kg) | Average |
Dead/year | Carcass weights (kg) |
|---|---|---|---|---|---|
| Calves placed/cycle (week old-market) | 1,000 | 45–215 | 102 | 100 | 10,167 |
Total kg/unit/year: 4.07 kg/calf
Appendix B. Worksheet for sizing deadstock composting bins
| Line | Steps to determine size of filling bin | Placed per grow cycle Example 1: 100,000 chicken broilers |
Placed per grow cycle Example 2: 1,000 SEW sows |
Placed per grow cycle Example 3: 300 meat ewes |
Your farm |
|---|---|---|---|---|---|
| A | Determine estimated total kg of deadstock annually on your farm based on Appendix A. | 18,240 kg at average weight 0.76 kg | 22,602 kg (average weight 2.6–166 kg) | 2,100 kg (average weight 12–79 kg) | Your answer here |
| B | Based on average deadstock weight and Table 2, determine if primary heating stage should be 30, 60, 90, 120, 180 or other days. | Average weight is 0.76 kg: so use 30 days. | Because sows are quite big, use 120 days. | Weight range suggests using 60 days. | Your answer here |
| C | Determine what type of substrate will be used and its density (refer to Table 1 or calculate actual bulk density) | Sawdust at 234 kg/m3 | Sawdust at 234 kg/m3 | Chopped wheat straw at 135 kg/m3 | Your answer here |
| D |
Safety factor for sizing compost bins:
|
All-in/all-out production: use 2.0 | Quite consistent losses: use 1.5 | Use 2.0, as herd might be expanding as soon as prices are good for lambs. | Your answer here |
| V | Determine volume (m3) of one filling bin, using formula with line figures: V = A × B ÷ C × D ÷ 365 days/year | Volume = 18,240 kg × 3 days ÷ 234 kg/m3 × 2 ÷ 365 days = 12.8 m3 | Volume = 22,602 kg × 120 days ÷ 234 kg/m3 × 1.5 ÷ 365 days = 47.6 m3 | Volume = 2,100 kg × 60 days ÷ 135 kg/m3 × 2.0 ÷ 365 days = 5.1 m3 | Your answer here |
| W | Determine filling bin opening width (m): Minimum 1.8 m (6 ft) and 0.6 m (2 ft) wider than pile-turning equipment. | Skid-steer loader is 1.2 m wide + 0.6 m = 1.8 m (6 ft) | Front-end loader is 2.4 m wide + 0.6 m = 3.0 m (10 ft) | Skid-steer loader is 1.2 m wide + 0.6 m = 1.8 m (6 ft) | Your answer here |
| H | Determine maximum height (m) of filling bin: 1.2 m–1.8 m (4–6 ft) | Skid-steer loader can dump at 2.0 m height (6.5 ft), so use 1.5 m (5 ft) so operator can see. | Front-end loader can dump at 3.0 m height (9.9 ft), so use 1.8 m (6 ft). | Skid-steer loader can dump at 2.0 m height (6.5 ft), so use 1.5 m (5 ft) so operator can see. | Your answer here |
| L | Determine length (m) of filling bin, using formula with line figures: L = V ÷ W ÷ H | Length = 12.8 m3 ÷ 1.8 m ÷ 1.5 m = 4.7 m (15.5 ft) | Length = 47.6 m3÷ 3.0 m ÷ 1.8 m = 8.8 m (29 ft) | Length = 5.1 m3 ÷ 1.8 m ÷ 1.5 m = 1.9 m (6 ft) | Your answer here |
| - | Other bins required (all of equal dimensions)
|
Build 6 equal bins 1.8 m wide × 4.7 m long × 1.5 m high:
|
Build 6 equal bins 3.0 m wide × 8.8 m long × 1.8 m high:
|
Build 3 equal bins: 1.8 m wide × 1.9 m long × 1.5 m high:
|
Your answer here |
Appendix C. Troubleshooting guide
Improper temperature
| Problem | Cause | Possible solution |
|---|---|---|
| Too cold | Too wet | Remove pile contents and add substrate. Protect pile from weather or shape to shed water. |
| Too cold | Low C:N ratio | Evaluate amount and type of substrate and adjust as necessary. |
| Too cold | Too porous | Replace or mix existing substrate with sawdust or another small-particle substrate. |
| Too cold | Insufficient substrate cover | Add substrate to top of pile. |
| Too hot | Too dry | Add water to mortality area. |
Failure to decompose
| Problem | Cause | Possible solution |
|---|---|---|
| Failure to decompose | Low carbon | Evaluate amount and type of substrate and adjust as necessary. |
| Failure to decompose | Mortalities layered too closely | Adjust pile ensuring 0.2–0.3 m (8–12 in.) of substrate between layers. |
| Failure to decompose | Mortalities placed too closely together | Adjust mortalities, ensuring they do not touch each other. |
| Failure to decompose | Mortalities placed too close to the side of the bin | Adjust pile, ensuring mortalities are placed at least 0.3 m (1 ft) from the bin wall. |
Odour
| Problem | Cause | Possible solution |
|---|---|---|
| Foul, high sulfur, organic acids | Too wet | Remove pile contents and add substrate. Protect pile from weather or shape to shed water. |
| Foul, high sulfur, organic acids | Not enough cover substrate | Add substrate ensuring 0.6 m (2 ft) of cover. |
| Foul, high sulfur, organic acids | Air flow restricted | Evaluate amount and type of substrate and adjust as necessary. Replace or mix existing substrate with a larger-particle substrate. Adjust pile ensuring mortalities are placed at least 0.4 m (1 ft) from edge of side of the bin. |
| Foul, high sulfur, organic acids | Excessive crusting on surface | Break up surface crusting; avoid using substrate that is frozen or too wet. |
| Smell of decaying flesh | Not enough cover substrate | Add substrate ensuring 0.6 m (2 ft) of cover. |
| Smell of decaying flesh | Too cold | Follow steps outlined above under "improper temperature." |
| Ammonia | Low carbon | Evaluate amount and type of substrate and adjust as necessary. |
Flies
| Problem | Cause | Possible solution |
|---|---|---|
| Flies | Not enough cover substrate | Add substrate ensuring 0.6 m (2 ft) of cover. |
| Flies | Poor sanitary conditions | Remove leachate from around pile. Maintain a clean, debris-free area around compost site. |
| Flies | Too cold | Follow steps outlined above under "improper temperature." |
| Flies | Too hot | Add water to mortality area. |
Animals/vermin
| Problem | Cause | Possible solution |
|---|---|---|
| Animals, vermin | Inadequate protection | Add substrate ensuring 0.6 m (2 ft) of cover. Construct a fence around the site. Enclose bin structure. |
Disclaimer
The information in this document is provided for informational purposes only and should not be relied upon to determine legal obligations. To determine your legal obligations, consult the relevant law. If legal advice is required, consult a lawyer. In the event of a conflict between the information in this fact sheet and any applicable law, the law prevails.
This fact sheet was written by Bill Groot-Nibbelink, livestock regulatory affairs specialist, Ministry of Agriculture, Food and Rural Affairs (OMAFRA), Hugh Fraser, P. Eng., hort crop protection and post harvest , OMAFRA, and Daniel Ward, P. Eng.. poultry and other livestock housing and equipment, OMAFRA.
Footnotes
- footnote[a] Back to paragraph C:N ratio and dry matter content vary considerably and can only be determined accurately through lab analysis.
- footnote[b] Back to paragraph Bulk density can vary considerably; the best way to verify bulk density is to calculate value using procedure listed.
- footnote[c] Back to paragraph Berge, A., Glanville, T., Millner, P., Klingborg, D. 2009. Methods and microbial risks associated with composting of animal carcasses in the United States. Journal of American Veterinary Medicine Association, Volume 234, No. 1, January 2009, p. 47–56.
- footnote[d] Back to paragraph Some operation sizes may seem odd, but they are in multiples of 10 so it is easier to scale up/down.
- footnote[e] Back to paragraph For operations with more than 1 cycle/year, death losses appear high (for example, 100,000 chicken broilers × 6 cycles/year × 4% mortality rate = 24,000 dead/year)
- footnote[f] Back to paragraph Average weights are used as in NMAN software, which are skewed toward the smaller weights in the range.
- footnote[g] Back to paragraph Includes industry standard "2% extra" day olds delivered to farm.
- footnote[h] Back to paragraph Does not include spiking with new roosters when older ones are shipped/euthanized because of breeding problems.