Fitness training guidelines for Type 1 Wildland Fire Fighter testing
A physical fitness training program to prepare candidates for performing the WFX-FIT.
Robert Gumieniak MSc, Norman Gledhill PhD & Veronica Jamnik PhD
August, 2011
School of Kinesiology and Health Science, Faculty of Health, York University
Following is a physical fitness training program to prepare candidates for performing the WFX-FIT. It begins with a six week generic plan to improve all areas of physical fitness, then, for candidates who do not have access to specific resistance training equipment, four different detailed programs are provided utilizing different training modalities;
- Contemporary Fitness Training Equipment
- Free Weights (dumbbells) Only
- Body Weight/Callisthenic Only
- A Replication of the WFX-FIT Circuit
Six-week generic training program for the WFX-FIT
| Week | Monday - Day 1 | Tuesday - Day 2 | Wednesday - Day 3 | Thursday - Day 4 | Friday - Day 5 | Saturday - Day 6 | Sunday - Day 7 |
|---|---|---|---|---|---|---|---|
| Week 1 | Muscular Strength & Endurance; Stretch | Aerobic training 25 minutes; Stretch | Muscular Strength & Endurance; Stretch | WFX-FIT (× 1) | (Make-up day) | Rest | Rest |
| Week 2 | Circuit Training | Aerobic training 25 minutes; Stretch | Muscular Strength and Endurance | WFX-FIT (× 1) | (Make-up day) | Rest | Rest |
| Week 3 | Aerobic training 30 minutes; Stretch | Muscular Strength & Endurance; Stretch | Circuit Training | WFX-FIT (× 1) | (Make-up day) | Rest | Rest |
| Week 4 | Muscular Strength and Endurance | Circuit Training | Aerobic training 35 minutes; Stretch | WFX-FIT (× 1) | (Make-up day) | Rest | Rest |
| Week 5 | Circuit Training | Aerobic training 40 minutes; Stretch | Muscular Strength and Endurance | WFX-FIT (× 1) | (Make-up day) | Rest | Rest |
| Week 6 | Aerobic training 45 minutes; Stretch | Muscular Strength and Endurance | Circuit Training | WFX-FIT (× 1) | (Make-up day) | Rest | Rest |
Note: Any missed training sessions can be made up on the “make-up” day.
Detailed aerobic fitness training
-
Aerobic training on a treadmill:
-
The following sample training session consists of 2 minute work intervals performed continuously until volitional. Continue repeating the cycles until the weekly requirement is accomplished or until the number of cycles that can be tolerated is achieved.
One Cycle: 2 minute walk at 3 mph – 2 % elevation
2 minute jog at 5 or 6 mph – 4 % elevation
2 minute run at 7 or 8 mph – 6 % elevation
2 minute run at 7 or 8 mph – 8 % elevationFollowing the loading sequence above, a walking pace is required initially, then subsequent workloads require jogging followed by running at a comfortable pace. Once a comfortable running pace has been established, keep the speed constant and achieve subsequent workloads by increasing the elevation to make the exercise progressively more demanding.
During the first two weeks, you may only be able to complete the first two workloads in the cycle after which you should repeat these workloads until the desired duration has been completed. During the third week, add another workload to the cycle and then repeat the cycle until the desired duration has been achieved. By the fourth week (and the remainder of the training program), you should be able to complete the four workloads in the cycle and then repeat the cycle until the desired duration has been completed.
- As an alternative, should you wish to use a different treadmill protocol; the 20m shuttle run protocol can be replicated on the treadmill. Below are the speed equivalents for 10 stages of the shuttle run. Each stage is two minutes in duration. In your exercise sessions you should increase the speed of the treadmill continuously following the speed equivalents listed for each stage of the shuttle run. Keep the treadmill elevation at 1-2%. If you are only able to run continuously for 4 stages, then walk for 2 minutes and repeat the process again until your total time is completed for that session.
Table listing speed equivalents for 10 stages of the shuttle run indicated above Speed km/hr Speed mph 20 m shuttle on stage METS Predicted VO2 max 8.5 5.3 1 6.7 23.5 9.0 5.6 2 7.6 26.6 9.5 5.9 3 8.5 29.8 10.0 6.2 4 9.3 32.6 10.5 6.5 5 10.2 35.7 11.0 6.8 6 11.0 38.5 11.5 7.1 7 11.9 41.7 12.0 7.5 8 12.7 44.5 12.5 7.8 9 13.6 47.6 13.0 8.0 10 14.5 50.8 - A third treadmill protocol alternative which simulates the inclination in the WFX-FIT circuit can be performed as follows.
Table listing speed, elevation and duration for the treadmill protocal indicated above Speed (mph) Elevation (%) Duration (min) 2.5 0 3 3.4 5 3 4.2 10 3 5.0 12 3 5.8 14 3 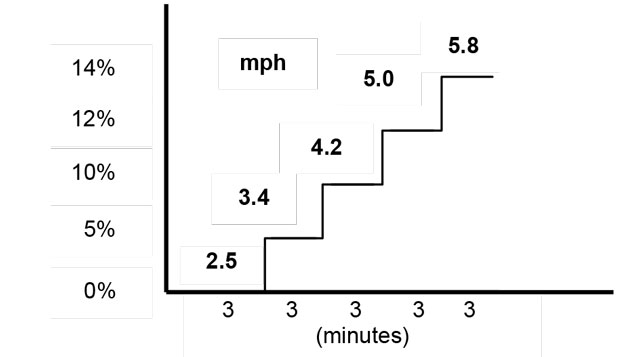
-
- Outdoor Aerobic Training: If you do not have access to a treadmill, aerobic training may be performed on a high school track or another surface of known distance (using a car odometer). An outdoor track generally measures 400 metres so that covering approximately one mile requires 4 laps and covering 2 kilometres requires 5 laps. Record your distance covered for the training session (i.e. number of laps and distance). Your goal for the following week should be to increase both time, as per the schedule, and the pace at which you are running.
Detailed musculoskeletal fitness program
- Muscular Strength, Endurance and Power Exercises: This program consists of 9 exercises, each of which is chosen to replicate the motions and forces required to complete the WFX-FIT protocol. These exercises can be performed one at a time with adequate rest between each, or in a circuit format. The circuit format means that one set of each exercise is completed with minimal rest in between, followed by a repetition of the entire circuit with the prescribed number of reps and sets. The goal is to reach the target number of repetitions listed in the chart below, with the last repetition performed being the most difficult. The circuit training format is recommended because while performing the WFX-FIT protocol there are no scheduled breaks and a variety of different muscle groups are used immediately following one another.
-
Sets, Reps, Weight and Rest: Weeks 1-4 are targeted as the strength development stage.
Perform 3 sets for each exercise, incrementally increasing the weight by 5-10 lb depending on the exercise for each set. The number of reps should decrease from 12 to 10 to 8 as the number of sets and the weight increase progressively. Rest: 45 to maximum 60 seconds between sets.
Weeks 5 & 6 are targeted as the strength and muscular endurance stage. Perform 4 sets of 10 repetitions. Keep the weight constant – it is usually the same weight used to perform the first set (12 RM) of the initial strength development stage. Rest: 30 seconds maximum between sets.
- Warm-Up: Should be dynamic and reflect those exercises included in the WFX-FIT training program (for example; push-ups, pull-ups, travelling lunges). The total warm-up routine, including an aerobic component, should last 3-5 minutes.
- Cool-Down: Each strength training session should conclude with a brief cool-down of 5 minutes of easy aerobic activity followed by the stretching program described below.
- Intensity and Volume:
Table listing target number of repetitions, sets and resistance for the musculoskeletal fitness program described above Week Target Number of Repetitions Sets Resistance Week 1 12, 10, 8 3 A light weight that can be easily lifted. Proper technique should be emphasized. Week 2 12, 10, 8 3 Weight increased to a point where the last rep is difficult to perform. Week 3 12, 10, 8 3 Weight increased to a point where the last rep of each set is difficult to perform. Week 4 12, 10, 8 3 Weight maintained from the previous week. Week 5 10 4 Weight maintained to a point where the last rep of sets 3-4 is difficult to perform. Week 6 10 4 Weight maintained from the previous week.
Note that determining the initial weights is essential. Learning proper form and technique is another important goal of the first training week and therefore lighter weights should be selected.
Following are four detailed training modality alternatives for preparing for the WFX-FIT.
A) Contemporary fitness training equipment
Muscular strength, endurance and power exercises using contemporary (sophisticated) fitness training equipment such as Nautilus, Cybex, and Life Fitness in a gym setting.
Lower body exercises:
-
Leg press using plate loaded or stack machine
Rationale: to strengthen the anterior muscles of the leg. Throughout the WFX-FIT circuit quadriceps strength and endurance is important for negotiating the ramps, meant to simulate traversing hills, mountains, and burms.
Execution: Sitting with your feet shoulder width apart on the deck/foot hold in front of you. Adjust the seat position so that your knees are at 90 degrees. Keep the weight on your heels, and push forward. Do not lock your knees. Return to the starting position.
-
Quadriceps extensions using dedicated machine
Rationale: to strengthen the anterior muscles of the leg and gluteals.
Execution: Sitting with your feet under the support pad, raise your feet by extending your legs, parallel to the floor. Slowly lower the weight back to the starting position. The support pad should be resting just above the ankle. Most machines will permit changing the height of the support pad or seat position to ensure the correct execution.
-
Stiff-legged dead lifts using Olympic bar or universal cables
Rationale: to strengthen the posterior muscles of the leg and gluteals. The inclusion of this exercise provides symmetry to an anterior dominant program.
Execution: Stand with feet shoulder width apart in front of the bar as it rests on the floor. Grasp the bar with an overhand grip and stand straight up. Bend forward at the waist, keeping the knees slightly bent and rigid. Keep the chest forward and lower back arched. Reach forward until a stretch is felt in the lower back, hamstrings and gluteals and return to the upright position. If using Universal cables, lower the pulleys to the lowest setting and attach a straight bar to the clips.
-
Hamstring curl using a dedicated curl machine
Rationale: to strengthen the anterior muscles of the leg while simulating the repetitive ramp climbing performed in the WFX-FIT circuit.
Execution: Sitting with your legs extended and feet under the support pad, pull your heels towards the seat. Slowly raise the weight back to the starting position. The support pad should be resting just above the ankle on the posterior side of the leg. Most machines will permit changing the height of the support pad or seat position to ensure the correct execution. Alternatively, some machines have the person lying face-down and raising the weight by bending at the knees.
Upper body exercises:
-
Seated row using dedicated machine or universal cables
Rationale: to strengthen the posterior muscles of the upper body. This motion will assist strengthening the posterior musculature needed to support the pump and hose pack.
Execution: Sit facing the machine, feet braced against the foot holds. Grasp the bar/handles and pull the weight towards the chest by straightening the back and pulling the elbows back along the side of your body. Alternatively, lower the pulley to the bottom position and affix a straight bar or handles to the cable.
-
Bent row (underhand grip) using dedicated machine or universal cables
Rationale: to strengthen the posterior muscles of the upper body. This motion will assist strengthening the posterior musculature needed to support the pump and hose pack.
Execution: Stand facing the machine, with feet shoulder width apart. Grasp the handles and, with the back straight, and knees slightly bent, lean forward approximately 45 degrees - bending at the hips. Pull the weight up to the chest and return to the starting position. Alternatively, lower the pulleys to the bottom position and affix a straight bar to the cable. Using an underhand grip perform the same movement execution.
-
Lateral arm raises using dedicated machine or universal cables
Rationale: to strengthen the musculature forming the shoulder (Deltoids, Trapezius, Pec Major). This motion will also assist lifting and lowering the hose pack.
Execution: Stand with feet shoulder width apart, arms at 90 degrees resting against the pads. Raise the arms to the sides of the body by pressing out against the pads then lower them back to the starting position under control. Alternatively, lower the pulleys to the bottom position and affix a handle to the cable. Using an overhand grip and an outstretched arm by your side, raise the weight by bringing the hand to shoulder height.
-
Incline press using dedicated machine or universal cables
Rationale: to strengthen the musculature forming the shoulder girdle (Deltoids, Pec Major, Triceps). This motion will help improve general upper body strength and provide symmetry to a pull dominant program.
Execution: Sitting on the machine, feet braced against the foot holds, grasp the bar/handles and push the weight up by extending the arms trying to avoid locking the elbows. Lower the weight under control to the starting position. Alternatively, lower the pulley to the bottom position and affix a straight bar or handles to the cable. Sit on a bench with a 45 degree angle. Hold the handles so they are in line with the shoulders and elbows bent. Extend the arms vertically, bringing the weights together at the top of the motion.
-
Core strengthening using dedicated machine or universal cables
Rationale: to strengthen the musculature forming the abdomen. There are a wide variety of exercises which can be performed. Based on familiarity and comfort with performing more complex exercises ‘Lumber-Jacks’, ‘overhead medicine ball slams’, and ‘lateral medicine ball slams’ are recommended. However, novice exercisers should begin with crunches or sit-ups.
Execution: Sitting on the machine, grasp the handles next to the head. Raise the weight by contracting the abdomen and curling forward; do not use the arms to pull the weight. Return the weight to the starting position under control. Alternatively, raise the pulley to the top position and affix a rope-like handle. Kneel down facing away from the machine. Grasp the handles behind the head. Raise the weight by contracting the abdomen and curling forward; do not use the arms to pull the weight. Return the weight to the starting position under control.
Stretching program:
- Stretch #1: Knee Flexion (Hamstrings: Raised Leg Knee Flexor Stretch)
- Stretch #2: Knee Extension (Quadriceps: Kneeling Knee Extensor Stretch)
- Stretch #3: Gastrocnemius / Soleus (Plantar Flexor Stretch)
- Stretch #4: Back Flexion (Seated Lower-Trunk Extensor Stretch)
- Stretch #5: Shoulder Extension (Extensor, Adductor and Retractor Stretch)
- Stretch #6: Chest (Shoulder Flexor Stretch)
Note: Each stretch is static in nature and should be held for 20-30 seconds considering any local muscle discomfort post exercise.
Summary table for muscular strength, endurance and power exercises using contemporary fitness training equipment
| Lower body exercises 1. Leg Press |
Lower body exercises 2. Quadriceps Extensions |
Lower body exercises 3. Dead Lifts |
Lower body exercises 4. Hamstring Curls |
Upper body exercises 5. Seated Row |
Upper body exercises 6. Bent Over Row |
Upper body exercises 7. Lateral Raises |
Upper body exercises 8. Incline Press |
Upper body exercises 9. Core Exercises |
|
|---|---|---|---|---|---|---|---|---|---|
| Week 1 | 3 Sets: 1 × 12 RM 1 × 10 RM 1 × 8 RM Rest: 45-60 seconds Increasing Wt each Set |
3 Sets: 1 × 12 RM 1 × 10 RM 1 × 8 RM Rest: 45-60 seconds Increasing Wt each Set |
3 Sets: 1 × 12 RM 1 × 10 RM 1 × 8 RM Rest: 45-60 seconds Increasing Wt each Set |
3 Sets: 1 × 12 RM 1 × 10 RM 1 × 8 RM Rest: 45-60 seconds Increasing Wt each Set |
3 Sets: 1 × 12 RM 1 × 10 RM 1 × 8 RM Rest: 45-60 seconds Increasing Wt each Set |
3 Sets: 1 × 12 RM 1 × 10 RM 1 × 8 RM Rest: 45-60 seconds Increasing Wt each Set |
3 Sets: 1 × 12 RM 1 × 10 RM 1 × 8 RM Rest: 45-60 seconds Increasing Wt each Set |
3 Sets: 1 × 12 RM 1 × 10 RM 1 × 8 RM Rest: 45-60 seconds Increasing Wt each Set |
3 Sets: 3 × 20-25 RM or as tolerated |
| Week 2 | 3 Sets: 1 × 12 RM 1 × 10 RM 1 × 8 RM Rest: 45-60 seconds Increasing Wt each Set |
3 Sets: 1 × 12 RM 1 × 10 RM 1 × 8 RM Rest: 45-60 seconds Increasing Wt each Set |
3 Sets: 1 × 12 RM 1 × 10 RM 1 × 8 RM Rest: 45-60 seconds Increasing Wt each Set |
3 Sets: 1 × 12 RM 1 × 10 RM 1 × 8 RM Rest: 45-60 seconds Increasing Wt each Set |
3 Sets: 1 × 12 RM 1 × 10 RM 1 × 8 RM Rest: 45-60 seconds Increasing Wt each Set |
3 Sets: 1 × 12 RM 1 × 10 RM 1 × 8 RM Rest: 45-60 seconds Increasing Wt each Set |
3 Sets: 1 × 12 RM 1 × 10 RM 1 × 8 RM Rest: 45-60 seconds Increasing Wt each Set |
3 Sets: 1 × 12 RM 1 × 10 RM 1 × 8 RM Rest: 45-60 seconds Increasing Wt each Set |
3 Sets: 3 × 20-25 RM or as tolerated |
| Week 3 | Same as Previous Wk | Same as Previous Wk | Same as Previous Wk | Same as Previous Wk | Same as Previous Wk | Same as Previous Wk | Same as Previous Wk | Same as Previous Wk | Same as Previous Wk |
| Week 4 | Same as Previous Wk | Same as Previous Wk | Same as Previous Wk | Same as Previous Wk | Same as Previous Wk | Same as Previous Wk | Same as Previous Wk | Same as Previous Wk | Same as Previous Wk |
| Week 5 | 4 Sets: 4 × 10 RM Rest: 30 s Maintain Wt each Set |
4 Sets: 4 × 10 RM Rest: 30 s Maintain Wt each Set |
4 Sets: 4 × 10 RM Rest: 30 s Maintain Wt each Set |
4 Sets: 4 × 10 RM Rest: 30 s Maintain Wt each Set |
4 Sets: 4 × 10 RM Rest: 30 s Maintain Wt each Set |
4 Sets: 4 × 10 RM Rest: 30 s Maintain Wt each Set |
4 Sets: 4 × 10 RM Rest: 30 s Maintain Wt each Set |
4 Sets: 4 × 10 RM Rest: 30 s Maintain Wt each Set |
Same as Previous Wk |
| Week 6 | Same as Previous Wk | Same as Previous Wk | Same as Previous Wk | Same as Previous Wk | Same as Previous Wk | Same as Previous Wk | Same as Previous Wk | Same as Previous Wk | Same as Previous Wk |
B) Free weights (dumbbells) only
Muscular strength, endurance and power training exercises using free weights (dumbbells) only
Lower body exercises:
-
Dumbbell squats
Rationale: to strengthen the anterior muscles of the leg. Throughout the WFX-FIT circuit quadriceps strength and endurance is important for negotiating the ramps which are meant to simulate traversing hills, mountains, and burms.
Execution: Stand with feet shoulder width apart with your feet, knees and hips in a straight line facing forward. Slowly lower your body, as though you are sitting in a chair. If you can, go down until knees are at 90 degrees. Make sure your knees are behind your toes. Keeping the weight in your heels, slowly push your body back to starting upright position. At the top of the movement, do not lock your knees.
-
Dumbbell lunges (walking / traveling)
Rationale: to strengthen the anterior muscles of the leg and gluteals.
Execution: Stand with feet together. Take a large step forward, and slowly lower your body into a lunge position. Make sure your knee is above your ankle, keeping it at a 90 degree angle. Slowly push back up to starting position, pushing from your heel. Do not lean/hunch forward or position your knee past your front foot.
-
Stiff-legged dead lifts
Rationale: to strengthen the posterior muscles of the leg and gluteals. The inclusion of this exercise provides symmetry to an anterior dominant program.
Execution: Stand with feet shoulder width apart. Grasp the weights with an overhand grip and stand straight up. Bend forward at the waist, keeping the knees slightly bent and rigid. Keep the chest forward and lower back arched. Reach forward until a stretch is felt in the lower back, hamstrings and gluteals and return to the upright position.
-
Step ups
Rationale: to strengthen the anterior muscles of the leg while simulating the repetitive ramp climbing performed in the WFX-FIT circuit.
Execution: With free weights held in hands, stand facing a box or bench. Place one foot on the platform, using it to push off the floor and onto the platform. The focus should be on using the front foot to push upward, avoid using the back foot to assist pushing off the floor.
Upper body exercises:
-
One arm row
Rationale: to strengthen the posterior muscles of the upper body. This motion will assist strengthening the posterior musculature needed to support the pump and hose pack.
Execution: Grasp a free weight with the palm facing in. Use the opposite hand and knee to support the body on a bench. Raise the upper arm and elbow as high as possible, inline with the body. Keep the back straight, the elbow should end at a 90 degree angle. Lower the weight under control.
-
Bent row (underhand grip)
Rationale: to strengthen the posterior muscles of the upper body. This motion will assist strengthening the posterior musculature needed to support the pump and hose pack.
Execution: Stand with feet shoulder width apart. Grasp the bar with an underhand grip, with the hands wider than shoulder width. With the back straight, and knees slightly bent, lean forward approximately 45 degrees - bending at the hips. Pull the bar up to the chest and return to the starting position.
-
Front raises
Rationale: to strengthen the musculature forming the shoulder (Deltoids, Trapezius, Pec Major). This motion will also assist lifting and lowering the hose pack.
Execution: Stand with feet shoulder width apart. Grasp the free weights with an overhand grip so they rest against the thighs. Raise the arms in front of your body to eye level and lower them back to the starting position under control.
-
Incline dumbbell press
Rationale: to strengthen the musculature forming the shoulder girdle (Deltoids, Pec Major, Triceps). This motion will help improve general upper body strength and provide symmetry to a pull dominant program.
Execution: Sit on a bench with a 45 degree angle. Hold the weights so they are in line with the shoulders and elbows bent. Extend the arms vertically, bringing the weights together at the top of the motion.
-
Core strengthening
Rationale: to strengthen the musculature forming the abdomen. There are a wide variety of exercises which can be performed. Based on familiarity and comfort with performing more complex exercises; ‘Lumber-Jacks’, ‘overhead medicine ball slams’, and ‘lateral medicine ball slams’ are recommended. However, novice exercisers should begin with crunches or sit-ups.
Execution: Lie on the back, with hands behind the head. Knees bent and feet flat on the floor. Raise the shoulders off the ground bringing the chest towards the knees.
Stretching program:
- Stretch #1: Knee Flexion (Hamstrings: Raised Leg Knee Flexor Stretch)
- Stretch #2: Knee Extension (Quadriceps: Kneeling Knee Extensor Stretch)
- Stretch #3: Gastrocnemius / Soleus (Plantar Flexor Stretch)
- Stretch #4: Back Flexion (Seated Lower-Trunk Extensor Stretch)
- Stretch #5: Shoulder Extension (Extensor, Adductor and Retractor Stretch)
- Stretch #6: Chest (Shoulder Flexor Stretch)
Note: Each stretch is static in nature and should be held for 20-30 seconds considering any local muscle discomfort post exercise.
Summary table of muscular strength, endurance and power exercises limited to free weights (dumbbells) only
| Week # | Lower body exercises 1. Db squats |
Lower body exercises 2. Db lunges |
Lower body exercises 3. Dead lifts |
Lower body exercises 4. Step ups |
Upper body exercises 5. One arm row |
Upper body exercises 6. Bent over row |
Upper body exercises 7. Front raises |
Upper body exercises 8. Incline Db Press |
Upper body exercises 9. Core exercises |
|---|---|---|---|---|---|---|---|---|---|
| Week 1 | 3 Sets: 1 × 12 RM 1 × 10 RM 1 × 8 RM Rest: 45-60 seconds Increasing Wt each Set |
3 Sets: 1 × 12 RM 1 × 10 RM 1 × 8 RM Rest: 45-60 seconds Increasing Wt each Set |
3 Sets: 1 × 12 RM 1 × 10 RM 1 × 8 RM Rest: 45-60 seconds Increasing Wt each Set |
3 Sets: 1 × 12 RM 1 × 10 RM 1 × 8 RM Rest: 45-60 seconds Increasing Wt each Set |
3 Sets: 1 × 12 RM 1 × 10 RM 1 × 8 RM Rest: 45-60 seconds Increasing Wt each Set |
3 Sets: 1 × 12 RM 1 × 10 RM 1 × 8 RM Rest: 45-60 seconds Increasing Wt each Set |
3 Sets: 1 × 12 RM 1 × 10 RM 1 × 8 RM Rest: 45-60 seconds Increasing Wt each Set |
3 Sets: 1 × 12 RM 1 × 10 RM 1 × 8 RM Rest: 45-60 seconds Increasing Wt each Set |
3 Sets: 3 × 20-25 RM or as tolerated |
| Week 2 | 3 Sets: 1 × 12 RM 1 × 10 RM 1 × 8 RM Rest: 45-60 seconds Increasing Wt each Set |
3 Sets: 1 × 12 RM 1 × 10 RM 1 × 8 RM Rest: 45-60 seconds Increasing Wt each Set |
3 Sets: 1 × 12 RM 1 × 10 RM 1 × 8 RM Rest: 45-60 seconds Increasing Wt each Set |
3 Sets: 1 × 12 RM 1 × 10 RM 1 × 8 RM Rest: 45-60 seconds Increasing Wt each Set |
3 Sets: 1 × 12 RM 1 × 10 RM 1 × 8 RM Rest: 45-60 seconds Increasing Wt each Set |
3 Sets: 1 × 12 RM 1 × 10 RM 1 × 8 RM Rest: 45-60 seconds Increasing Wt each Set |
3 Sets: 1 × 12 RM 1 × 10 RM 1 × 8 RM Rest: 45-60 seconds Increasing Wt each Set |
3 Sets: 1 × 12 RM 1 × 10 RM 1 × 8 RM Rest: 45-60 seconds Increasing Wt each Set |
3 Sets: 3 × 20-25 RM or as tolerated |
| Week 3 | Same as Previous Wk | Same as Previous Wk | Same as Previous Wk | Same as Previous Wk | Same as Previous Wk | Same as Previous Wk | Same as Previous Wk | Same as Previous Wk | Same as Previous Wk |
| Week 4 | Same as Previous Wk | Same as Previous Wk | Same as Previous Wk | Same as Previous Wk | Same as Previous Wk | Same as Previous Wk | Same as Previous Wk | Same as Previous Wk | Same as Previous Wk |
| Week 5 | 4 Sets: 4 × 10 RM Rest: 30 seconds Maintain Wt each Set |
4 Sets: 4 × 10 RM Rest: 30 seconds Maintain Wt each Set |
4 Sets: 4 × 10 RM Rest: 30 seconds Maintain Wt each Set |
4 Sets: 4 × 10 RM Rest: 30 seconds Maintain Wt each Set |
4 Sets: 4 × 10 RM Rest: 30 seconds Maintain Wt each Set |
4 Sets: 4 × 10 RM Rest: 30 seconds Maintain Wt each Set |
4 Sets: 4 × 10 RM Rest: 30 seconds Maintain Wt each Set |
4 Sets: 4 × 10 RM Rest: 30 seconds Maintain Wt each Set |
Same as Previous Wk |
| Week 6 | Same as Previous Wk | Same as Previous Wk | Same as Previous Wk | Same as Previous Wk | Same as Previous Wk | Same as Previous Wk | Same as Previous Wk | Same as Previous Wk | Same as Previous Wk |
C) Body weight/callisthenic only
Muscular strength, endurance and power exercises using body weight (calisthenics) only.
Lower body exercises:
-
Step ups
Rationale: to strengthen the anterior muscles of the leg while simulating the repetitive ramp climbing performed in the WFX-FIT circuit.
Execution: The following may be performed using body weight only or while wearing a hose pack on the back. Weight can be added or removed by increasing or decreasing the number of sections of hose in the bag. Stand facing a box or bench. Place one foot on the platform, using it to push off the floor and onto the platform. The focus should be on using the front foot to push upward, avoid using the back foot to assist pushing off the floor.
-
Lunges (walking / traveling)
Rationale: to strengthen the anterior muscles of the leg and gluteals.
Execution: The following may be performed using body weight only or while wearing a hose pack on the back. Weight can be added or removed by increasing or decreasing the number of sections of hose in the bag. Stand with feet together. Take a large step forward, and slowly lower your body into a lunge position. Make sure your knee is above your ankle, keeping it at a 90 degree angle. Slowly push back up to starting position, pushing from your heel. Do not lean/hunch forward or position your knee past your front foot.
-
One-legged hamstring bridges
Rationale: to strengthen the posterior muscles of the leg and gluteals. The inclusion of this exercise provides symmetry to an anterior dominant program.
Execution: Lie on the back, with hands flat on the floor and knees bent to 90 degrees. Raise the pelvis and lower back off the floor by pushing down through the heels. Squeeze the hamstrings during the contraction.
-
Side facing step ups
Rationale: to strengthen the anterior muscles of the leg while simulating the repetitive ramp climbing performed in the JSC.
Execution: The following may be performed using body weight only or while wearing a hose pack on the back. Weight can be added or removed by increasing or decreasing the number of sections of hose in the bag. Stand next to a box or a bench. The outside foot comes across the inside foot and is positioned on the box/bench. Use this lead foot to raise and lower off the platform in a similar motion to that of the step ups.
Upper body exercises:
-
Pull ups (chin ups)
Rationale: to strengthen the latissimus, deltoids and anterior shoulder. This motion will assist strengthening the musculature needed to lift and lower the pump and hose pack.
Execution: The following may be performed using body weight only or while wearing a hose pack on the back. Weight can be added or removed by increasing or decreasing the number of sections of hose in the bag. Stand facing a horizontal bar, at arm’s reach above the head. Using an underhand grip on the bar, raise your body by curling your arms until the bar meets chin-level. Lower in a controlled manner, try to avoid swinging.
-
Supine pull ups (Inverted Row)
Rationale: to strengthen the posterior muscles of the upper body. This motion will assist strengthening the posterior musculature needed to support the pump and hose pack.
Execution: Lying on your back with a horizontal bar or nylon straps with handles secured to a structure, grasp the bar/handles using an overhand grip. Form a bridge with your torso by keeping your heels firmly in place, tightening your core and raising your hips. Pull up on the bar/handles until they contact the chest. Lower in a controlled manner.
-
Back (hyper) extensions
Rationale: to strengthen the musculature forming the lower back (erectors). This motion will also assist bending and lifting as well as supporting the weight of the pump/hose pack against the lower back.
Execution: Lay on your front with your arms and legs extended in front and behind your body. Keeping your arms and legs straight, raise them both 6-8 inches off the floor by contracting the muscles of your lower back.
-
Push ups
Rationale: to strengthen the musculature forming the shoulder girdle (Deltoids, Pec Major, Triceps). This motion will help improve general upper body strength and provide symmetry to a pull dominant program.
Execution: Lay on your front with your arms slightly wider than shoulder-width and legs extended in front and behind your body. Press down on your palms raising your body off the floor and keeping your legs straight. Extend upward until full extension at the elbows and lower yourself until the chin contacts the floor. Maintain a horizontal posture throughout by keeping the core muscles tight and raising the hips slightly.
-
Core strengthening
Rationale: to strengthen the musculature forming the abdomen. There are a wide variety of exercises which can be performed. Based on familiarity and comfort with performing more complex exercises ‘Lumber-Jacks’, ‘overhead medicine ball slams’, and ‘lateral medicine ball slams’ are recommended. However, novice exercisers should begin with crunches or sit-ups.
Execution: Lie on the back, with hands behind the head, knees bent and feet flat on the floor. Raise the shoulders off the ground bringing the chest toward the knees.
Stretching program:
- Stretch #1: Knee Flexion (Hamstrings: Raised Leg Knee Flexor Stretch)
- Stretch #2: Knee Extension (Quadriceps: Kneeling Knee Extensor Stretch)
- Stretch #3: Gastrocnemius / Soleus (Plantar Flexor Stretch)
- Stretch #4: Back Flexion (Seated Lower-Trunk Extensor Stretch)
- Stretch #5: Shoulder Extension (Extensor, Adductor and Retractor Stretch)
- Stretch #6: Chest (Shoulder Flexor Stretch)
Note: Each stretch is static in nature and should be held for 20-30 seconds considering any local muscle discomfort post exercise.
Summary table of muscular strength, endurance and power exercises limited to body weight (calisthenics) only
| Week | Lower body exercises 1. Step Ups |
Lower body exercises 2. Lunges |
Lower body exercises 3. One Leg Hamstring Bridge |
Lower body exercises 4. Side Facing Step Up |
Lower body exercises 5. Pull Ups |
Upper body exercises 6. Supine Pull Ups |
Upper body exercises 7. Back Extensions |
Upper body exercises 9. Push Ups |
Upper body exercises 9. Core Exercises |
|---|---|---|---|---|---|---|---|---|---|
| Week 1 | 3 Sets: 1 × 25 RM 1 × 20 RM 1 × 15 RM Rest: 45-60 seconds Increasing step height each set |
3 Sets: |
3 Sets: 3 × 12 RM Rest: 45-60 s |
3 Sets: |
3 Sets: |
3 Sets: |
3 Sets: 3 × 15 RM Rest: 45-60 s Increasing Wt each Set |
3 Sets: 3 × to fatigue Rest: 45-60 s |
3 Sets: 3 × 20-25 RM or as tolerated |
| Week 2 |
3 Sets: |
3 Sets: |
3 Sets: 3 × 12 RM Rest: 45-60 s |
3 Sets: |
3 Sets: |
3 Sets: |
3 Sets: 3 × 15 RM Rest: 45-60 s Increasing Wt each Set |
3 Sets: 3 × to fatigue Rest: 45-60 s |
3 Sets: 3 × 20-25 RM or as tolerated |
| Week 3 | Same as Previous Wk | Same as Previous Wk | Same as Previous Wk | Same as Previous Wk | Same as Previous Wk | Same as Previous Wk | Same as Previous Wk | Same as Previous Wk | Same as Previous Wk |
| Week 4 | Same as Previous Wk | Same as Previous Wk | Same as Previous Wk | Same as Previous Wk | Same as Previous Wk | Same as Previous Wk | Same as Previous Wk | Same as Previous Wk | Same as Previous Wk |
| Week 5 | 4 Sets: 4 × 15-20 RM Rest: 30 s Maintain step height |
4 Sets: 4 × 10-12 RM Rest: 30 s |
4 Sets: 4 × 10 RM Rest: 30 s |
4 Sets: 4 × 15-20 RM Rest: 30 s Maintain step height |
4 Sets: 4 × to fatigue Rest: 30 s |
4 Sets: 4 × 10-12 RM Rest: 30 s Maintain angle each set |
4 Sets: 4 × to fatigue Rest: 30 s |
4 Sets: 4 × to fatigue Rest: 30 s |
Same as Previous Wk |
| Week 6 | Same as Previous Wk | Same as Previous Wk | Same as Previous Wk | Same as Previous Wk | Same as Previous Wk | Same as Previous Wk | Same as Previous Wk | Same as Previous Wk | Same as Previous Wk |
D) A replication of the WFX-FIT circuit
The following exercises can be performed to simulate the demands of the WFX-FIT circuit. Using minimal equipment and available landscape or facilities, each component of the circuit can be recreated. This requires accessing a set of stairs, or a portion of a hill or a burm and the space available must be adequate to perform length of the as course described below.
WFX-FIT circuit components:
- Carry a Medium Pump on Back
- Hand Carry a Medium Pump
- Hose Pack Lift and Carry on Back
- Advanced Charged Hose
Replicated WFX-FIX course:
- The Carry a Medium Pump on Back over the ramp can be simulated using a standard issue medium decommissioned pump or object of similar weight and dimensions and substituting stairs, or a portion of a hill, or a burm for the ramp. If using stairs, a minimum of 5 steps up followed by 5 steps down is required. If using a portion of a hill or burm, a 35° slope best simulates the incline of the ramp. The total distance travelled should be 160 m (525 ft) with a total of 8 trips over or up and down the simulated “ramp”.
- The Hand Carry a Medium Pump can be simulated using a standard issue medium decommissioned pump or object of similar weight and dimensions, carried on any flat unobstructed surface. The total distance travelled is 80 m (263 ft).
- The Hose Pack Lift and Carry on Back over the ramp can be simulated using a standard issue hose pack a weighted back pack or object of similar weight and dimensions and substituting stairs, or a portion of a hill or a burm for the ramp. If using stairs, a minimum of 5 steps up followed by 5 steps down is required. If using a portion of a hill or burm, a 35° slope best simulates the incline of the ramp. The total distance travelled should be 1000 m (3281 ft) with a total of 50 trips over the simulated “ramp”.
- The Advanced Charged Hose can be replicated by dragging an object of similar weight and friction along the ground a distance of 80 m (263 ft). Some creativity may be required in assembling a simulation sled, but a tire affixed with weights requiring a drag force 18.5 kg (40.8 lb) would be ideal.
Stretching program:
- Stretch #1: Knee Flexion (Hamstrings: Raised Leg Knee Flexor Stretch)
- Stretch #2: Knee Extension (Quadriceps: Kneeling Knee Extensor Stretch)
- Stretch #3: Gastrocnemius / Soleus (Plantar Flexor Stretch)
- Stretch #4: Back Flexion (Seated Lower-Trunk Extensor Stretch)
- Stretch #5: Shoulder Extension (Extensor, Adductor and Retractor Stretch)
- Stretch #6: Chest (Shoulder Flexor Stretch)
Note: Each stretch is static in nature and should be held for 20-30 seconds considering any local muscle discomfort post exercise.
Summary table of the training on a Replicated WFX-FIT Circuit
| Week # | 1. Carry a Medium Pump on Back | 2. Hand Carry a Medium Pump | 3. Hose Pack Lift and Carry on Back | 4. Advanced Charged Hose |
|---|---|---|---|---|
| Week 1 | Performed once to establish a baseline time. | Performed once to establish a baseline time. | Performed once to establish a baseline time. | Performed once to establish a baseline time. |
| Week 2 | Performed once improving on established time. | Performed once improving on established time. | Performed once improving on established time. | Performed once improving on established time. |
| Week 3 | Same as Previous Week | Same as Previous Week | Same as Previous Week | Same as Previous Week |
| Week 4 | Same as Previous Week | Same as Previous Week | Same as Previous Week | Same as Previous Week |
| Week 5 | Same as Previous Week | Same as Previous Week | Same as Previous Week | Same as Previous Week |
| Week 6 | Same as Previous Week | Same as Previous Week | Same as Previous Week | Same as Previous Week |
References
- Delavier, Frederic, 2010. Strength Training Anatomy. Human Kinetics
- Nelson, A. G. and J. Kokkonen, 2007. Stretching Anatomy. Human Kinetics