Varroa mites
Information about varroa mites (Varroa destructor), a common and very serious pest of honey bees in Ontario.
About varroa mites
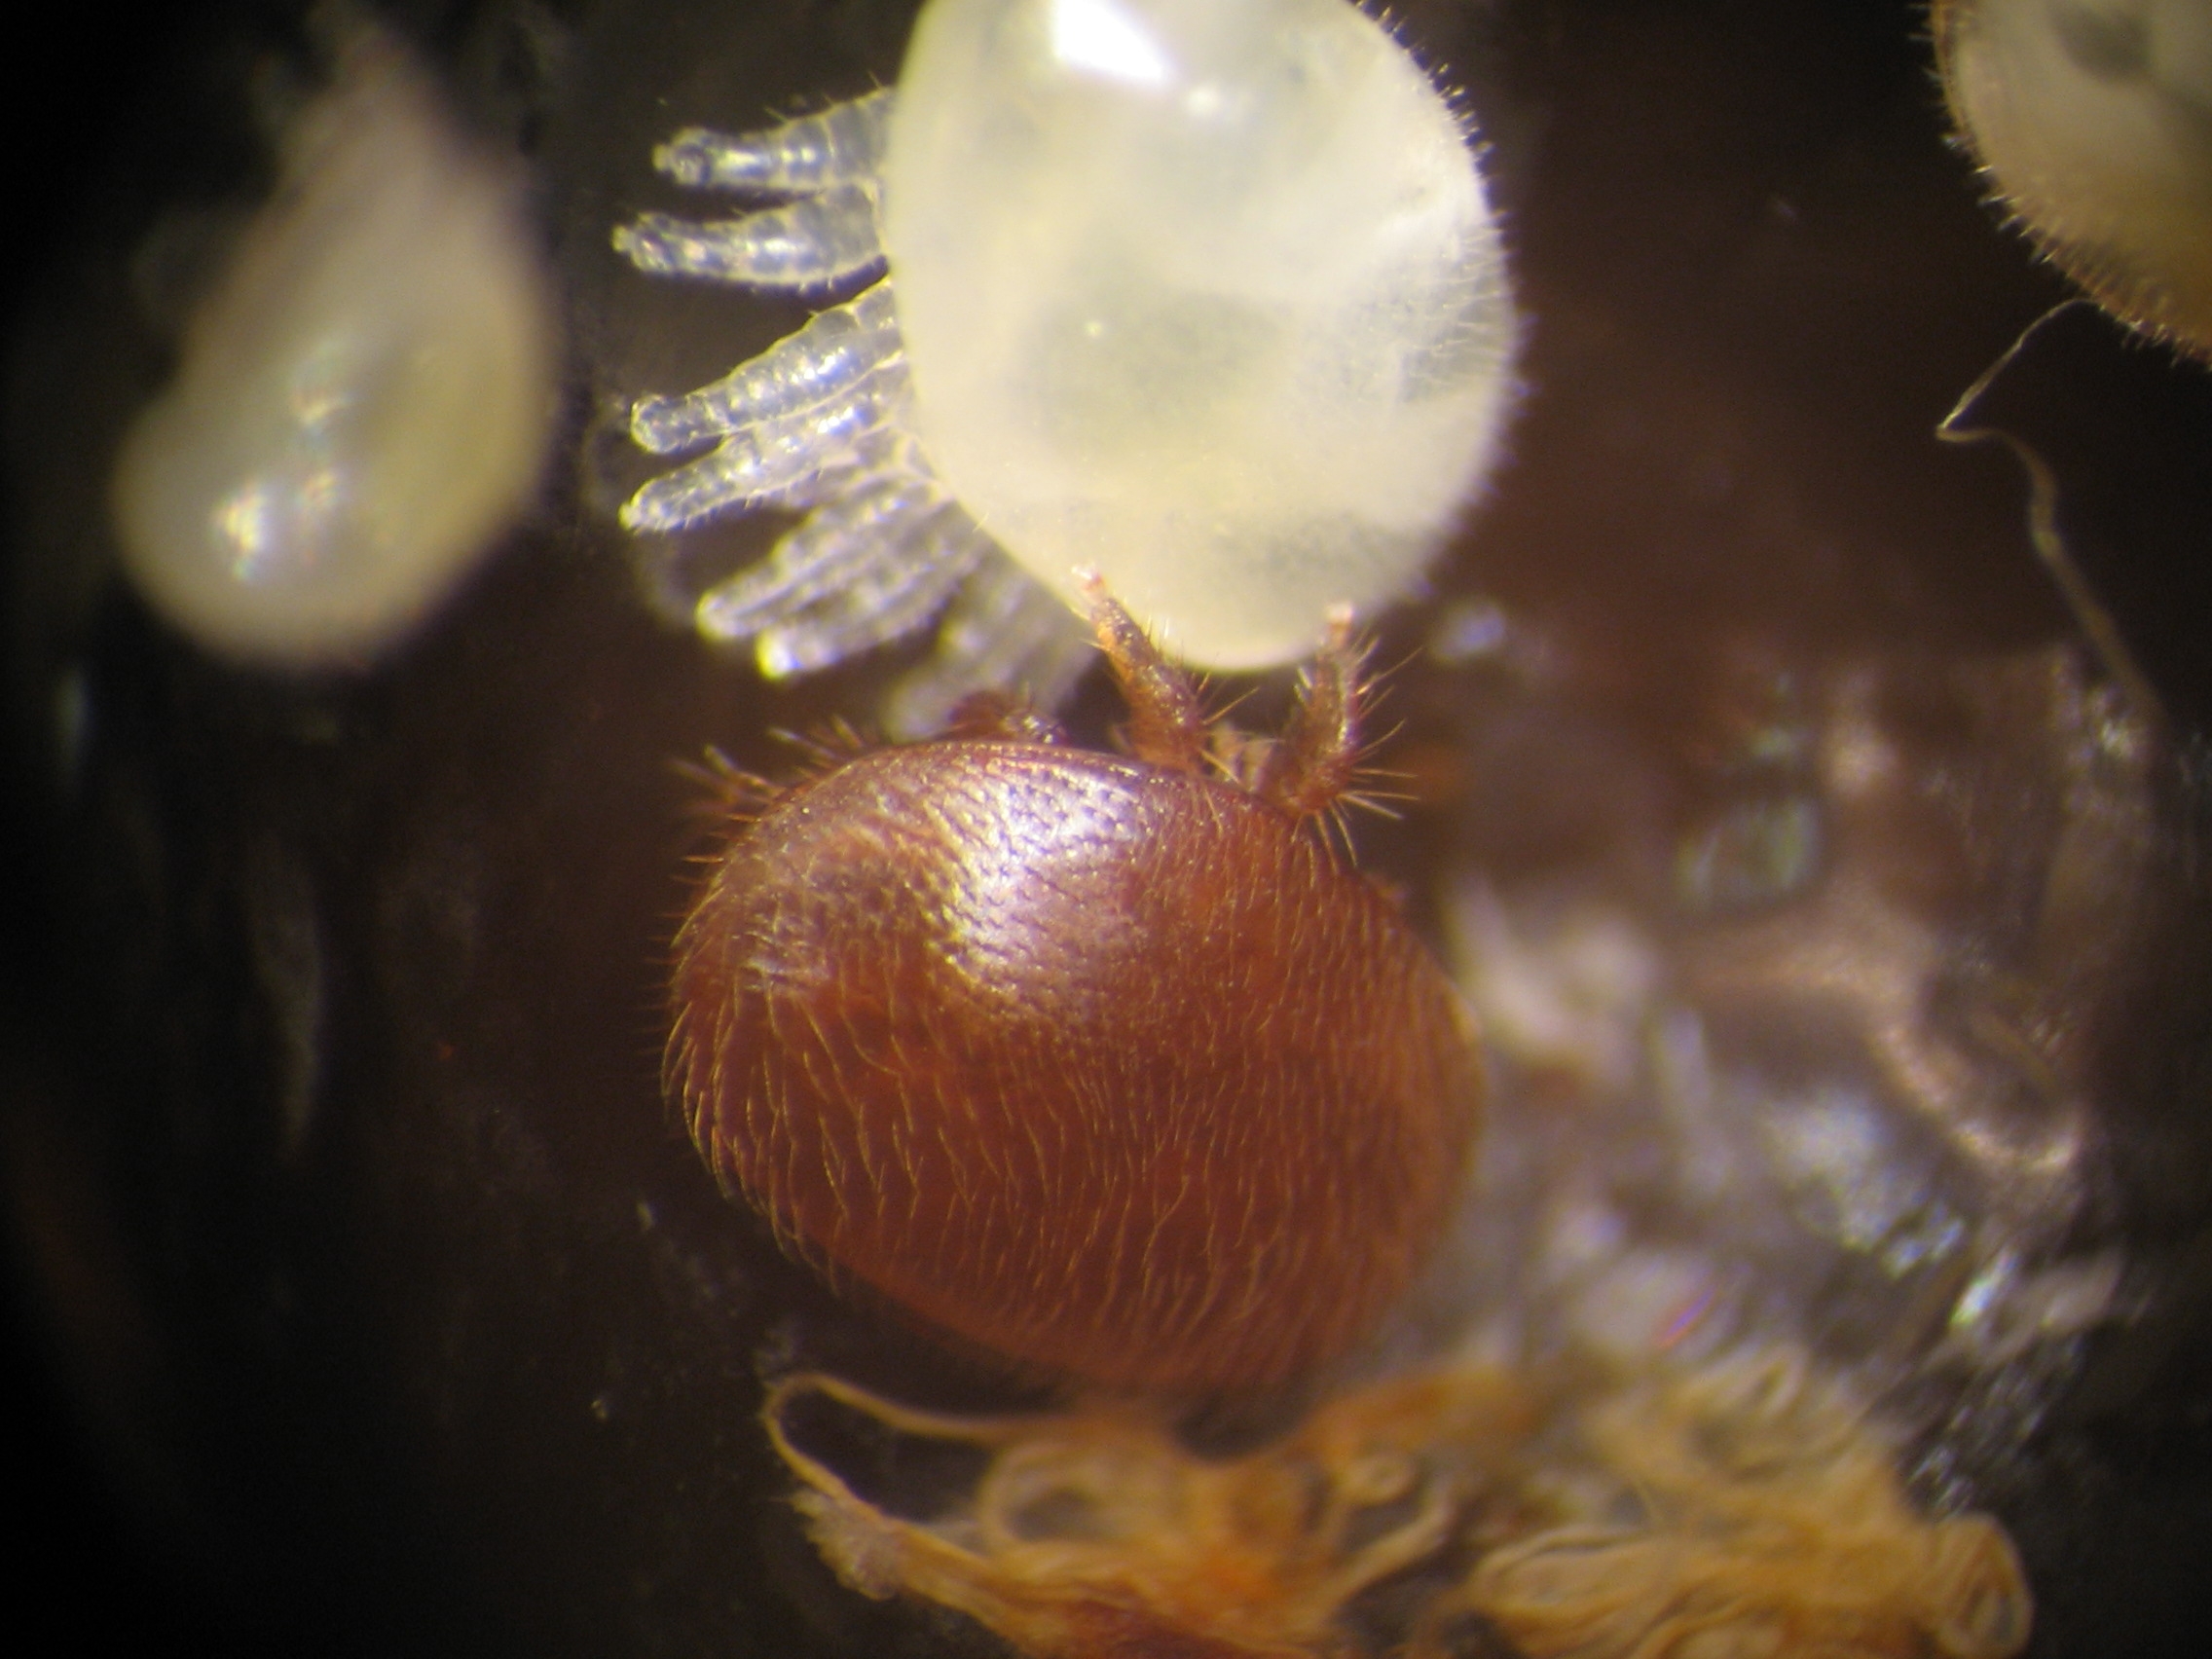
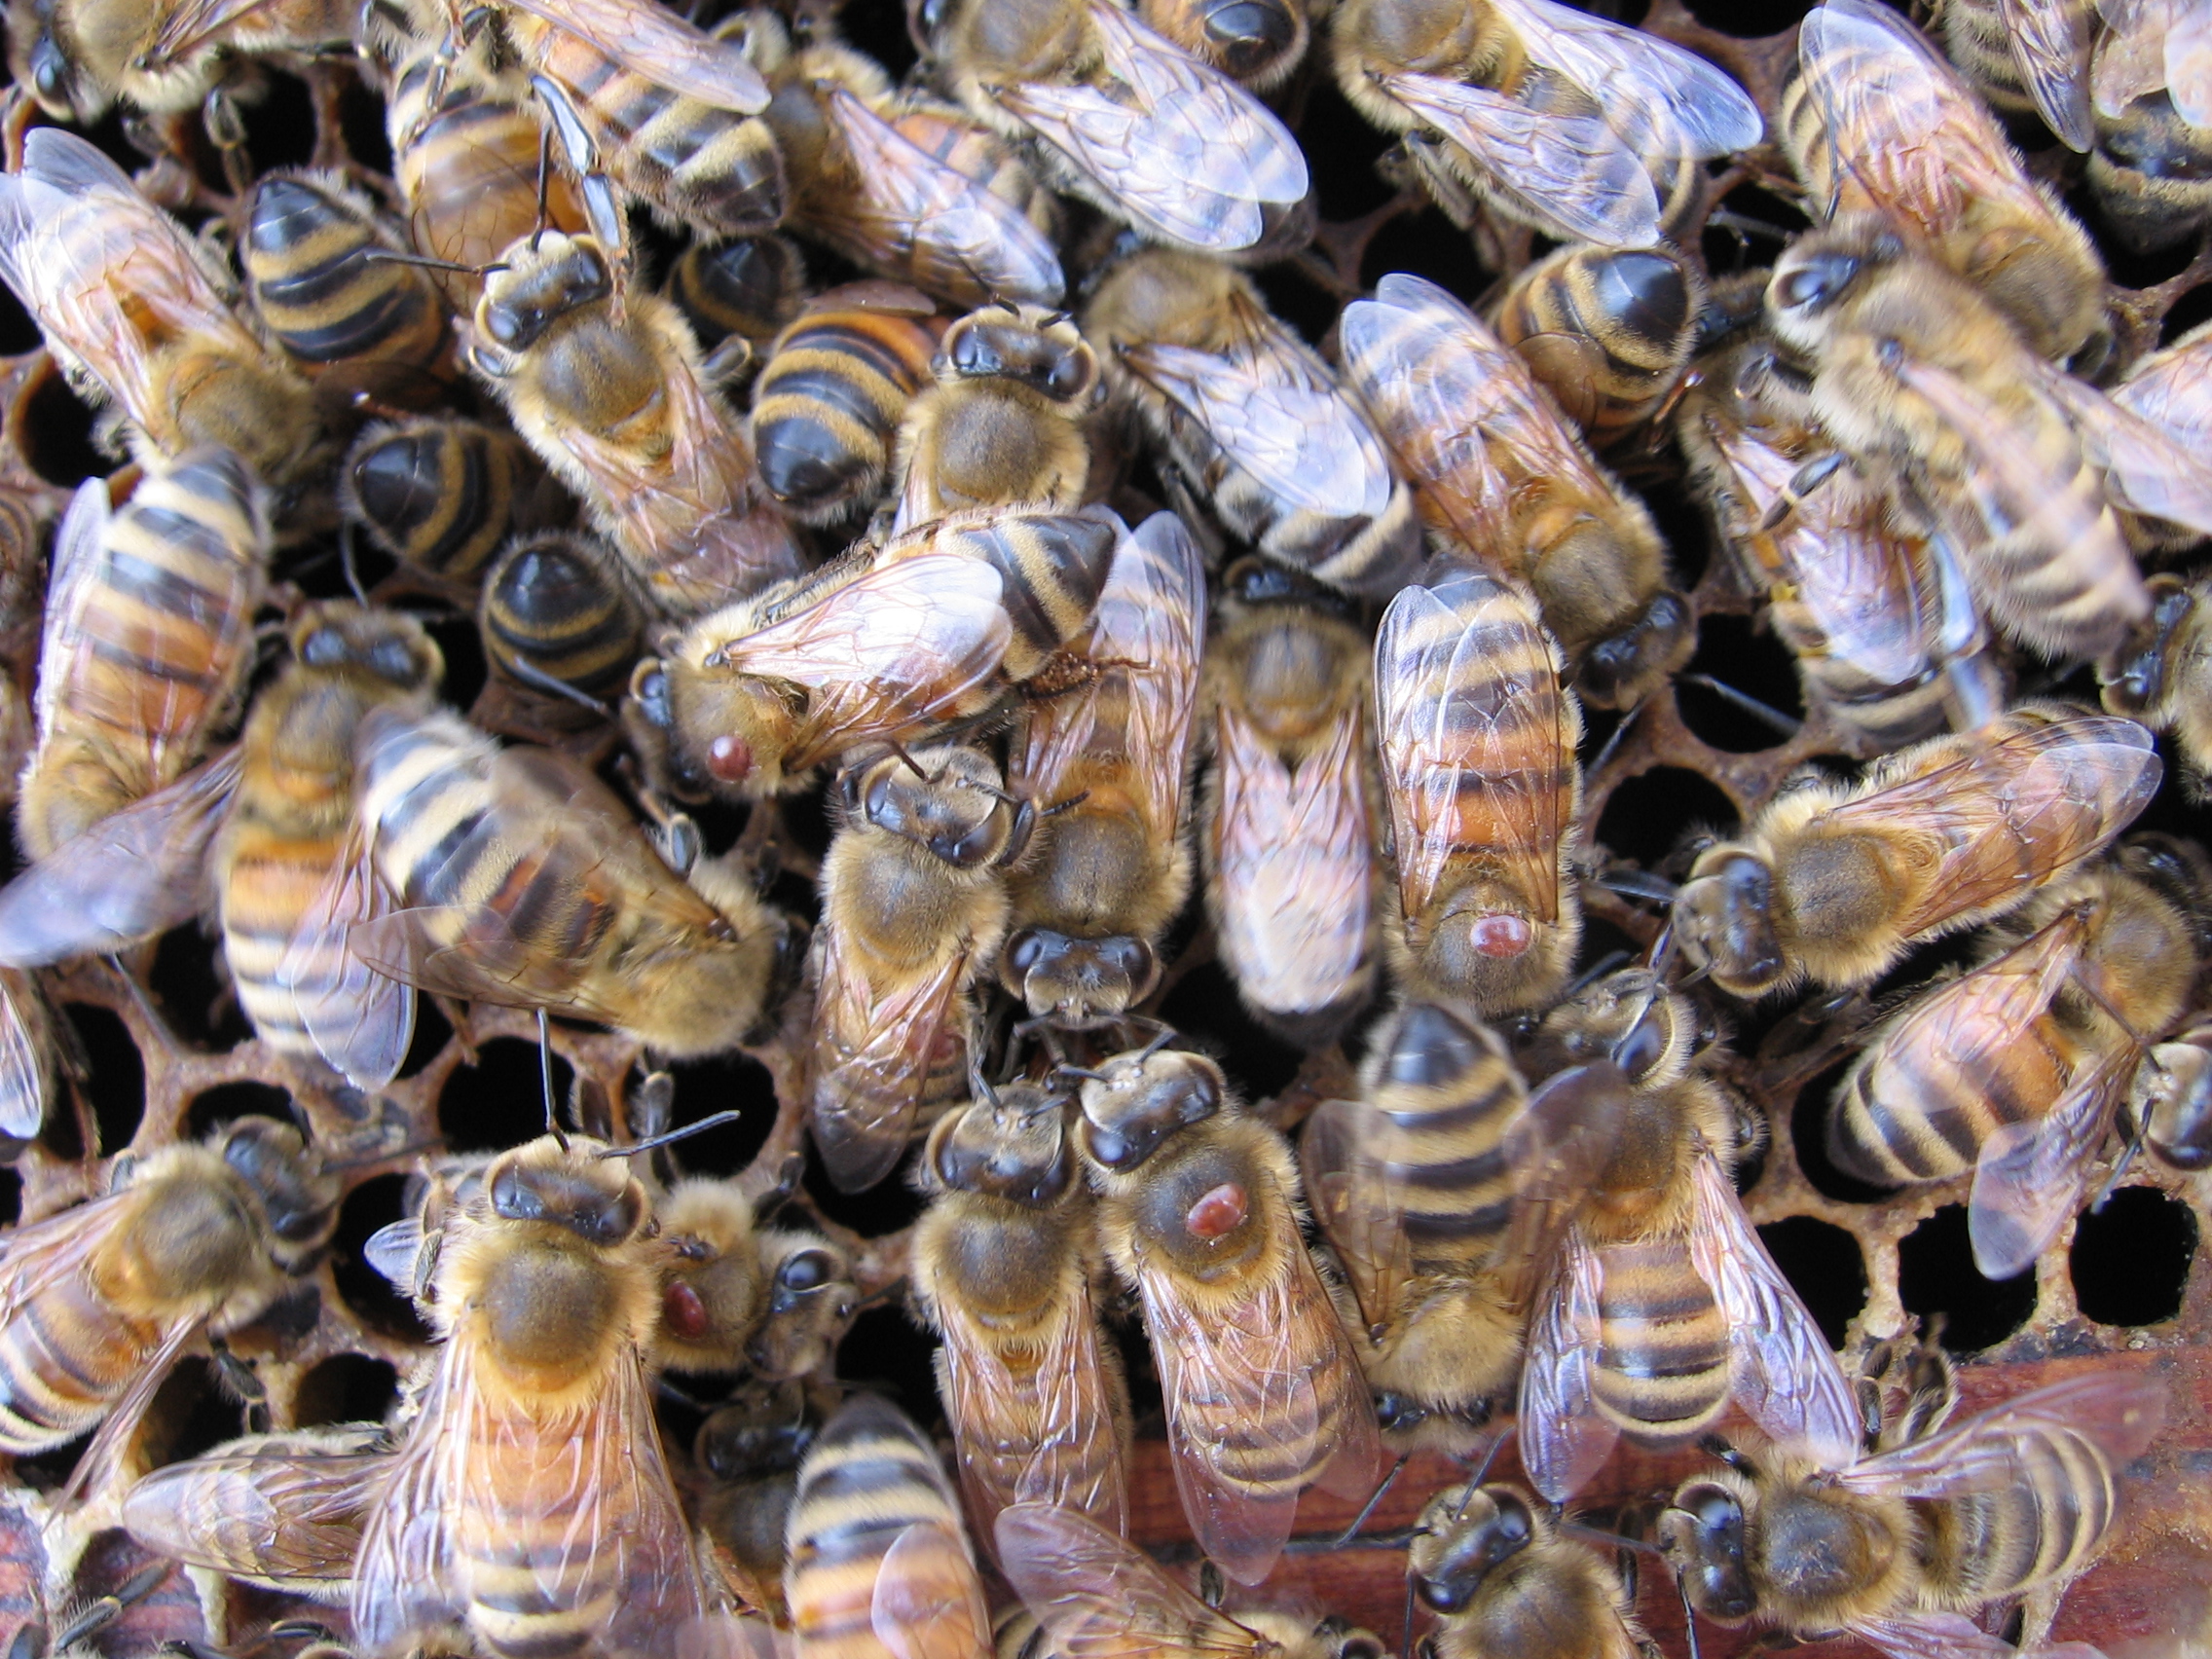
Varroa mites (Varroa destructor) are a pest commonly found in Ontario apiaries and pose a serious threat to honey bee health. These mites are dependent on honey bees specifically for survival (they cannot complete their life cycle on other species of bees, such as the bumble bee) as they cannot survive separately from the bees for more than a few days. Varroa mites are relatively large, external parasites (Figure 1) that attach themselves to adult and developing honey bees to feed on their body fluids and fat bodies.
Due to their parasitic nature, varroa mites can weaken, cause physical damage and transmit a variety of pathogens to bees, particularly viruses. It is crucial that beekeepers manage and suppress the population of varroa mites in all of their honey bee colonies throughout the beekeeping season. In almost all cases, when varroa mite infestations are not effectively managed, they will eventually result in the death of the entire honey bee colony.
Identification
Varroa mites are arachnids, a large class of animals that include spiders, ticks and other mites. They are also ectoparasites as they feed on the outside of their host (honey bee). Adult female varroa mites can be seen with the naked eye, so identifying them is not difficult when you know what to look for. The most encountered life stage of varroa is the mature female mite.
Adult female varroa mites are:
- relatively large parasites compared to their host (Figure 2). They are approximately 1 to 1.5 mm long by 1 to 1.9 mm wide (honey bees are about 2 to 3.9 mm long). This is comparable to having a tick the size of a small plate feeding on the human body!
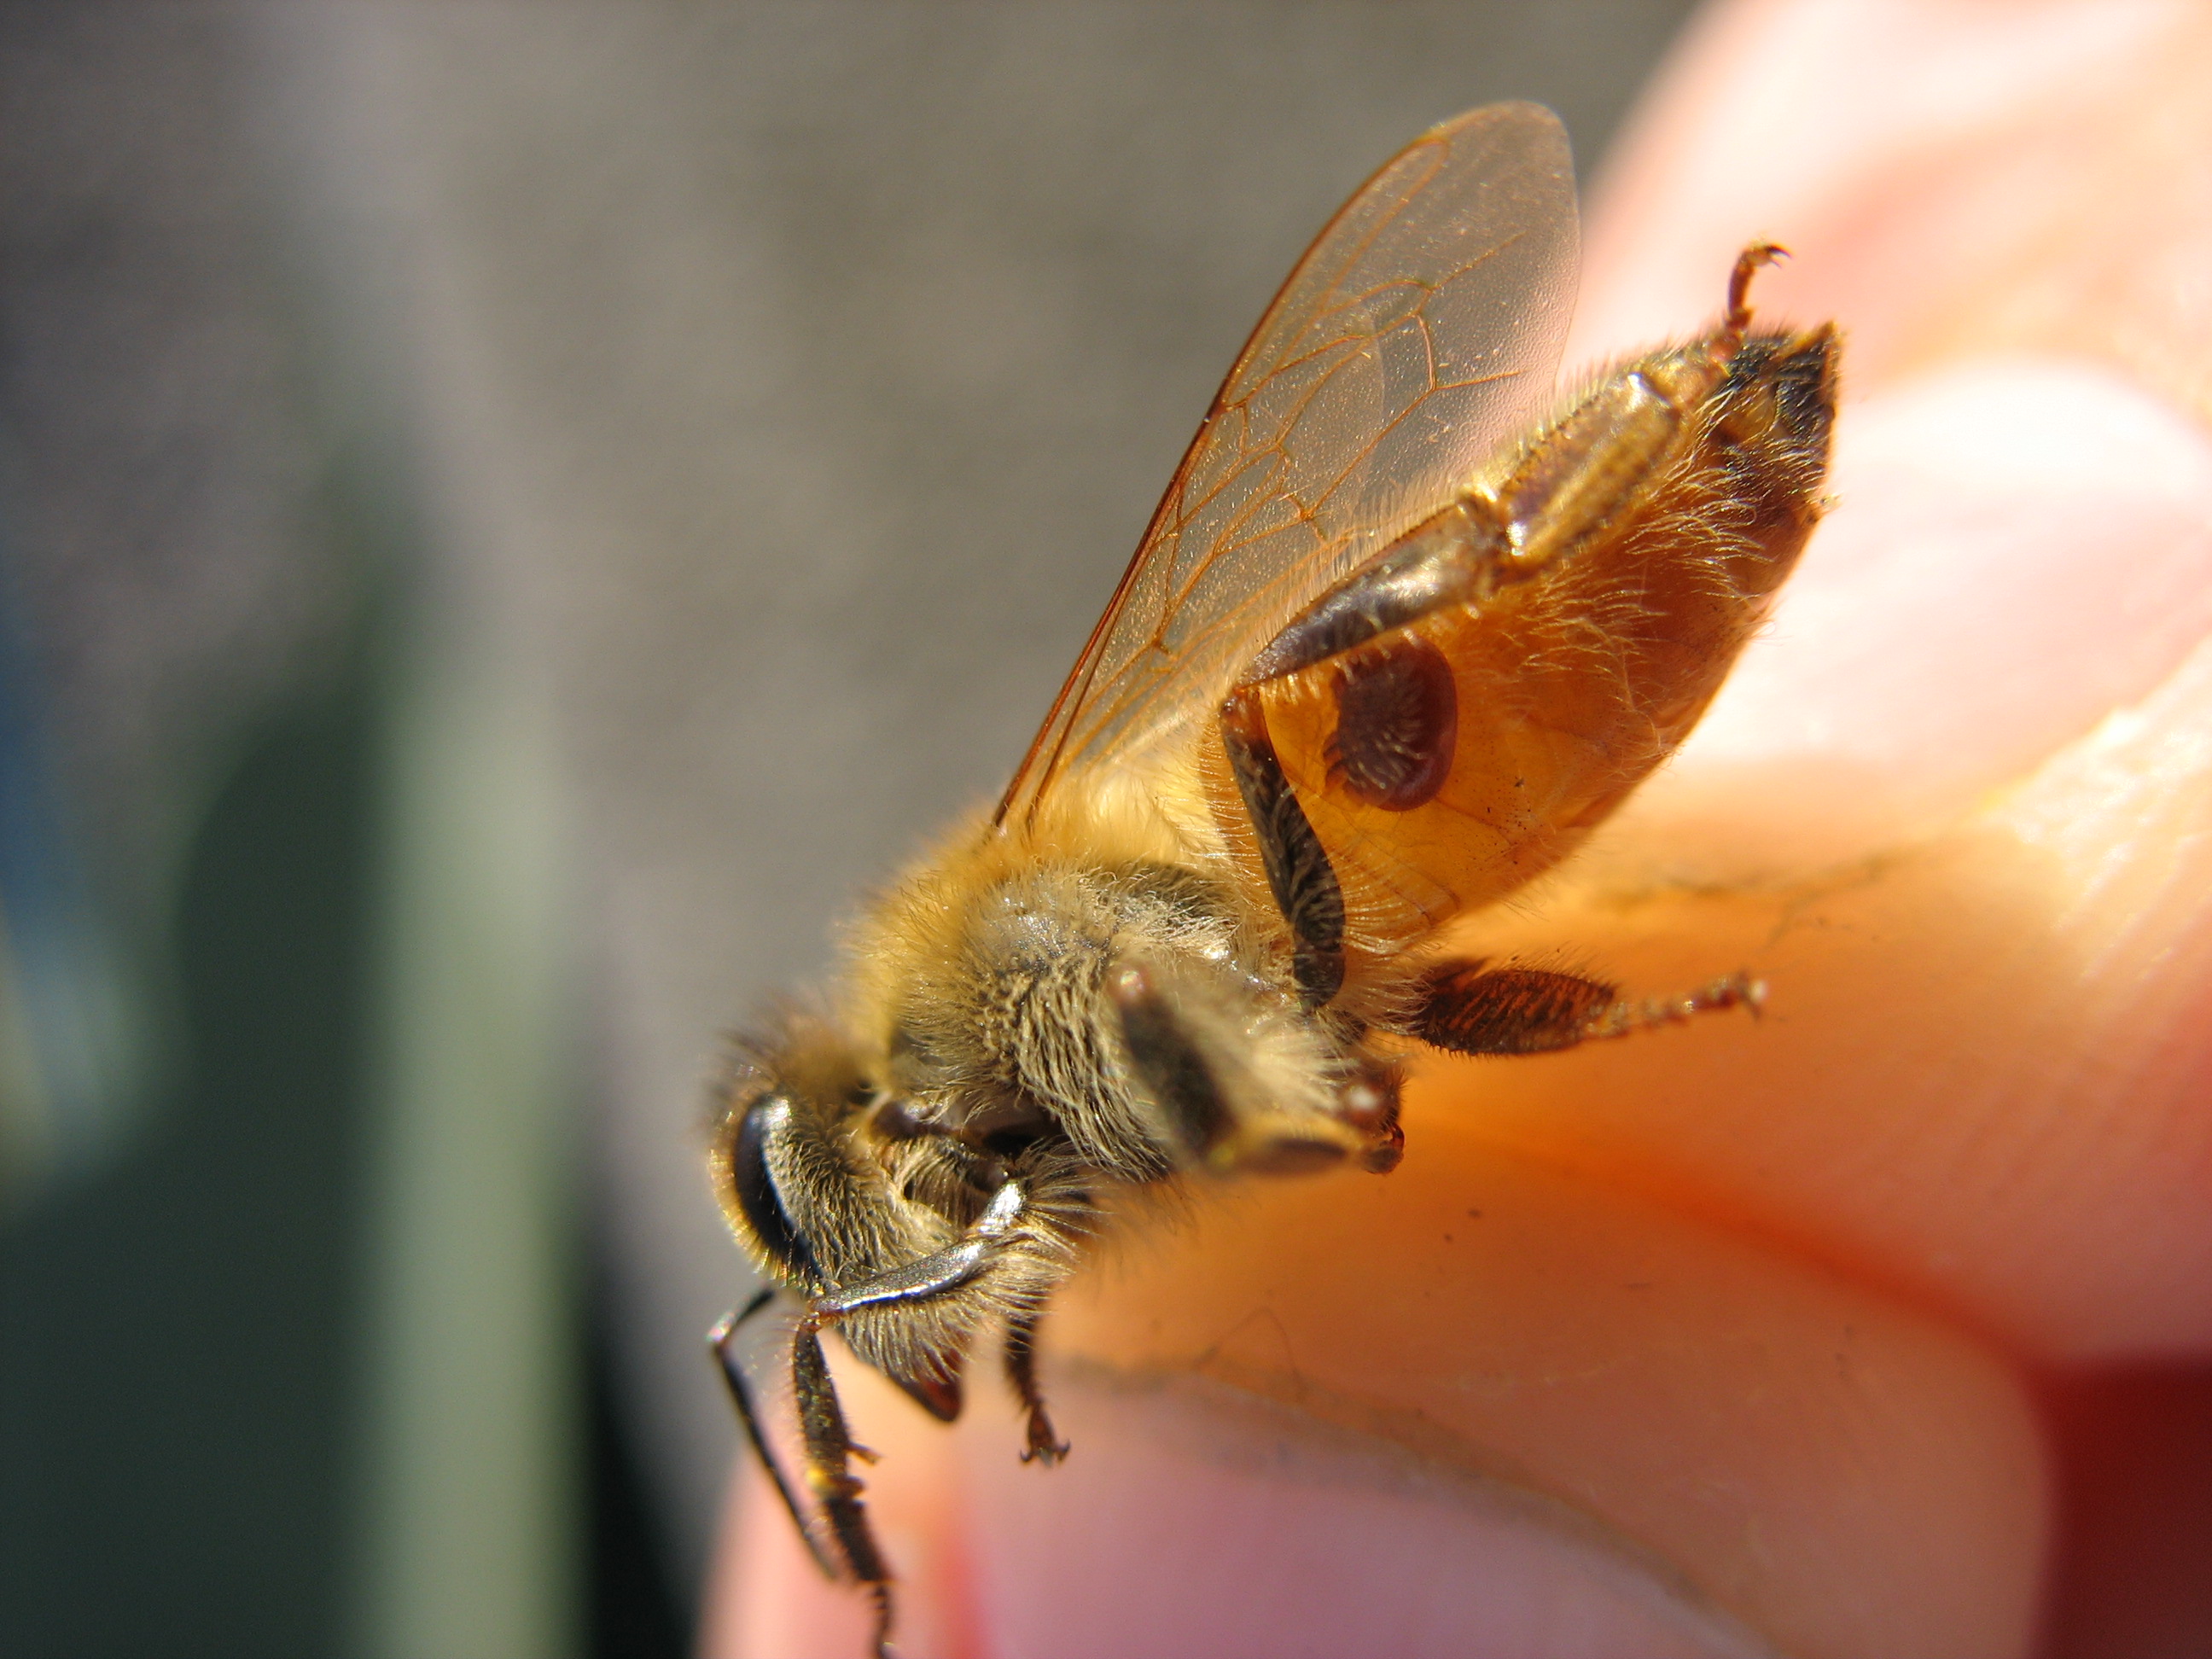
- dark red, oval-shaped, with fine hairs covering their body, have well-developed chelicerae (jaws), and eight legs located at the front of the body (Figure 3). The jaws are used to puncture and attach themselves to the body of their honey bee host between segments of their exoskeleton, usually between the lower abdominal plates.
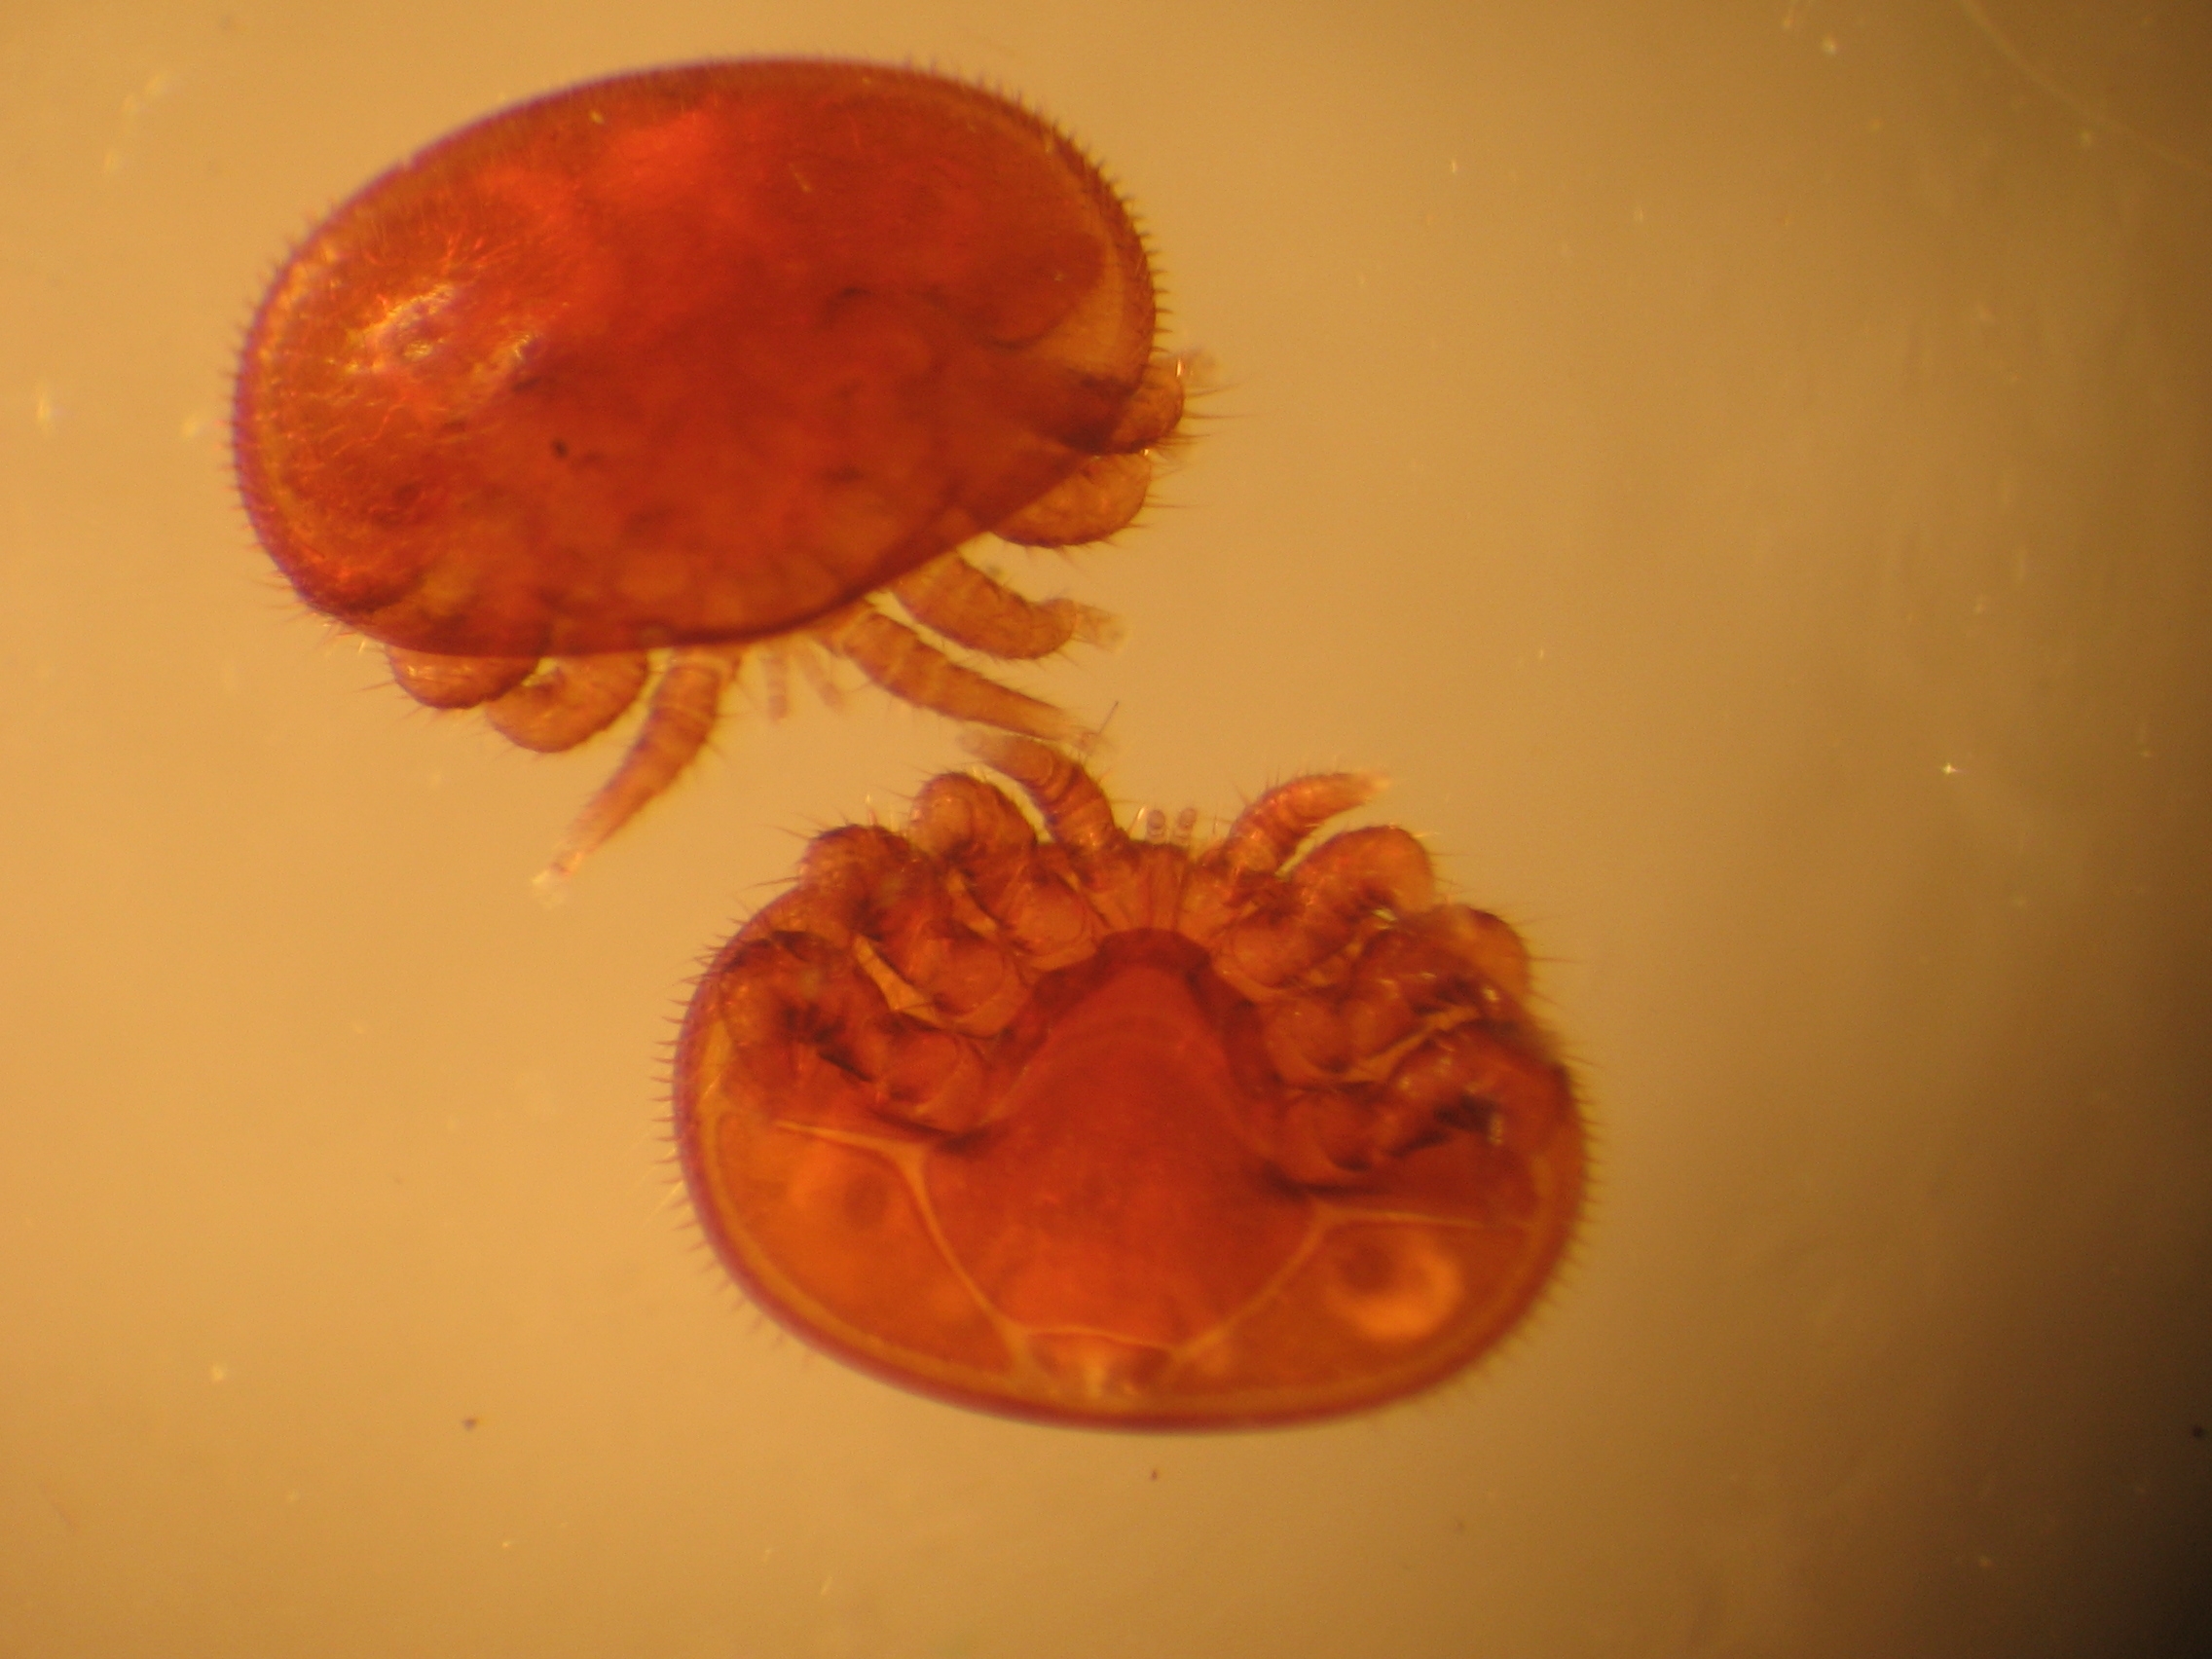
- eyeless, but detect honey bees by smell and movement
- fast moving and can easily move from the body of one honey bee to another
- typically concentrated in the brood nest of the honey bee colony and present in the brood cells (particularly drone brood, which they have a greater attraction to). In severe infestations, varroa mites may also be observed on the surface of worker bees.
Life cycle and prevalence
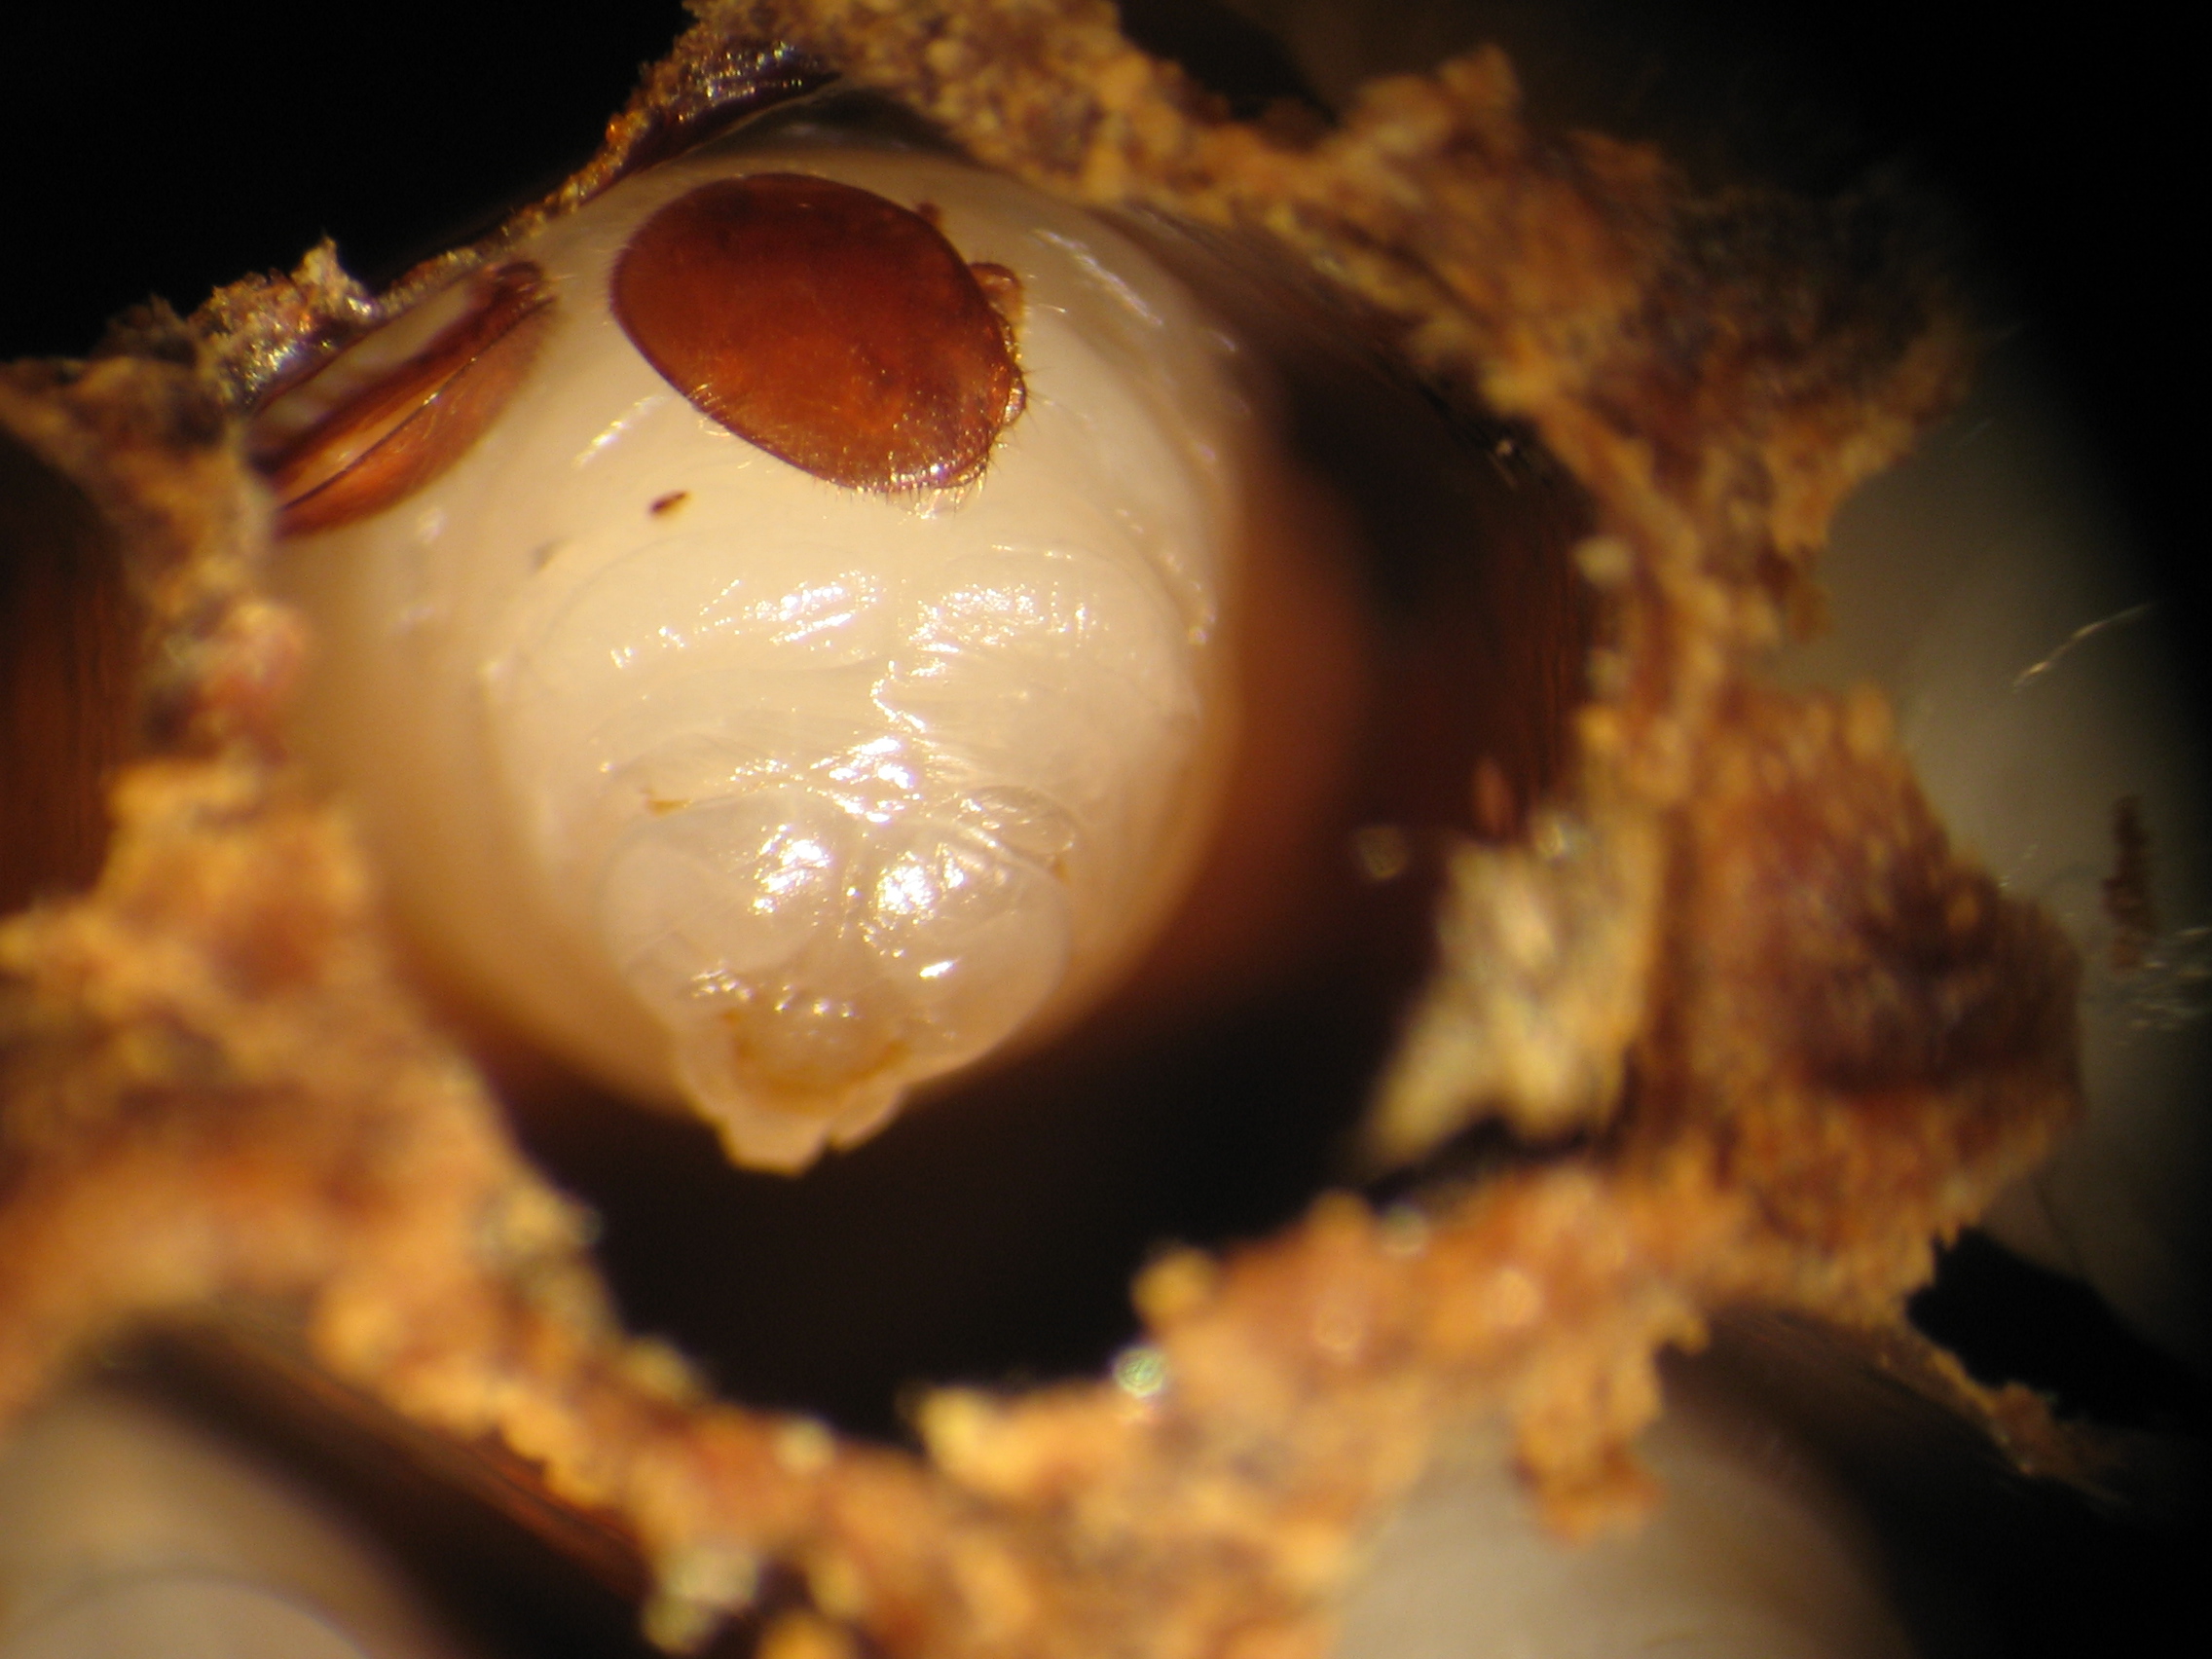
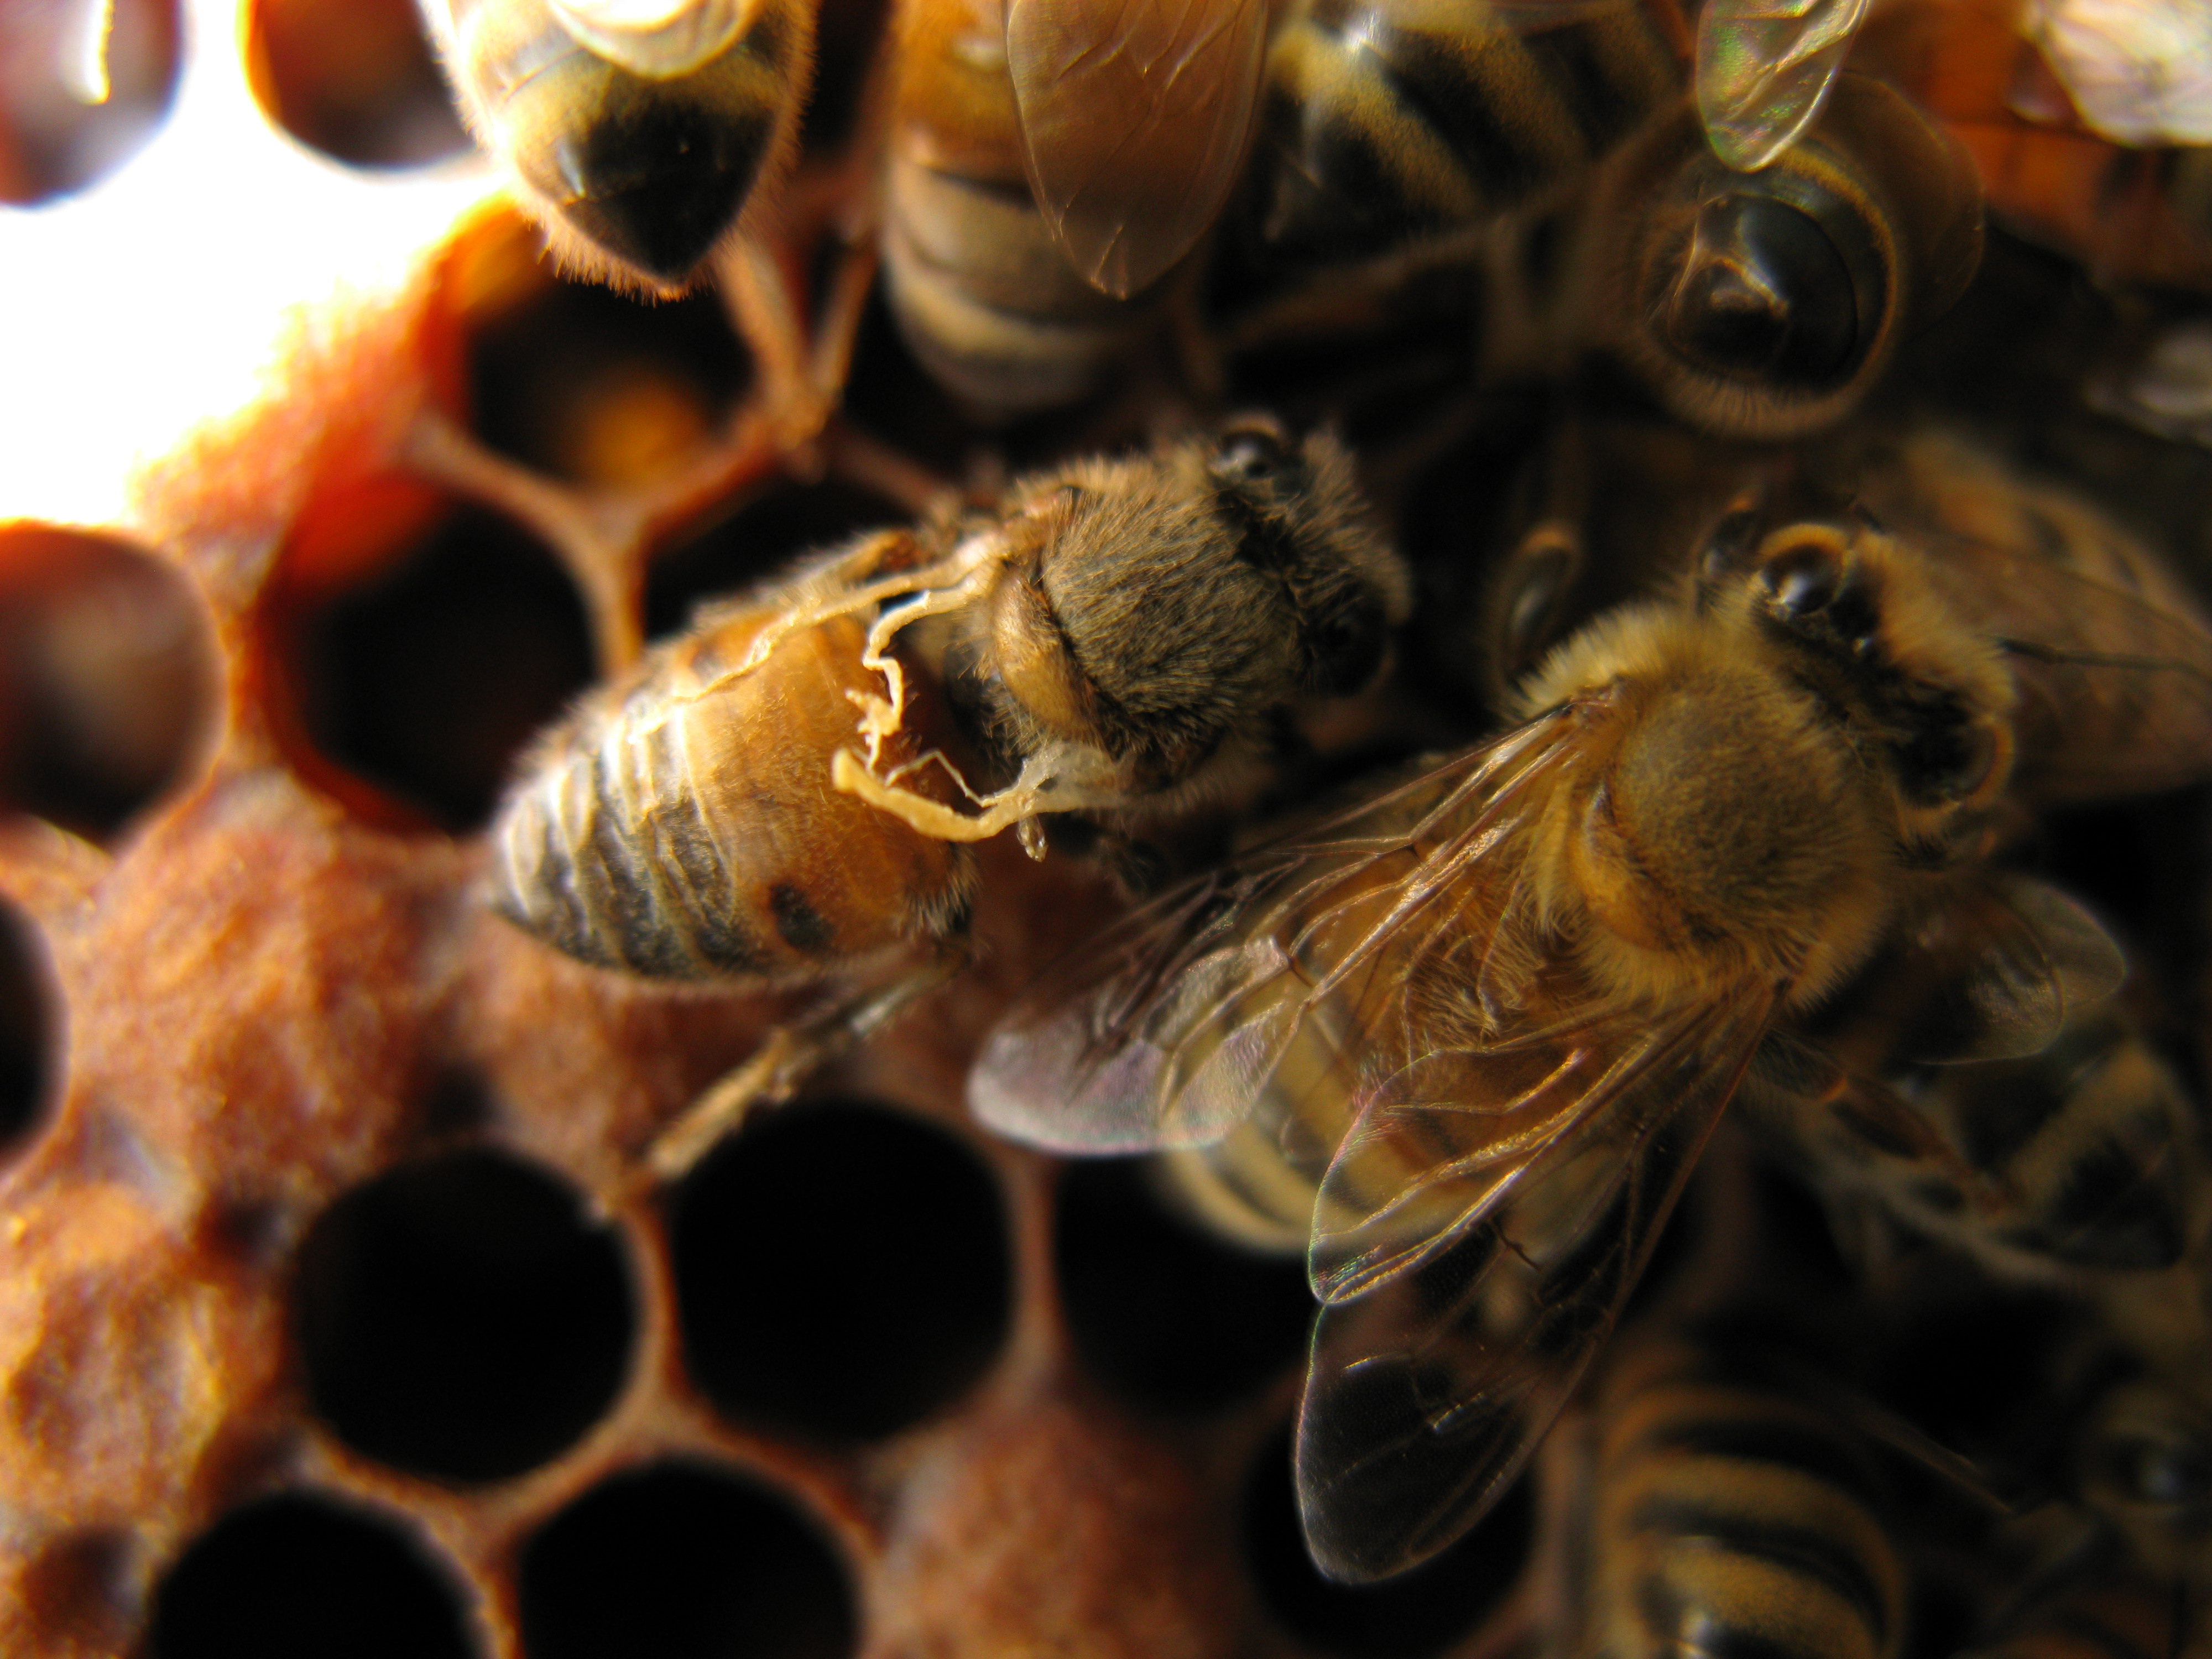
The life cycle of varroa mites is linked to and dependent on the life cycle of honey bees as varroa mites cannot reproduce independent of the developing honey bees. The life cycle of varroa mites begins with eggs being laid by the female mite. She enters a honey bee brood cell just prior it to being capped and after the cell is capped, lays eggs. The number of varroa mite offspring generated in a brood cell depends on the time the cell remains capped. Each female varroa mite produces, on average, two to three offspring in drone brood (which is capped for a total of 14 to 15 days) and one to two offspring in worker bee brood (which is capped for 12 days).
When the varroa mite eggs hatch, the offspring feed on the developing bee brood (Figure 4) and mate with each other. When the new adult bee emerges from the brood cell, the parent mite and its offspring are released from the cell into the colony to continue the cycle. The parasitized honey bee will emerge from the brood cell weakened with a shortened lifespan.
The pattern of varroa mite population growth follows the growth of the honey bee colony and the production of brood. If left unmanaged, the varroa mite population in a honey bee colony will increase starting in the spring and reach extremely high levels towards the end of summer when the winter population of bees are developing. After the honey bee colony stops rearing brood in late fall, all the varroa mites remaining in the colony become concentrated on the bodies of the adult bees (Figure 5).
As the varroa mite levels increase in the colony, more and more individual bees in the colony will be damaged and suffer a reduced lifespan. While an unmanaged varroa mite infestation can result in the death of an entire colony, a dead colony is not conclusively a sign of varroa mite infestation. Beekeepers may be able to open old brood cells to look for varroa mites and conduct an alcohol wash of dead bees on the bottom board to determine if the colony had high levels of varroa mites leading into the winter as well as re-examine their varroa management from the previous season (such as treatment, monitoring and timing).
Signs of the pest
In general, it is important for beekeepers to familiarize themselves with healthy honey bee colony conditions and types of honey bee pests to be able to maintain viable healthy colonies. The are some signs that may indicate a serious varroa mite infestation in a colony. However, it is crucial to detect varroa mite levels through regular monitoring and manage them before they reach damaging levels.
Visible mites
Varroa mites are relatively large, dark-red and oval-shaped parasites that can be seen with the naked eye. They are typically concentrated in the brood nest of the honey bee colony, but can be found on the bodies of worker bees in severe infestations. If you can easily see numerous varroa mites on your bees, then the infestation is very serious.
Deformed wing virus (DWV)
This virus, along with several other viruses, is transmitted to honey bees by varroa mites. DWV affects the developing honey bee larvae, resulting in deformed, non-functional wings, abnormal abdomens and damaged appendages and ultimately affects the bees ability to fly (Figure 6). Honey bees, however, may also appear normal looking. High levels of DWV within a colony often results in the mortality of the honey bee colony as a large proportion of the bees have reduced lifespans and are unable to fly and forage resulting in a weakened colony.
Perforated capping of the brood cell
Perforations of brood cell cappings may occur when brood is damaged from high levels of varroa mites or high levels of viruses (typically referred to as parasitic mite syndrome or PMS) as this causes some of the bee brood to die and rot in the cell. This sign may often be confused with bacterial brood diseases (such as American or European foulbrood).
Distribution and spread
Varroa mites originated on a different bee species in a different part of the world before coming to North America and Ontario where they adapted as a parasite of the western honey bee. While varroa mites have been able to adapt to the western honey bee and spread globally to most continents, varroa mites are still a newly introduced pest in evolutionary terms.
Spread through honey bee or pest activity
Varroa mites are present in almost all Ontario honey bee colonies and at levels of infestation that are constantly increasing unless treated. If you have honey bees, you will likely have varroa mites. Any swarms present in Ontario will also likely be infested with varroa mites.
Colonies with high levels of varroa mite infestation are at higher risk of being in a weakened state and as such may have their honey stores robbed by foraging bees from stronger, healthier colonies within the yard or even from surrounding bee yards. When this occurs, varroa mites can transfer onto the robbing honey bees and this process can spread or increase varroa mite levels between different beekeeping operations.
Spread through beekeeper activity
Packages
Honey bee packages are a potential source of varroa mites. Although packages require a federal and/or provincial import permit, varroa mites may be present, but are required to be below certain thresholds at the time of inspection for the permit.
Purchasing infested honey bee colonies
Selling and purchasing honey bees is a common practice in the beekeeping industry. This practice does risk transferring varroa mites into an operation. It is important that selling beekeepers inspect their colonies to detect pest/disease. It is equally important that purchasing beekeepers purchase from permitted sources. Selling beekeepers must have a valid permit issued by the Ontario Ministry of Agriculture, Food and Rural Affairs’ (OMAFRA) Apiary Program prior to any sales of bees or used equipment taking place. Permits are issued by the ministry’s Apiary Program only after the inspection requirements, including varroa mite levels, are met which helps protect the health of honey bees, particularly from pests and diseases.
Swarms
Swarms always pose a risk of transferring pests and diseases since there is no way to be certain of the swarm's origin. There is an opportunity to take management steps to minimize the risk of varroa mites by sampling and applying treatments.
Exchanging equipment between colonies
Moving frames of brood between different colonies in a bee yard to equalize colonies or to boost weak colonies is a common beekeeping practice. However, varroa mites may be spread from a colony with a higher level of infestation to a colony with a lower level of infestation. This may be of particular risk between bee yards. Beekeepers must be mindful of this practice's risk and should be vigilant for any signs of the pest.
How and when to manage varroa mites
It is important for beekeepers to know the level of varroa mite infestation in a honey bee colony before it becomes too high. Thus, beekeepers must continuously monitor levels of infestation in their honey bee colonies and treat them at regular intervals to ensure levels of infestation are kept below damaging levels.
Sampling and monitoring
It can be difficult to determine how many colonies to sample within an operation. Ideally, beekeepers should sample all their colonies in all yards. However, not all beekeepers have the time or resources to do this. At minimum, it is recommended that each beekeeper samples a proportion (a minimum of three colonies or 20% of the colonies, whichever is greater) of the colonies from each of their bee yards. Individual bee yards and honey bee colonies will have variation in their varroa mite infestation levels.
When to sample
At a minimum, beekeepers should sample for varroa mites three times a year, in early spring, in mid summer (July) and in late summer (August). This will provide an estimate of the varroa mite population immediately before a treatment period (May and August). Beekeepers should consider taking samples after a treatment is applied to determine if the treatment was effective at lowering the population of varroa mites in the colony. Beekeepers should also consider taking a sample as often as once a month, with even more frequent samples in the summer to fall and particularly if colonies appear weak and/or stressed.
Timing of treatments
Applying effective varroa mite treatments and controls at proper times of the year is crucial to suppressing the population of varroa mites and managing the severity of varroa mite infestations in honey bee colonies. Without this type of management, a honey bee colony is unlikely to survive in the long term.
Based on research conducted in Ontario
| Monitoring method | Treat in May if the number of varroa mites is: | Treat in August if the number of varroa mites is: |
|---|---|---|
| Alcohol wash | >2 mites/100 bees | >3 mites/100 bees |
| Sticky board | >9 mites/24-hour drop | >12 mites/24-hour drop |
Beekeepers must take particular care not to delay late summer or early fall (September) treatments for varroa mites as the bees that will make up the winter population are being produced during this time and must be healthy going into the winter. Research has demonstrated that inadequate varroa mite control is the primary cause of winter mortality in honey bee colonies in Ontario
It should be noted that even though a beekeeper may have administered a treatment, colonies can become re-infested from outside sources of mites (surrounding colonies) or because the treatment did not completely eradicate the mites from the colony. It is also important for beekeepers to regularly (ideally once a month) sample and monitor for varroa mites to know the level of varroa mite infestation in a honey bee colony before it becomes too high.
Consult the Ontario Treatment Recommendations for Honey Bee Disease and Mite Control for more detail on the recommended monitoring methods, treatment methods and timing of treatments for varroa mites.
Recommended monitoring methods
Monitoring varroa mite infestation throughout a season is essential for beekeepers to confirm the level of infestation in honey bee colonies at key times in the season, to determine if and when treatments are needed to reduce varroa mite levels, what type of treatment may be required, and to determine if mite control methods were successful.
The two recommended methods to monitor for varroa mites are:
- alcohol wash
- sticky boards
Varroa mite monitoring methods that are not recommended include:
- visually checking colonies for varroa mites
- sugar shake method
Alcohol wash monitoring method
The materials required for the alcohol wash monitoring method are:
- a sample container
- mite shaker device (or sealable container)
- 70% alcohol solution
- a ⅛ inch hardware cloth or wire mesh screen
- a collection pan
- water for rinsing
- a notebook and pen
Alcohol wash method steps to monitor for varroa mites in honey bee colonies:
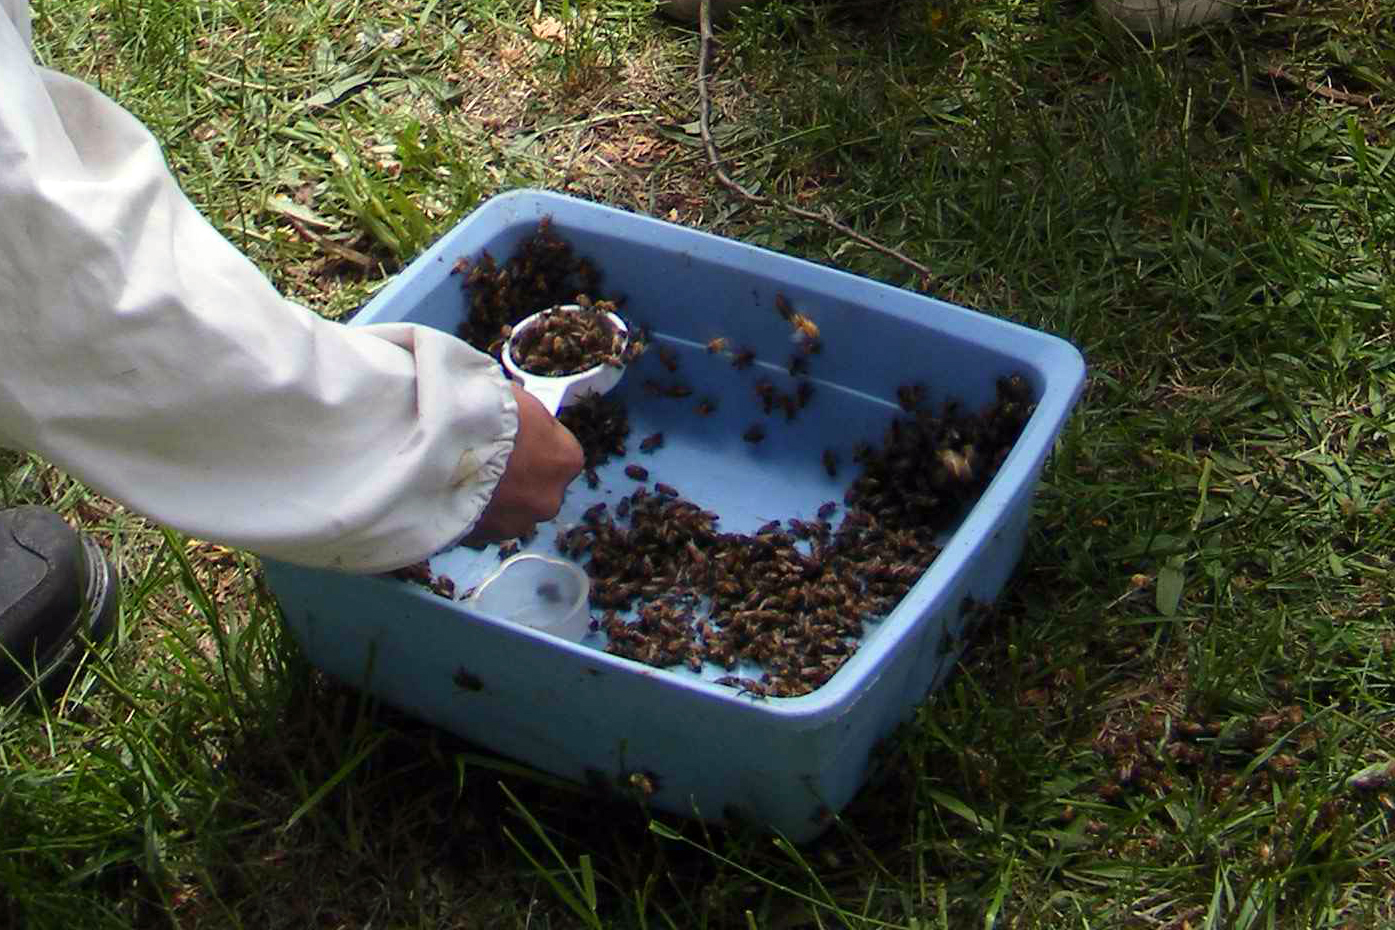
- Collect half a cup of live worker bees (approximately 300 bees) from the brood chamber of the colony and place the bees inside a mite shaker device.
To collect a sample of live bees:- Obtain the sample of bees from the brood chamber as this is where the highest number of varroa mites will be present.
- Since the bees in the sample will be killed, beekeepers must be particularly careful not to include the colony's queen in the sample. Beekeepers may choose to locate and cage the queen prior to collecting the sample.
- For a representative sample of the colony, collect bees from at least three different frames in the brood chamber. There are two ways to do this:
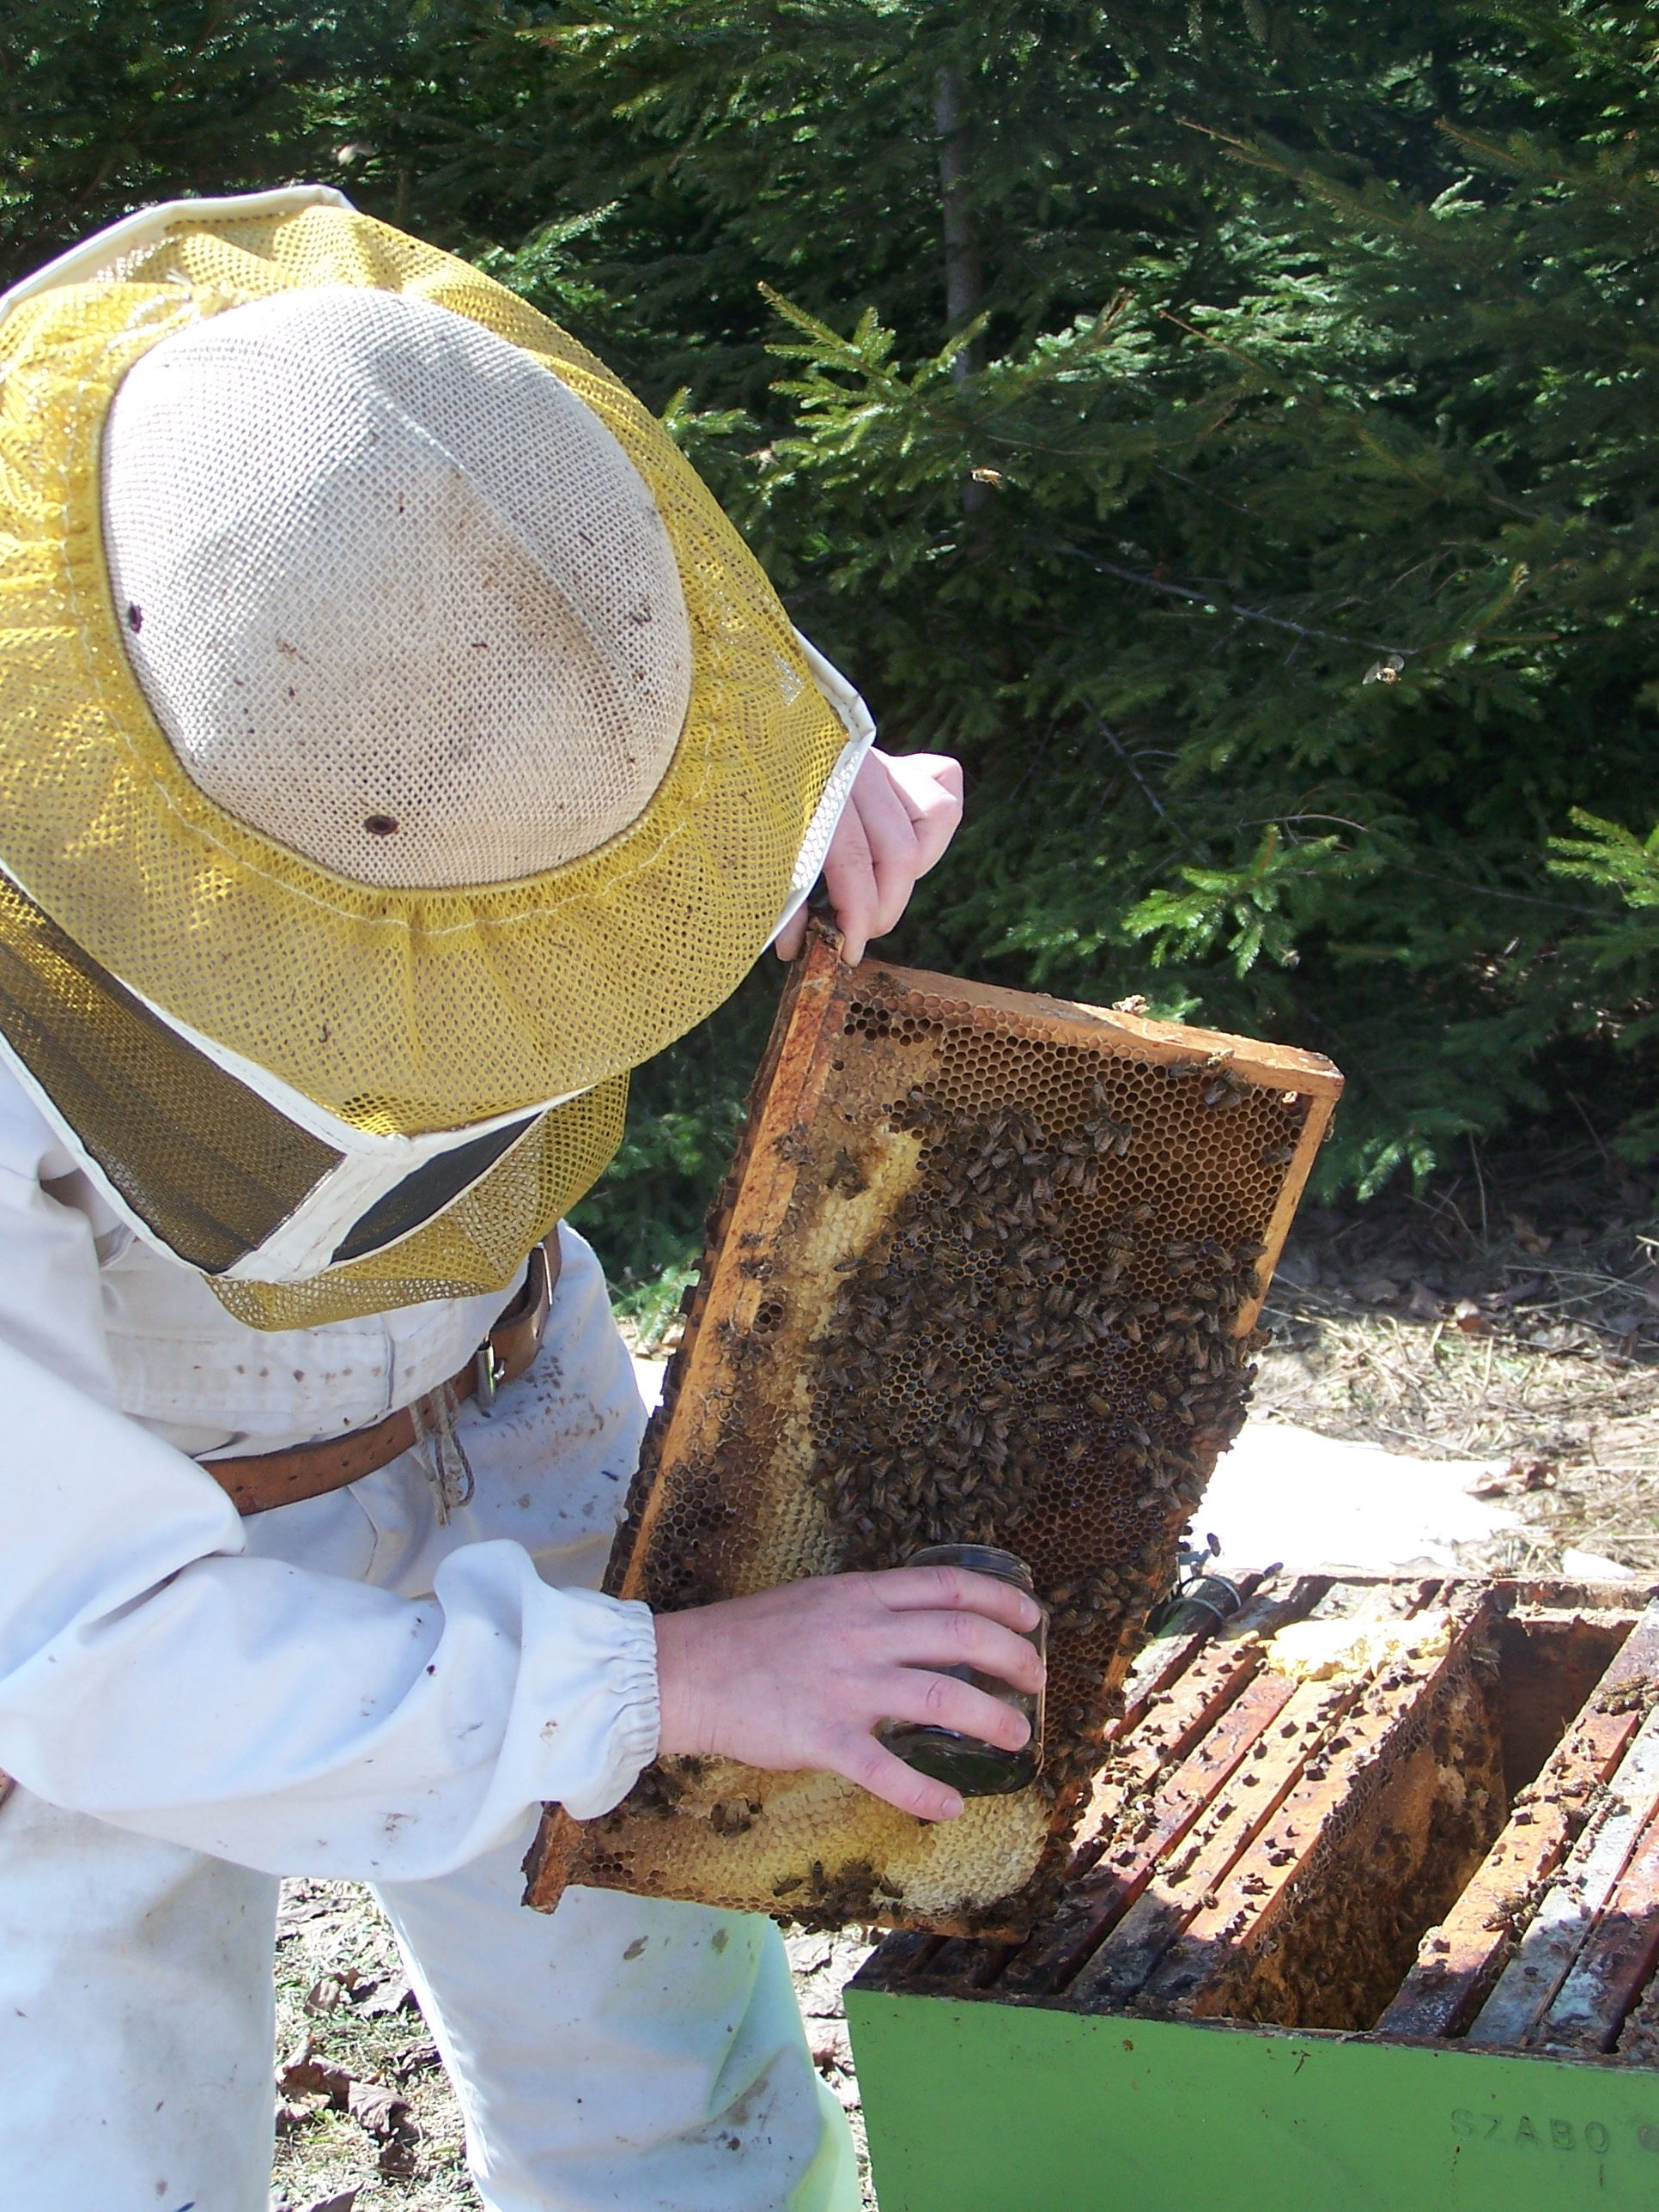
- Beekeepers may shake the bees directly off the frame and into a pan where the bees can then be scooped into a container (Figure 7).
- Beekeepers may collect bees directly from the frame by gently running the sample container over the surface of the frame with the frame tilted downwards at a 30° angle so that the bees fall into the container (Figure 8).
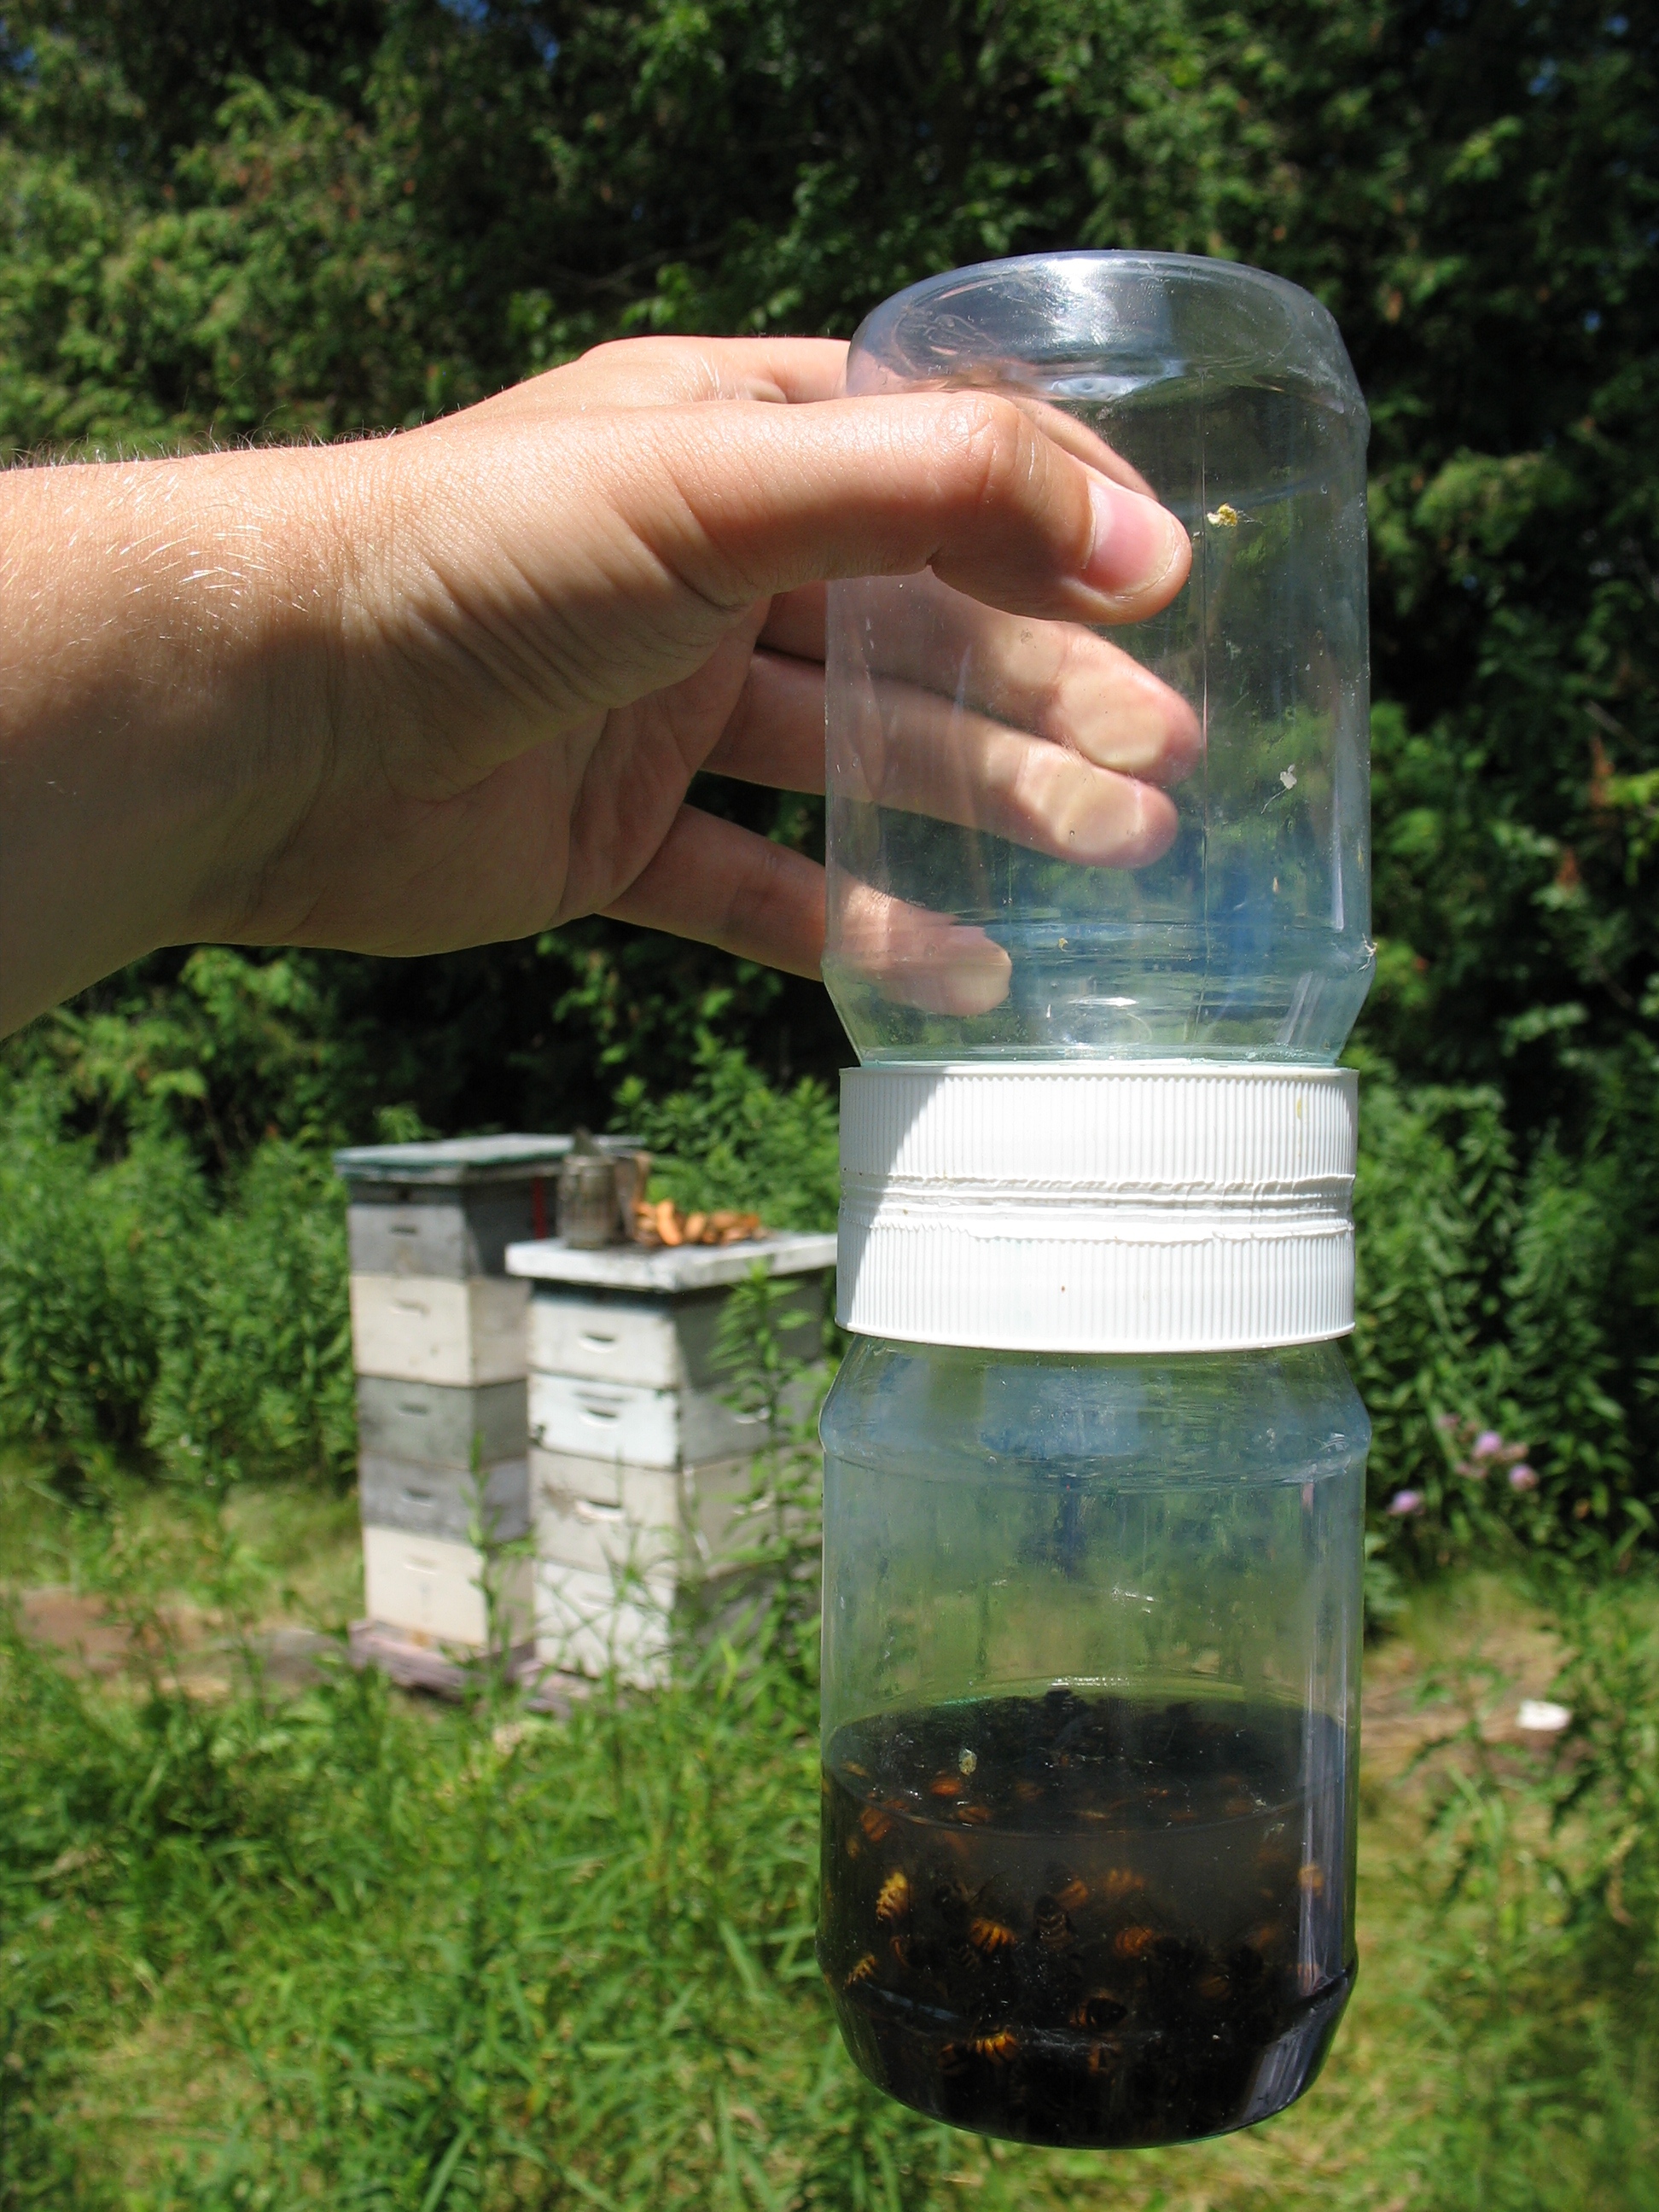
- Add a 70% alcohol solution to the shaker, ensuring that the alcohol completely covers the honey bees in the shaker to a level of approximately two centimeters above the surface of the bees (Figure 9).
- Vigorously shake the sample in the shaker for two minutes to dislodge varroa mites from the bodies of the worker bees.
- To count the varroa mites, pour the mixture of dead bees, mites and alcohol onto a ⅛-inch hardware cloth or mesh wire screen over a collection pan to filter out the honey bees from the dislodged varroa mites. The collection pan should be light coloured or clear so that the varroa mites can be easily seen. Alternatively, the shaker device can be inverted so that the liquid pours in the bottom end, leaving the mites at the other end to be counted.
- Count the number of varroa mites in the collection pan or shaker. Divide the total count by 300 and then multiply by 100 to obtain the percentage of varroa mite infestation for the colony. For example, if you find 3 varroa mites in a sample of 300 bees then (3 ÷ 300) x 100 = 1% infestation.
- Record the result and dispose of the dead bees and rinse the container with water to remove any mites between samples. It is important to record the results of monitoring so that you can track the level of varroa mite infestation within each of your colonies. By comparing varroa mite monitoring results, taken before and after a varroa treatment or intervention is applied, a beekeeper can determine the effectiveness of the treatment or intervention.
Sticky board monitoring method
The materials required for the sticky board monitoring method are:
- heavy paper
- sticky material
- ⅛-inch hardware cloth or wire mesh
- a magnifying glass
- a notebook and pen
Sticky board method steps to monitor for varroa mites in honey bee colonies:
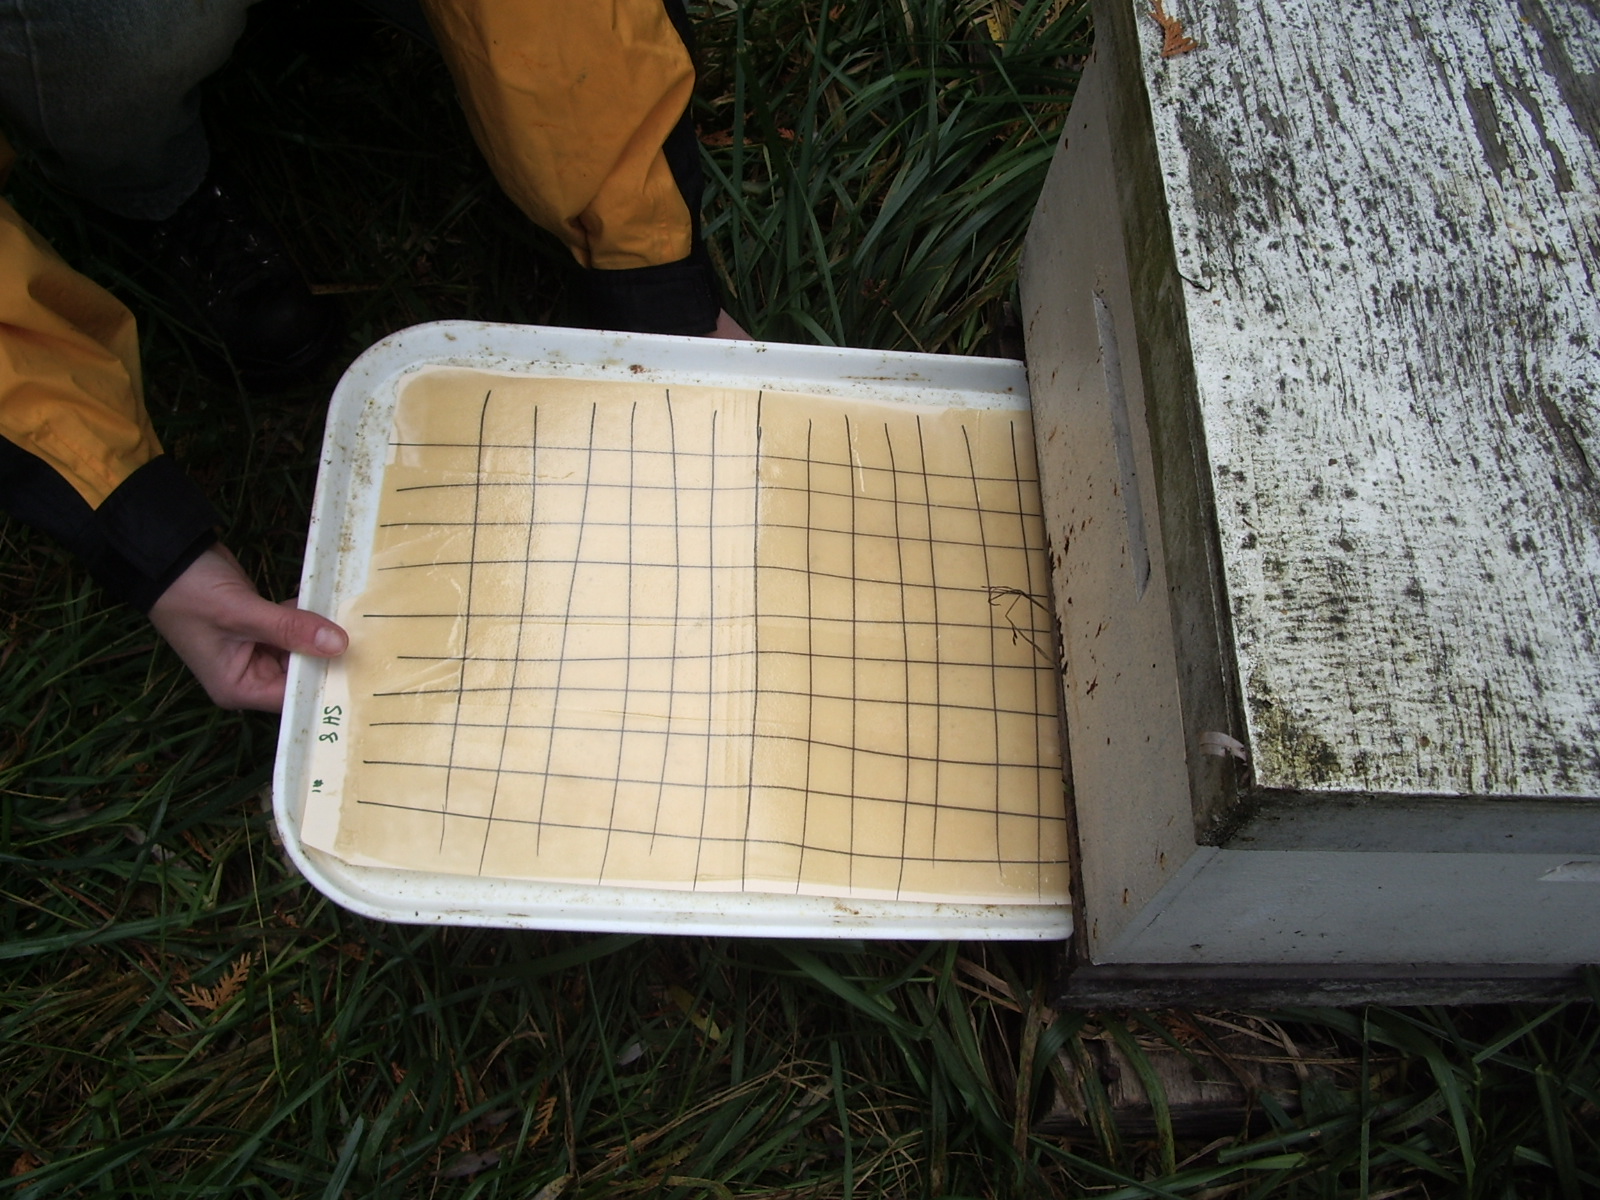
- Start by creating the sticky board.
- Mark a piece of heavy paper (40 cm tall by 30 cm wide) with a grid to facilitate the counting process. A letter-sized folder makes an excellent sticky board. Open and flatten the folder, cut approximately five centimeters off one end and identify the colony on the folder’s tab at the other end.
- Evenly coat the paper with a sticky material. Tangle-Trap Insect Trap Coating (paste formula), a combination of Crisco and vegetable oil, or petroleum jelly can all be used to coat the paper and make it sticky.
- Insert the sticky board directly beneath the frames of the brood chamber, ideally under a screened bottom board (Figure 10). If there is no screened bottom board, place hardware cloth or wire mesh screen directly over the sticky board.
- Leave the sticky board beneath the brood chamber for either 24, 48 or 72 hours. Note that a more reliable estimate of colony mite levels is gained the longer the sticky board is left in place.
- Remove the sticky board and count the number of mites that are on the sticky board using a magnifying glass if needed. Divide the mite count by the number of days that the sticky board was left in the brood chamber to get the mite drop count per 24-hour period, which is the typical unit of measure when referring to sticky board monitoring results. For example, a sticky board left in a colony for 72 hours (3 days) results in a mite drop count of 36 mites. The mite count per 24 hours for the colony is 36 mites ÷ 3 days = 12 mites per 24 hours.
- Record the results and use a new sticky board for monitoring different colonies.
| Varroa mite monitoring method | Advantages | Disadvantages |
|---|---|---|
| Alcohol wash |
|
|
| Sticky board |
|
|
Footnotes
- footnote[1] Back to paragraph Guzman-Novoa E., Eccles L., Calvete Y., McGowan J., Kelly P. and Correa-Benitez A. 2010. Varroa destructor is the main culprit for death and reduced populations of overwintered honey bees in Ontario, Canada. Apidologie. 4 (4) 443-451.