8. Well Disinfection
Chapter Description
This chapter covers the importance of disinfecting pumping equipment and wells during initial construction, alterations and maintenance activities. It details the process required to comply with the Wells Regulation. Information on proper sampling and testing of water, safety issues and hazards is also provided.
This chapter does not cover ongoing well maintenance for existing wells. For information on maintenance, see Chapter 13: Maintenance & Repair.
Regulatory requirements - disinfection
Relevant sections - The Wells Regulation
Disinfection - section 15
The requirements - plainly stated
The Wells Regulation requires the following for Well Disinfection:
After new well construction is complete
Unless exempt, on the day the well’s structural stage is complete, the person constructing the well shall:
- remove all debris from the well, and
- ensure:
- the water in the well is dosed to a concentration between 50 mg/L and 200 mg/L of free chlorine and is left undisturbed for at least 12 hours.
- the water in the well is not used for human consumption until the steps listed in the “Shock” Chlorination steps section of the Plainly Stated are followed.
If the water in the well is not to be used for human consumption, no further disinfection steps are required.
If the water in the well is to be used for human consumption and unless exempt, the person constructing the well must follow the requirements in steps 1 to 4 listed in the “Shock” Chlorination steps section of the Plainly Stated.
Installing pumping equipment in a well or altering an existing Well:
Unless exempt, the person installing a pump or altering a well must follow tteps 1 to 4 in the “Shock” Chlorination steps section of the Plainly Stated.
Exemption - Disinfection
The person does not have to follow steps 1 to 4 in the “Shock” Chlorination steps section of the “Plainly Stated” in the following circumstances:
- The well is considered a “flowing well”, “test hole” or “dewatering well”.
- The person performs a “minor alteration” on an existing well.
- The Wells Regulation exempts the installation of equipment for certain sampling, testing or monitoring activities.
- The person constructing the well has written approval from the Director to use another method of disinfection and the approved method is complied with.
- The person has replaced a pump, including associated pumping equipment, that is installed above or adjacent to a well or in a well pit unless the replacement involves the removal of a well cover or well cap.
“Shock” Chlorination steps
The person constructing the well must ensure the following steps set out in the Wells Regulation are taken:
- The well water is dosed to a free chlorine concentration between 50 mg/L and 200 mg/L (initial dose) as soon as possible after construction or installation of pumping equipment and all debris has been removed from the well.
- The well water is tested for free chlorine residual at least 12 hours and not more than 24 hours after the water is chlorinated.
- If the test indicates the concentration of free chlorine residual in the well water is less than 50 mg/L or more than 200 mg/L, the person constructing the well must do the following steps, in the order shown below, as soon as reasonably possible:
- Pump the water out of the well until the concentration of free chlorine residual in the well water is less than 1 mg/L.
- Re-dose the well water to a concentration of not more than 200 mg/L of free chlorine.
- Test the well water for a free chlorine residual 12 to 24 hours later.
- If the test again indicates the concentration of free chlorine residual in the well water is less than 50 mg/L or more than 200 mg/L, these steps must be repeated. The Alternate Method section in the Plainly Stated discusses a possible alternative if the testing repeatedly shows a free chloring concentration that is too low.
- If the test indicates the concentration of free chlorine residual in the well water is between 50 mg/L and 200 mg/L, the person constructing the well must do the following:
- Pump the water out of the well until the concentration of free chlorine residual in the well water is less than 1 mg/L.
Reminder: All reasonable care should be taken to ensure that chlorinated well water is not pumped out in a quantity, concentration, or under conditions that may impair the quality of the surface water or groundwater, or that cause, or may cause, adverse effects to the natural environment. See the “Handling Heavily Chlorinated Water Discharge” section in this chapter for further information.
Use of Well during dosing and testing
In between the dosing and testing outlined in the “Shock” Chlorination Steps section of the Plainly Stated, no person must disturb the well or use the water for any purpose.
Written records of test results
The person who is responsible for ensuring that the water is tested for free chlorine residual must ensure the well purchaser is provided with a written record of the test results before the well is used as a source of water for human consumption.
Special circumstances
The “shock” chlorination process after the initial dosing (i.e., step 1 in the “Shock” Chlorination steps section of the Plainly Stated) does not apply to an alteration of a well if all of the following are satisfied:
- The alteration involves the urgent replacement or repair of a pump, including associated equipment, that unexpectedly failed.
- No water supply is immediately available as an alternative to the water from the well.
- The well purchaser provides written instructions to the person who undertakes the well alteration to discontinue the disinfection process after dosing the well to a concentration not less than 50 mg/L and not more than 200 mg/L free chlorine.
In these cases, the following is required:
- The well purchaser must ensure that, before the well water is used for any purpose, water is pumped from the well until no odour of chlorine is detected in the well water.
- The person who undertakes the alteration must retain the written instructions referred to above for two years.
Relevant standards
American Water Works Association (AWWA). 2003. ANSI/AWWA C654 -03 – “Disinfection of Wells.” AWWA, Denver, CO. 2003. AWWA website.
American Water Works Association (AWWA). 2006. ANSI/AWWA A100-06 – “Minimum Requirements for Vertical Water Supply Wells.” AWWA, Denver, CO. 2006. AWWA website.
NSF International Standard/American National Standard 60, 2009. “Drinking Water Treatment Chemicals - Health Effects.” NSF International, Ann Arbor, MI 2009. NSF website.
Reminder: The standards cited in this document are current at the time of printing. Check current documents for recent updates.
Relevant sections - additional regulations or legislation
Ontario Regulation 169/03 as amended made under the Safe Drinking Water Act
Well record - relevant sections - disinfection
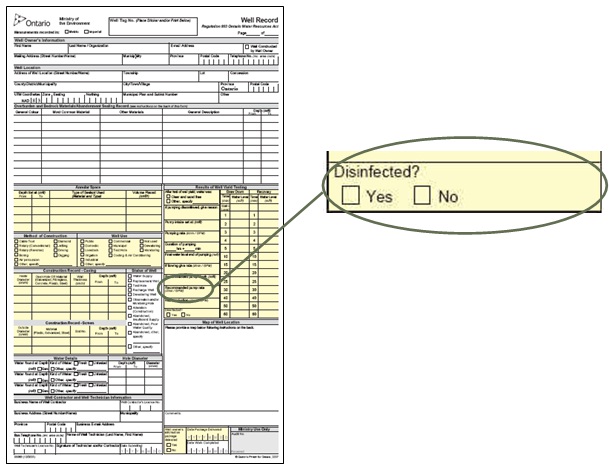
The Wells Regulation - Figure 8-1 shows a sample of the details to be completed on the well record relating to disinfection.
Reminder: By checking “Yes” in this section of the well record the person constructing the well is confirming that the disinfection requirements in the Wells Regulation have been followed.
Reminder: A person can only select “No” in this section of the well record when exemptions to disinfection apply, such as flowing wells and minor alterations.
Figure 8-1: Well Record - Relevant Sections
Key concepts
What to consider when disinfecting a well
Purpose of disinfection
Disinfection protects Ontario’s waters by reducing pathogens.
The disinfection steps provide an adequate level of removal or inactivation of pathogenic organisms that may be present in the well or groundwater
This chapter covers disinfection during and after well construction and installation of equipment in a well. This chapter does not include disinfection treatment (primary or secondary) on municipal distribution systems or treatment on private domestic water supplies.
Process of disinfection
With respect to well construction and installation of equipment in a well, the process of disinfection involves the following
- initial steps, including:
- following sanitary practices when constructing a new well,
- properly developing a new well, and
- removing any debris from a well
- thorough flushing of the well,
- treating with a properly prepared chlorine solution,
- discharging of heavily chlorinated water from the well and the plumbing, and
- collecting and analyzing water samples.
When must disinfection take place?
A well can become contaminated during well construction and pump installation.
The Wells Regulation - While every effort should be made to keep the equipment used and the environment worked in contaminant free, the Wells Regulation requires that, unless exempt, a person must disinfect the well water after:
- constructing a new well,
- installing, including re-installing, the pumping equipment in a well,
- deepening or extending a well, or
- conducting an alteration or a repair on an existing well or on equipment in a well except for a minor alteration.
The person does not have to disinfect the well in the following circumstances:
- The well is considered a “flowing well”, “test hole” or “dewatering well”.
- The person performs a “minor alteration” on an existing well.
- The Wells Regulation exempts the installation of equipment for certain sampling, testing or monitoring activities.
- The person constructing the well has written approval from the Director to use another method of disinfection and the approved method is complied with.
- The person has replaced a pump, including associated pumping equipment, that is installed above or adjacent to a well or in a well pit unless the replacement involves the removal of a well cover or well cap.
Use of chlorinated water in the disinfection process
Chlorine, in its various delivery forms, is generally a good disinfectant for indicator organisms and most pathogenic organisms. Treatment with chlorine products, after the well is properly cleaned and pumped, is an inexpensive and effective way to disinfect the pumping system and the well water. Although chlorinating the water is a good treatment for a well and pumping equipment, its effectiveness depends on a number of factors, including the following:
Form – The most effective form of chlorine solutions for dosing well water is liquid sodium hypochlorite (such as unscented bleach). When used properly, it is the easiest to mix to achieve a concentration of not less than 50 mg/L, and not more than 200 mg/L, of free chlorine throughout the column of water in the well.
Granular calcium hypochlorite is another choice but it is difficult to mix with water. It is best to avoid the use of chlorine puck or tablet products to dose the well as they can become lodged in the well, corrode the equipment and may not provide the proper concentration for the required amount of time.
It is also best to avoid the use of chlorine products used for pools as they typically contain other chemicals such as algaecides and surfactants.
Chlorine concentration – The Wells Regulation requires a dose to create a free chlorine of not less than 50 mg/L (0.007 oz/gal) and not more than 200 mg/L (0.032 oz/gal). This range is based on recommendations provided by Ontario’s Advisory Council on Drinking Water Quality and Testing Standards.
Free chlorine residual – The amount of chlorine available that acts as an oxidizer (kills micro-organisms). The free chlorine is comprised of hypochlorous acid (HOCl) and hypochlorite ion (OCl−) that is not combined with ammonia NH3) or other compounds in water.
Contact time – The longer the microorganisms are in contact with the free chlorine, the more effective the disinfection. The Wells Regulation requires a minimum contact time of 12 hours, but not more than 24 hours
Agitation – Dosing a well by pouring a chlorine solution into a well is not enough to ensure it is completely mixed to the required concentration. To ensure the free chlorine residual is at the correct concentration throughout the entire water column, well water should be agitated while avoiding the suspension of sediment from the bottom of the well into the water column.
pH of water – The effectiveness of free chlorine is maximized at pH levels between 6.0 and 7.0
Temperature – The effectiveness of free chlorine can change with temperature. Free chlorine is more effective at higher temperatures.
Interfering substances – Available chlorine will be used up by any inorganic and organic compounds in the well water which will reduce the concentration of free chlorine.
Biofilm - Biofilm is a slimy substance that attaches to sides of wells and pumping equipment. The slime consists primarily of nuisance microbes (e.g., iron oxidizing bacteria and sulphate-reducing bacteria) that can shield pathogens from the oxidizing action of the free chlorine and reduce the amount of available chlorine. Therefore, it is necessary that biofilm be removed before treating the well water with free chlorine.
Initial steps for new wells
Sanitary practices
The initial step for disinfection begins with adopting sanitary practices to prevent contaminants from entering the well during construction. This is done by following sanitary practices during storage, transport, handling and installation of well components and equipment. Essentially, anything that comes into contact with the water in the well can potentially introduce contaminants in the well.
Each of the scenarios listed below presents a potential cause of contamination to a well:
- pumping equipment that has been placed on a recently fertilized lawn
- pumping equipment that has been placed on a lawn where pathogens from soil and animal waste exist
- construction equipment that has been dragged through a field where cows or other domestic animals graze
- contaminated sand or gravel filter pack material that will be installed around a well screen
- a storage tank that recently held contaminated water
- a faulty well cap that can act as a direct pathway for foreign materials to enter the well
- unsealed annular space outside the casing can provide a pathway for surface water runoff to enter the well
- improper use of grease, lubricants and drilling additives during construction can promote bacterial growth
footnote 5 - contaminated water from ponds, rivers and lakes has been used in the construction process
Best management practice – preventing contamination during storage and transportation
To prevent contamination during storage and transportation of well components, the following procedures
- Water supply equipment and construction materials should be kept off the ground by placing them on clean sheeting.
- Vehicles that transport the equipment and materials should be clean.
- Equipment and materials on vehicles should be covered to protect them from road dirt and grit.
- The components and materials should be kept in their wrapping or boxes until just before use if the components and materials have been wrapped or boxed by the manufacturer.
Best management practice – preventing contamination during construction
To prevent contamination from construction equipment or materials that come in contact with the water the following practices should be adopted:
- All equipment such as drill bits, drill rods or backhoe shovel should be cleaned and sanitized with chlorinated water that has a free chlorine residual of not less than 200 mg/L
footnote 7 . - An approved potable water supply (e.g., municipal water trucked in to the site, should be used during the construction process. The potable water source should have a free chlorine residual of at least 10 mg/L to suppress bacterial growth
footnote 8 . - The water used in the construction process should be placed in clean containers
footnote 9 . - All equipment should be kept off the ground by placing it on clean tarps or on the drilling rig until needed.
- The equipment should not be dragged on the ground.
- Any drilling mud or water with additives that may promote bacterial growth should be avoided.
- The use of excessive amounts of grease on drill rod tool joints should be avoided.
Disinfection for sand or gravel(filter pack)
In addition to keeping materials clean during storage and transportation, a person installing sand or gravel (filter pack) during well construction should:
- avoid, if possible, buying the material in bulk and storing it on-site to reduce the risk of exposing the material to sources of contamination such as soil bacteria, insects and animal feces,
- ensure the sand or gravel are free of all organic materials to reduce the potential for bacterial growth, and
- saturate the sand or gravel (filter pack) using chlorinated water with a free chlorine residual of at least 50 mg/L or a mixture of calcium hypochlorite tablets at a ratio of 113 g (¼ lb) to 227 g (½ lb) to a 22.7 kg (50 lb) bag of sand or gravel.
Reminder: The use of calcium hypochlorite tablets in hard water environments (hardness in excess of 100 mg/L) should be discouraged as this form is very slow to solubilize in the water. The condition will result in low levels of free chlorine over extended periods of time which may account for low levels of disinfection by-product formation. The situation becomes more critical in private wells, which are subject to limited pumping and long periods of inactivity.
Reminder: For details on installing sand or gravel (filter pack) in a well – See Chapter 5: Constructing, Casing and Covering the Well.
Well development
Proper well development is required to remove fine soils, drilling fluids and drill cuttings from the well and surrounding formation. See Chapter 7: Completing the Well’s Structure, for further details on well development.
Initial steps for existing wells
During the alteration of an existing well or the installation of a pump (and related equipment) there is the potential for pathogens to be introduced into the well. Disinfection must occur to remove pathogens from the well.
Scaling, biofilm and other debris is commonly present on the side of the hole, casing or the equipment and in the well water. This organic and inorganic matter can reduce the available free chlorine. Biofilm can also shield pathogens from the oxidizing action of the free chlorine.
To remove this matter and prepare the well before the well is dosed with a chlorinated solution, the person disinfecting the well should follow the “Initial Steps for Existing Wells” Best Management Practice in this chapter.
Best management practice – initial steps for existing wells
To properly prepare an existing well for chlorination and other disinfection methods, all factors that can influence the effectiveness of the process should be minimized. Before chlorination takes place, a person should
- remove any debris in the bottom of the well
- remove scale on the sidewalls of the casing or the hole
- remove slime buildup from biofouling organisms
- evaluate and fix well construction deficiencies or problems, including but not limited to:
- buried well head with a well seal that can become compromised over time and create a direct pathway for contamination
- unprotected horizontal water intake line (pipe) that can develop leaks due to physical damage or corrosion
- open horizontal water intake line (pipe) that can allow a direct pathway between the near surface and the well
- damaged or compromised well cap, cover or seal allowing surface water and other foreign materials to enter the well
- deteriorated, cracked or compromised casing due to physical damage or corrosion (e.g., oxidization, electrolysis) that can create openings and may allow surface water or other foreign materials to enter the well
- improperly sealed or unsealed annular space or eroded sealant in the annular space that can create a direct pathway to the well
- improperly abandoned wells on site that can cause re-contamination
- unsealed openings between the electrical conduit and the well cap allowing foreign materials, insects and other vermin to enter the well
- cross connections that can allow unwanted backflow to enter the well
- improperly placed, screened or sized well vent that can allow surface water, foreign materials, insects and other vermin to enter the well
- Clean the well by:
footnote 12 - scrubbing the inside of the casing with a swab, packer, brush or similar device,
- removing debris from the bottom of the screen or hole with an air line, bailer or other method, and/or
- removing suspended materials in the water by pumping the well water until it runs clear.
Reminder: If the building’s plumbing also needs to be disinfected, a person should turn off and completely drain distribution waterlines, water heaters and storage tanks.
Reminder: Carbon filters, water softeners and other treatment units on the plumbing should be removed or bypassed. Highly chlorinated water can damage treatment units. It is important to follow the manufacturer’s recommendations to ensure treatment systems are properly disinfected.
Reminder: It is important that water and debris be collected and disposed of in an approved manner or discharged to waste in an approved manner.
Thorough flushing of the well (new and existing)
Flushing is the process of pumping out the water to help rid the well of contaminants and debris. The scouring action of the moving water assists in removing scaling and biofilm from the sides of the well. Flushing is used:
- before the well is dosed with a chlorinated solution to prepare the well, and
- after the treatment period to remove the chlorine residual from the well.
footnote 13
This section discusses flushing prior to chlorination. For flushing of the well after chlorination see the “Handling Heavily Chlorinated Water Discharge” section in this chapter.
Best Management Practice – Flushing the Water Supply
The following steps should be considered when flushing of a well:
- The pump should be installed as close to the bottom of the well as possible to ensure movement of the entire water column and removal of debris.
- The pump intake should be placed above the top of the well screen.
- The pump intake should be moved up and down in the well column, in some wells, as this will help with cleaning the sides of the well and removing material.
- The pumping rate should be maximized to provide a more effective flush. Care should be taken not to exceed the well’s capacity as this could cause damage to the well, the pumping equipment and to the formation around the well.
- Low capacity wells should be flushed with injected potable water to clean the well out and remove contaminants
- Pumping the well as long as possible. It is recommended that a minimum of 20 volumes of the water column in the well be pumped
footnote 14 . - It is important that water and debris be collected and disposed in an approved manner. Discharge water should not be disposed of in any river, lake, stream, wetland, septic system, pond or ditch.
- Flooding of property and roadways should be prevented.
Treatment using “Shock” Chlorination
The simplest and one of the more effective ways to disinfect well equipment and the well water is to use a chlorine solution. The oxidizing action of the chlorine solution kills bacteria, viruses, protozoa and some protozoal cysts.
“Shock” chlorination is an effective treatment method that is done after the initial steps of developing, cleaning and flushing the well to eliminate pathogens.
Free chlorine degrades rapidly in the natural environment. As such an approval from the Ministry of the Environment and Climate Change is not required to disinfect a well with certain chlorine-based products (e.g., hypochlorite).
Forms of Chlorine for Disinfection
1. Sodium Hypochlorite(Such as Typical Household Bleach)
Sodium hypochlorite is commonly found in products like household bleach and swimming pool disinfection products. It has a yellow colour and a chlorine smell. Household bleaches typically contain 3 to 6% available chlorine. Industrial strength commercial bleach and swimming pool products can contain 10 to 12% available chlorine. However, the use of swimming pool products is not recommended because they typically contain additives that may impair the quality of the well water.
Household bleaches containing sodium hypochlorite are routinely used in domestic wells and are recommended in “shock” chlorination treatment because:
- they are familiar and common household products
- calculating, measuring and mixing the required volume of liquid to achieve the required dose is less complicated than for other products (e.g., powders, tablets or pucks)
- they are safer to use than liquid chlorine, chlorine gas or calcium hypochlorite
However, only regular major brand bleach products should be used as the greater percentage of bleach products on the household market contain silicates, surfactants, silicon and/or thickeners. All of these additives will harm both the water quality and the performance of the water supply.
Reminder: A person who is going to use a bleach product for chlorinating well water should check the product’s label to verify that additives such as surfactants or fragrances have not been added.
Reminder: The unstable nature of sodium hypochlorite makes it sensitive to temperature and light and therefore it has a limited shelf life. For example, sodium hypochlorite degrades extremely rapidly in the hot, sunlit cab of a truck. Purchasing and carrying small containers ensure a fresh supply for each well construction project.
Reminder: Sodium hypochlorite products are described as weight % of available chorine, weight % of sodium hypochlorite and trade %. To convert to weight % of available chlorine from trade % and sodium hypochlorite use the following:
Trade Percent = grams per litre (gpL) of available chlorine ⁄ 10
Weight % of available chlorine = gpL ⁄ 10 × specific gravity of solution
Weight % of available chlorine = Weight % of sodium hypochlorite ⁄ 1.05
Reminder: To minimize impacts to groundwater, it is important that all chlorine products used be approved for potable water use and be either fresh unscented bleach or must meet the NSF International Standard 60 for Drinking Water Treatment Chemicals – Health Effects, or an equivalent standard.
Reminder: Scented bleach or products such as swimming pool chlorine should be avoided as they typically contain additives such as surfactants, thickeners, stabilizers, perfumes, UV inhibitors, algaecides or other additives. These additives can impair the quality of the water and aquifer after disinfection and are not designed for potable water use.
Reminder: It is important to always check product labels to verify product contents and manufacturer’s suggested usage as well as Material Safety Data Sheets (MSDS). See the “Safe Handling of Chlorine” section in this chapter for further information.
Reminder: Chlorine products should always be stored in a cool, dry and dark environment.
2. Calcium Hypochlorite(Dry - Powder, Granules Or Tablets)
Calcium hypochlorite is a white granular compound containing about 60 to 70% available chlorine, which is fairly stable when stored in a cool dry place. Calcium hypochlorite is available as granules, powders, tablets and pucks.
Calcium hypochlorite is not typically recommended for “shock” chlorination the following reasons:
- Calculations can be difficult with such a high concentration.
- The high potency and required agitation can cause difficulties in obtaining the free chlorine residual concentration range in the Wells Regulation (not less than 50 mg/L and not more than 200 mg/L).
- Greater safety precautions are needed when handling and using the product.
- Tablets should be avoided as they are slow to dissolve and may become lodged within the parts of the well and pumping components. If tablets are used, they should first be broken up and dissolved into a 20 litre (4 gallon) pail or tank.
- In limestone, marble and other calcium-rich environments, calcium hypochlorite can increase the concentration of calcium in groundwater that is already hard, causing partial plugging of well intakes, screens and water-bearing fractures
footnote 15 .
Reminder: When a calcium hypochlorite product is selected, it is important that it is approved for use in potable water and meets all applicable standards such as ANSI/AWWA B300 titled: AWWA Standard for Hypochlorites
Effectiveness of Chlorine
Free Chlorine Residual
When a chlorine solution is first added to water (i.e., when the well is dosed) the available chlorine will react with substances in the water, and on the surfaces inside the well. During this reaction, some of the available chlorine is used up by organic and inorganic matter and can no longer kill pathogens and disinfect the well. The remaining available chlorine is the free chlorine residual that can effectively react to any pathogens. Free chlorine residual consists of two main compounds: hypochlorous acid (HOCl) and hypochlorite ion (OCl−). Hypochlorous acid is much more effective (80 to 200 times better) at killing pathogens than the hypochlorite ion.
Substance That Interfere With The Effectiveness of Free Chlorine Residual
As indicated above, available chlorine will be used up by any inorganic and organic compounds in the well water which will reduce the concentration of free chlorine. Examples of common materials or properties that reduce the free chlorine concentration are:
- alkalinity,
- hydrogen sulphide (H2S),
- methane (CH4),
- iron,
- manganese,
- biofilm (iron oxidizing bacteria and sulphate-reducing bacteria),
- silt, and
- clay.
Therefore, additional cleaning of the well or additional chlorine solution may be needed to achieve the required free chlorine residual concentration range in the Wells Regulation (not less than 50 mg/L to not more than 200 mg/L).
Well Structure
In some cases the geologic environment and well structure play a role in the amount and placement of the chlorine dose. For example, injecting and mixing of the dose by a surge block is more appropriate in a well screen, whereas a jetting tool may be more appropriate in an open bedrock hole. Also, large open fractures in open bedrock wells may allow the calculated chlorine solution to move further away from the well. This may require more chorine solution to maintain the required free chlorine residual in the bedrock well.
pH Levels
Sodium hypochlorite (bleach) and calcium hypochlorite are alkaline (caustic). It is important to note that when a person adds these chlorine products to water, the pH will increase. The form of free chlorine residual is pH-dependent. High pH environments create more hypochlorite ions and significantly reduce the effectiveness of the treatment. Therefore, it is important not to use too high of a concentration of these chlorine products. Hypochlorous acid production and thus, the effectiveness of free chlorine are maximized at pH levels between 6.0 and 7.0
Best Management Practice – Adjusting the pH of the Chlorine Solutionfootnote 19
A person should consider controlling the pH to maximize the amount of hypochlorous acid available to kill pathogens. There are several commercial acid products on the market that can lower the pH of water that will be used to make the chlorine solution.
Any of the acid products used in the process must not impair the quality of the water in the well or the aquifer and should meet NSF International Standards for potable water or an equivalent standard.
A person performing disinfection should carefully follow the manufacturer’s instructions when adding any acids to the water. Acid should be added to water in a storage tank to lower the pH to 4.5 to 5.0
A recommended acid includes:
- Acetic Acid(distilled white vinegar only)
Acids to avoid include:
- oxalic Acid – is dangerous to skin and eyes and produces oxalates which are poisonous,
- citric acid – is a food source for bacteria and difficult to get out of a well,
- muriatic (hydrochloric) Acid – is hazardous to handle, and
- phosphoric Acid – leaves phosphate residue behind.
Reminder: caution! Never add acid directly to a hypochlorite solution (e.g., bleach) as chlorine gas can be formed. Avoid exposure to the fumes from the acid container.
When acid has been added to the water to lower the pH below 5.0 followed by adding a hypochlorite solution, some chlorine gas will be produced. The chlorine gas will be produced for a short period of time until the hypochlorite raises the chlorine solution’s pH above 5.0. Chlorine gas is toxic. Therefore, add the acid source to the water and then the hypochlorite solution only in a well ventilated area (see the section titled: “Safe Handling of Chlorine and Other Chemicals” in this chapter for further information.
Measuring pH
During the mixing of the water with the chemicals, the pH should be tested frequently to identify any risk of chlorine gas production, for other health and safety reasons and to verify that the correct pH (6.0 to 7.0) of the free chlorine residual solution has been achieved. Test papers and comparison charts, calibrated field test kits or calibrated meters should be used to test the mixtures for pH.
Figure 8-2: Measuring pH
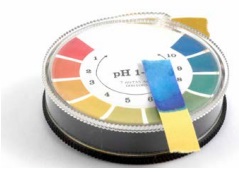
Figure 8-2 shows a pH test strip being checked against a comparison chart. The test strip is placed into the solution and changes colour. The test strip’s colour is matched to the colour on the comparison chart which has the corresponding pH value. In this example the test solution has a high pH.
Temperature
The effectiveness of free chlorine can change with temperature. Higher temperatures increase the amount of hypochlorous acid in the free chlorine making the treatment more effective. However, as groundwater is typically between 6 and 12°C, increasing the temperature of the well water is cost prohibitive, impractical and could impair the quality of the water.
Safe Handling of Chlorine and Other Chemicals
Proper transportation, storage and use of chemicals must be observed during all phases of well construction. In accordance with the Occupational Health and Safety Act and regulations made under this Act, safe practices must be followed when dealing with chlorine products and solutions, acids and other chemicals used in the “shock” chlorination process. Extra caution should be used when working with acids and calcium hypochlorite tablets or powder and acids as they can cause chemical burns, fire, or explosion. Chlorine gas can be released if the water used to make the chlorine solution is acidified below a pH of 5.0 and hypochlorite is then added to the water. Therefore, proper precautions should be in place to protect workers from any possible release of chlorine gas during the treatment process.
Best Management Practice – Precautions in the “Shock” Chlorination Process
Precautions in the “shock” chlorination process include, but are not limited to the following:
- Protective clothing, such as gloves, aprons, goggles and a vapour mask should be worn at all times when working with chlorine products and acids.
- The pH adjustment products (acids) should be added to the mixing water before the hypochlorite solution is added to reduce the risk of chlorine gas generation. To minimize exposure to fumes, this should always be done in a well ventilated area. Chemicals must not be mixed in a confined space or a poorly ventilated area.
- The Material Safety Data Sheet (MSDS) for any chemical product should be obtained and the guidelines followed. The MSDS will include:
- the properties of the material,
- the hazards associated with the material,
- Personal Protective Equipment (PPE) required when using the material, and
- first aid and medical attention information
“Shock” Chlorination Procedures
Calculating Chlorine Solution Dose Amounts Using Bleach
The Wells Regulation - When the water in the well is required to be disinfected, the person constructing the well must dose the water in the well to concentration of not less than 50 mg/L (0.008 oz/Imp gal) and not more than 200 mg/L (0.032 oz/Imp gal) free chlorine.
To determine the dose that will create a free chlorine residual of not less than 50 mg/L and not more than 200 mg/L, a person constructing a well or installing a pump should calculate the volume of well water in the well and then the amount of chlorine product needed to dose the well water.
The following calculations and tables in this section are provided to assist the person in calculating the correct dose for the well.
To Calculate the Volume of Well Water in a Well
- Well depth elevation and static water level elevation are measured.
- Height of water column in well is calculated:
= Well Depth elevation − static water level elevation
- If the well opening is circular, the inner diameter of the well is measured.
- The radius of the well is calculated:
= diameter of well ⁄ 2
- The radius is converted to the same units as the length of the water column.
- The area of the well casing opening is calculated:
Π × radius2
or
3.14 × radius × radius - The volume of well water in the well is calculated:
= area of well casing opening × water column in the well
Reminder: To prevent calculation errors and incorrect doses, it is important to use consistent units (e.g., metric or Imperial).
Example
The well depth is 35 metres below the ground surface and the static water level is 5 metres below the ground surface.
Therefore, the water well column height is 35 m − 5 m = 30 m (100ft).
The inner diameter of the well casing is 16 centimetres (6 ¼ inches).
The inner radius of the well casing = diameter of well ⁄ 2 = 16cm ⁄ 2 = 8cm
All units are converted to metres.
Therefore, the inner radius = 8cm ⁄ 100 = 0.08m
The area of the well casing opening = Π × radius2 = 3.14 × 0.08m × 0.08m = 0.02 metres2
The volume of the water well column = area of well casing opening × water column in the well
= 0.02m2 × 30m
= 0.6 m3
*1m3 = 1,000L
0.6 × 1,000 = 600L
Percent Volume of Bleach Required
Typical available chlorine concentrations of unscented bleach by weight (as noted on the product label): are as follows:
0.005% = 50 mg/L
0.02% = 200 mg/L
1% = 10,000 mg/L
5% = 50,000 mg/L
12% = 120,000 mg/L
To Dose 1 Litre of Water to 50 mg/L of Free Chlorine
Using typical fresh unscented bleach (5.25 % available sodium hypochlorite) with 5 % (or 50,000 mg/L) available chlorine
(1L × 50) ⁄ 50,000 = 0.0010 L of bleach
An alternative formula using percentages:
(1L × 0.005%) ⁄ 50,000 = 0.0010 L of bleach
= 1 mL (0.035 fl. oz.) of typical fresh unscented bleach needed to create a concentration of 50mg/L of free chlorine in 1 L of water
Using typical fresh unscented bleach (6 % available sodium hypochlorite) with 5.7 % (or 57,000 mg/L) available chlorine
(1L × 50) ⁄ 57,000 = 0.000088L of bleach
An alternative formula using percentages:
(1L × 0.005%) ⁄ 5.7% = 0.00088L of bleach
= 0.88 mL (0.031 fl. oz.) of typical fresh unscented bleach needed to create a concentration of 50mg/L of free chlorine in 1 L of water
Using industrial sodium hypochlorite (12.5 % available sodium hypochlorite) with 12 % (or 120,000 mg/L) available chlorine
(1L × 50) ⁄ 120,000 = 0.00042L of Bleach
An alternate formula using percentages:
(1L × 0.005%) ⁄ 12% = 0.00042L of bleach
= 0.42 millilitres (0.015 fluid ounces) of industrial sodium hypochlorite at 12 % available chlorine is needed to create a concentration of 50mg/L of free chlorine in 1 L of water
Reminder: There are about 227 mL in one Imperial cup. There are about 4.7 mL in one Imperial teaspoon and 28.4 mL in one Imperial fluid ounce.
To Dose 1 Litre of Water to 200mg/L of Free Chlorine
Using typical unscented bleach (5.25 % available sodium hypochlorite) with 5 % (or 50,000 mg/L) available chlorine
(1L × 200) ⁄ 50,000 = 0.0040L of bleach
An alternative formula using percentages
(1L × 0.02%) ⁄ 5% = 0.0040L of bleach
= 4 mL (0.14 fl. oz.) of typical fresh unscented bleach is needed to create a concentration of 200mg/L of free chlorine in 1 L of water
Using typical fresh unscented bleach (6 % available sodium hypochlorite) with 5.7 % (or 57,000 milligrams per litre) available chlorine
(1L × 200) ⁄ 57,000 = 0.0035L of bleach
An alternative formula using percentages
(1L × 0.02%) ⁄ 5.7% = 0.0035L of bleach
= 3.5 mL (0.12 fl. oz.) of typical fresh unscented bleach needed to create a concentration of 200mg/L of free chlorine in 1 L of water
Using industrial sodium hypochlorite (12.5 % available sodium hypochlorite) with 12 % (or 120,000 milligrams per litre) available chlorine
(1L × 200) ⁄ 120,000 = 0.0017L of bleach
An alternative formula using percentages
(1L × 0.02%) ⁄ 12% = 0.0017L of bleach
= 1.7 mL (0.06 fl. oz.) of industrial sodium hypochlorite at 12 % available chlorine is needed to create a concentration of 200mg/L of free chlorine in 1 L of water
To Calculate the Dose for the Column of Well Water
Dose = Volume of Water in well × Dose for 1 litre of water
Reminder: Dose is dependent on what free chlorine concentration the person is targeting (i.e., from not less than 50 to not more than 200 milligrams per litre), and is also dependent on the % of available chlorine (e.g., 5, 5.25 or 12%).
Example
This example uses the above calculations and the previous well example where the 35 metre deep well has 600 Litres of water.
To obtain a concentration of 50 mg/L free chlorine using typical fresh unscented bleach with 5% available chlorine, the 600 Litres is multiplied by 1 mL/L = 600 mL (21 fl. oz.) of typical fresh unscented bleach
An alternative formula using percentages
(600L × 0.005%) ⁄ 5% = 600 mL of bleach
To obtain a concentration of 200 mg/L free chlorine using typical fresh unscented bleach with 5% available chlorine, the 600 Litres is multiplied by 4 mL/L = 2.4 L (84 fl. oz.) of typical fresh unscented bleach
An alternative formula using percentages
(600L × 0.02%) ⁄ 5% = 2.4L of bleach
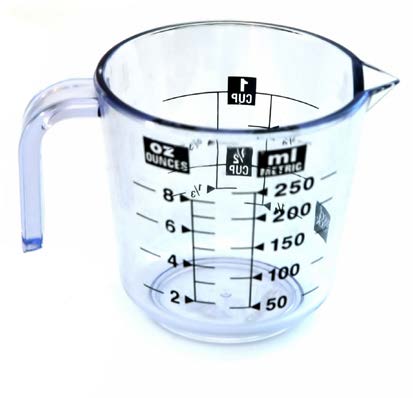
Figure 8-3: Common Measuring Cup to Assist in Calculating Amount of Bleach
Tables to Calculate Dose using Bleach
Tables 8-1 to 8-4 provide the amount of bleach needed to dose various diameters of wells that will create 50, 100, 150 or 200 mg/L of free chlorine per metre of water column. The calculations shown on the previous pages were used to derive Tables 8-1 to 8-4.
If a different concentration of bleach is used, the calculations shown on the previous pages can be used to determine the amount required to dose the well.
Notes regarding Tables 8-1 to 8-4
Reminder: The volume of bleach provided by the tables will have to be multiplied by the depth of the column of well water to determine the dose for the well. The calculations consider well volumes only and do not include water in the plumbing and the water used for mixing. For additional information see the final note below.
Reminder: To dose the entire well column, obtain the volume of bleach needed in millilitres from appropriate Table (Table 8-1 or Table 8-3) and multiply by the well water column height in metres.
Reminder: If the height of the well water column is measured in ft, the height of the well water column is divided by 5 and multiplied by the volume of bleach in fluid ounces obtained using Table 8-2 or Table 8-4.
Reminder: The tables provide the amounts of bleach required to achieve the target concentrations under the ideal conditions of neutral pH (i.e., 7 pH units), no turbidity and no total dissolved solids. Additional bleach will be required if these conditions are not met. Test strips or other methods are used to verify if the free chlorine residual achieved meets the Wells Regulation requirements of not less than 50 mg/L and no more than 200 mg/L. Not meeting the required range can reduce the effectiveness of the treatment and will require the treatment to be repeated.
Reminder: The values in the tables do not account for the volume of any mixing water (typically 25 L or up to 4 to 5 times the volume of the well water column) or, if required, the volume of water in the plumbing (e.g., installing a pump in an existing well). It is important to consider this factor prior to putting the well into use because additional bleach will be needed to achieve the required range (see Table 8-7 or Table 8-8).
| Diameter of Well in Centimetres | Volume of Water per Metre of Water Depth in Litres | Vol. of Bleach needed in mL to Obtain 50 mg/L for Each Metre of Water Depth | Vol. of Bleach needed in mL to Obtain 100 mg/L for Each Metre of Water Depth | Vol. of Bleach needed in mL to Obtain 150 mg/L for Each Metre of Water Depth | Vol. of Bleach needed in mL to Obtain 200 mg/L for Each Metre of Water Depth |
|---|---|---|---|---|---|
| 3.8 | 1.1 | 1.1 | 2.3 | 3.4 | 4.5 |
| 5 | 2 | 2 | 3.9 | 5.9 | 7.9 |
| 6 | 3 | 3 | 5 | 8 | 10 |
| 11 | 9 | 9 | 18 | 27 | 37 |
| 13 | 14 | 14 | 28 | 42 | 56 |
| 16 | 20 | 20 | 40 | 59 | 79 |
| 18 | 27 | 27 | 53 | 80 | 106 |
| 21 | 34 | 34 | 69 | 103 | 138 |
| 61 | 292 | 292 | 583 | 875 | 1167 |
| 76 | 456 | 456 | 912 | 1367 | 1823 |
| 91 | 656 | 656 | 1313 | 1969 | 2625 |
Reminder: The formula used to calculate this table is based on common well casing diameters in inches. The formula calculates the metric equivalent for diameter, litres per metre and then millilitres based on the initial industry standard diameter. The calculated numbers have then been rounded.
| Diameter of Well in Inches | Volume of Water per 5ft of Water Depth in Fluid Ounces | Vol. of Bleach Required in Fluid Ounces to Obtain 50 mg/L for Each 5ft of Water Depth | Vol. of Bleach Required in Fluid Ounces to Obtain 100 mg/L for Each 5ft of Water Depth | Vol. of Bleach Required in Fluid Ounces to Obtain 150 mg/L for Each 5ft of Water Depth | Vol. of Bleach Required in Fluid Ounces to Obtain 200 mg/L for Each 5ft of Water Depth |
|---|---|---|---|---|---|
| 1 ½ | 40 | 0.04 | 0.08 | 0.12 | 0.16 |
| 2 | 69 | 0.07 | 0.14 | 0.21 | 0.28 |
| 2 ¼ | 138 | 0.14 | 0.28 | 0.41 | 0.55 |
| 4 ¼ | 491 | 0.49 | 1.0 | 1.5 | 2.0 |
| 5 ¼ | 749 | 0.75 | 1.5 | 2.2 | 3.0 |
| 6 ¼ | 1061 | 1.1 | 2.1 | 3.2 | 4.2 |
| 7 ¼ | 1428 | 1.4 | 2.9 | 4.3 | 5.7 |
| 8 ¼ | 1849 | 1.8 | 3.7 | 5.5 | 7.4 |
| 24 | 15,646 | 15.6 | 31.3 | 46.9 | 62.6 |
| 30 | 24,447 | 24.4 | 48.9 | 73.3 | 97.8 |
| 36 | 35,203 | 35.2 | 70.4 | 105.6 | 140.8 |
Reminder: When using ft and imperial fluid ounces, a person needs to divide the entire water column height in the well in ft by 5 and then multiply the result by the corresponding concentration found in the table to obtain the required dose.
Reminder: The formula used to calculate this table is based on common well casing diameters in inches. The calculated numbers have then been rounded.
| Diameter of Well in Centimetres | Volume of Water per Metre of Water Depth in Litres | Vol. of Bleach Required in mL to Obtain 50 mg/L for Each Metre of Water Depth | Vol. of Bleach Required in mL to Obtain 100 mg/L for Each Metre of Water Depth | Vol. of Bleach Required in mL to Obtain 150 mg/L for Each Metre of Water Depth | Vol. of Bleach Required in mL to Obtain 200 mg/L for Each Metre of Water Depth |
|---|---|---|---|---|---|
| 3.8 | 1.1 | 0.5 | 0.9 | 1.4 | 1.9 |
| 5 | 2 | 0.8 | 1.6 | 2.5 | 3.3 |
| 6 | 3 | 1 | 2 | 3 | 4 |
| 11 | 9 | 4 | 8 | 11 | 15 |
| 13 | 14 | 6 | 12 | 17 | 23 |
| 16 | 20 | 8 | 16 | 25 | 33 |
| 18 | 27 | 11 | 22 | 33 | 44 |
| 21 | 34 | 14 | 29 | 43 | 57 |
| 61 | 292 | 122 | 243 | 365 | 486 |
| 76 | 456 | 190 | 380 | 570 | 760 |
| 91 | 656 | 273 | 547 | 820 | 1094 |
Reminder: The formula used to calculate this table is based on common well casing diameters in inches. The formula calculates the metric equivalent for diameter, litres per metre and then millilitres based on the initial industry standard diameter. The calculated numbers have then been rounded.
| Diameter of Well in Inches | Volume of Water per 5ft of Water Depth in Fluid Ounces | Vol. of Bleach Required in Fluid Ounces to Obtain 50 mg/L for Each 5ft of Water Depth | Vol. of Bleach Required in Fluid Ounces to Obtain 100 mg/L for Each 5ft of Water Depth | Vol. of Bleach Required in Fluid Ounces to Obtain 150 mg/L for Each 5ft of Water Depth | Vol. of Bleach Required in Fluid Ounces to Obtain 200 mg/L for Each 5ft of Water Depth |
|---|---|---|---|---|---|
| 1 ½ | 40 | 0.02 | 0.03 | 0.05 | 0.07 |
| 2 | 69 | 0.03 | 0.06 | 0.09 | 0.12 |
| 2 ¼ | 138 | 0.06 | 0.11 | 0.17 | 0.23 |
| 4 ¼ | 491 | 0.20 | 0.41 | 0.61 | 0.82 |
| 5 ¼ | 749 | 0.31 | 0.62 | 0.94 | 1.2 |
| 6 ¼ | 1061 | 0.44 | 0.88 | 1.3 | 1.8 |
| 7 ¼ | 1428 | 0.59 | 1.2 | 1.8 | 2.4 |
| 8 ¼ | 1849 | 0.77 | 1.5 | 2.3 | 3.1 |
| 24 | 15,646 | 6.5 | 13.0 | 19.6 | 26.1 |
| 30 | 24,447 | 10.2 | 20.4 | 30.6 | 40.7 |
| 36 | 35,203 | 14.7 | 29.3 | 44.0 | 58.7 |
Reminder: When using ft and imperial fluid ounces, a person needs to divide the entire water column height in the well in ft by 5 and then multiply the result by the corresponding concentration found in the table to obtain the required dose.
Reminder: The formula used to calculate this table is based on common well casing diameters in inches. The calculated numbers have then been rounded.
Calculating Chlorine Solution Dose Amounts using Calcium Hypochlorite Powder
The formula used to calculate this table is based on common well casing diameters in inches. The calculated numbers have then been rounded.
To Dose 1L of Water To 50 mg/L of Free Chlorine
1 L = 1 kg or 1,000 g of water
To obtain the weight of a calcium hypochlorite powder at 65% available chlorine to create a dose of 50 mg/L (0.005%):
(1kg × 0.005%) ⁄ 65% = 0.00008Kg
= 0.0008Kg (0.003 ounces) of calcium hypochlorite powder is needed to create a concentration of 50 mg/L of free chlorine in 1 L of water
To Dose 1L of Water to 200 mg/L of Free Chlorine
To obtain the weight of a calcium hypochlorite powder at 65% available chlorine to create a dose of 200 mg/L (0.02) %):
(1kg × 0.02%) ⁄ 65% = 0.0003kg
= 0.0003 kg = 0.3 g (0.01 oz) of calcium hypochlorite powder is needed to create a concentration of 200 mg/L of free chlorine in 1 L of water
To Calculate Dose for the Column of Well Water
Volume of Water in well = Weight of Water in Well × free chlorine residual desired [e.g., 50 mg/L (0.005%) or 200 mg/L (0.02 %)] divided by % of available chlorine (65 %).
Example
Use the above calculations and the previous well example where the 35 metre deep well has 600 L of water (600 L of water = 600 kg of water).
To obtain a concentration of 50 mg/L free chlorine using calcium hypochlorite powder with 65% available chlorine
(600kg × 0.005%) ⁄ 65% = 0.046kg = 46g (1.62oz)
To obtain a concentration of 200 mg/L free chlorine using calcium hypochlorite powder with 65% available chlorine
(600kg × 0.02%) ⁄ 65% = 0.185kg = 185g (6.52oz)
Tables to Calculate Dose using Calcium Hypochlorite Powder
Table 8-5 and Table 8-6 provide the amount of calcium hypochlorite powder (at 65% available chlorine) needed to dose various diameters of wells that will create 50, 100, 150 or 200 mg/L of free chlorine per metre of water column. The calculations shown on the previous pages were used to derive Tables 8-5 and 8-6.
If a different amount of calcium hypochlorite powder is used, the calculations shown on pages 39 and 40 can be used to determine the amount required to dose the well.
Notes Regarding Table 8-5 and Table 8-6:
Reminder: The volume of calcium hypochlorite powder provided by the tables will have to be multiplied by the depth of the column of well water to determine the dose for the well. The calculations consider well volumes only and do not include water in the plumbing and the water used for mixing. For additional information, see the final note below.
Reminder: To dose the entire well column, the volume of calcium hypochlorite is obtained from Table 8-5 in grams and multiplied by the well water column height in metres.
Reminder: If the height of the water well column is measured in ft, divide the height of the well water column is divided by 5 and multiplied by the volume of calcium hypochlorite in ounces needed from Table 8-6.
Reminder: The tables provide the amounts of calcium hypochlorite needed to achieve the target under the ideal conditions of neutral pH (i.e., 7 pH units), no turbidity and no total dissolved solids. Additional calcium hypochlorite will be required if these conditions are not met. Test strips or other methods can be used to verify that the free chlorine residual achieved is no less than 50 mg/L and no more than 200 mg/L. Not meeting the required range can reduce the effectiveness of the treatment and in many cases requires the treatment to be repeated.
Reminder: The values in the tables do not account for the volume of any mixing water (typically 25 L or up to four to five times the volume of the well water column) or, if required, the volume of water in the plumbing (e.g., installing a pump in an existing well). It is important to consider these factors prior to putting the well into use because additional calcium hypochlorite will be needed to achieve the target dose concentration (see Table 8-7 or Table 8-8).
| Diameter of Well in Centimetres | Volume of Water per Metre of Water Depth in Litres | Dry Weight of Calcium Hypochlorite in Grams to Obtain 50 mg/L for Each Metre of Water Depth | Dry Weight of Calcium Hypochlorite in Grams to Obtain 100 mg/L for Each Metre of Water Depth | Dry Weight of Calcium Hypochlorite in Grams to Obtain 150 mg/L for Each Metre of Water Depth | Dry Weight of Calcium Hypochlorite in Grams to Obtain 200 mg/L for Each Metre of Water Depth |
|---|---|---|---|---|---|
| 3.8 | 1 | 0.1 | 0.1 | 0.2 | 0.3 |
| 5 | 2 | 0.2 | 0.3 | 0.5 | 0.6 |
| 6 | 3 | 0.2 | 0.4 | 0.6 | 0.8 |
| 11 | 9 | 0.7 | 1.4 | 2.1 | 2.8 |
| 13 | 14 | 1.1 | 2.1 | 3.2 | 4.3 |
| 16 | 20 | 1.5 | 3.0 | 4.6 | 6.1 |
| 18 | 27 | 2.0 | 4.1 | 6.1 | 8.2 |
| 21 | 34 | 2.7 | 5.3 | 8.0 | 10.6 |
| 61 | 292 | 22.4 | 44.9 | 67.3 | 89.8 |
| 76 | 456 | 35.1 | 70.1 | 105.2 | 140.2 |
| 91 | 656 | 50.5 | 101.0 | 151.5 | 202.0 |
Reminder: The formula used to calculate this table is based on common well casing diameters in inches. The formula calculates the metric equivalent for diameter, litres per metre and then millilitres based on the initial industry standard diameter. The calculated numbers have then been rounded.
| Diameter of Well in Inches | Volume of Water per 5ft of Water Depth in Fluid Ounces | Dry Weight of Calcium Hypochlorite in Ounces to Obtain 50 mg/L for Each 5ft of Water Depth | Dry Weight of Calcium Hypochlorite in Ounces to Obtain 100 mg/L for Each 5ft of Water Depth | Dry Weight of Calcium Hypochlorite in Ounces to Obtain 150 mg/L for Each 5ft of Water Depth | Dry Weight of Calcium Hypochlorite in Ounces to Obtain 200 mg/L for Each 5ft of Water Depth |
|---|---|---|---|---|---|
| 1 ½ | 33.8 | 0.003 | 0.005 | 0.008 | 0.010 |
| 2 | 69 | 0.005 | 0.011 | 0.016 | 0.021 |
| 2 ¼ | 138 | 0.01 | 0.02 | 0.03 | 0.04 |
| 4 ¼ | 491 | 0.04 | 0.08 | 0.11 | 0.15 |
| 5 ¼ | 749 | 0.06 | 0.12 | 0.17 | 0.23 |
| 6 ¼ | 1061 | 0.08 | 0.16 | 0.25 | 0.33 |
| 7 ¼ | 1428 | 0.11 | 0.22 | 0.33 | 0.44 |
| 8 ¼ | 1849 | 0.14 | 0.29 | 0.43 | 0.57 |
| 24 | 15,646 | 1.2 | 2.4 | 3.6 | 4.8 |
| 30 | 24,447 | 1.9 | 3.8 | 5.7 | 7.5 |
| 36 | 35,203 | 2.7 | 5.4 | 8.1 | 10.9 |
Reminder: When using ft and imperial fluid ounces, a person needs to divide the entire water column height in the well in ft by 5ft and then multiply the result by the corresponding concentration found in the table to obtain the required dose.
Reminder: The formula used to calculate this table is based on common well casing diameters in inches. The calculated numbers have then been rounded
Preparing Mixing Dose above Ground Surface
Adding bleach or calcium hypochlorite directly to the well typically does not allow for a uniform dose of the well water column and makes it almost impossible to control the pH. To properly mix and if necessary control the pH, it is important to create the mixing dose in a bulk mixing or other container set on the ground surface. Therefore, extra water used to create the mixing dose has to be added to the water well column volume to provide the total water needed to be dosed.
If 25 Litres of water is used to mix the solution above the ground surface, then Table 8-7 or Table 8-8 provides the amount of unscented bleach and weight of calcium hypochlorite powder required to dose the 25 L (or 5 gal) of extra water used to mix the chlorine solution at 50, 100, 150 and 200 mg/L.
Best Management Practice – Mixing Four to Five times the Well Volume of Solution above Ground Surface Prior to Dosing the Well
Where practical, a dosing solution of four to five times the water column volume of the well should be mixed in a bulk mixing container set on the ground surface and thoroughly mixed with the entire well column to account for:
- the standing well volume,
- the saturation of the adjacent formation, and
- if present, the saturation of the gravel pack.
| Bleach or Calcium Hypochlorite Powder Available Chlorine | Volume of Bleach (mL) or Weight of Calcium Hypochlorite Powder (g) Needed to Dose 25 L of Mixing Water to 50 mg/L | Volume of Bleach (mL) or Weight of Calcium Hypochlorite Powder (g) Needed to Dose 25 L of Mixing Water to 100 mg/L | Volume of Bleach (mL) or Weight of Calcium Hypochlorite Powder (g) Needed to Dose 25 L of Mixing Water to 150 mg/L | Volume of Bleach (mL) or Weight of Calcium Hypochlorite Powder (g) Needed to Dose 25 L of Mixing Water to 200 mg/L |
|---|---|---|---|---|
| Bleach with 5% Available Chlorine | 25 ml | 50 ml | 75 ml | 100 ml |
| Bleach with 12% Available Chlorine | 10 ml | 21 ml | 31 ml | 42 ml |
| Hypochlorite Powder with 65% Available Chlorine | 2 g | 4 g | 6 g | 8 g |
| Bleach or Calcium Hypochlorite Powder Available Chlorine | Volume of Bleach (fl. oz.) or Calcium Hypochlorite Powder (oz.) Needed to Dose 5 Gal of Mixing Water to 50 mg/L | Volume of Bleach (fl. oz.) or Calcium Hypochlorite Powder (oz.) Needed to Dose 5 Gal of Mixing Water to 100 mg/L | Volume of Bleach (fl. oz.) or Calcium Hypochlorite Powder (oz.) Needed to Dose 5 Gal of Mixing Water to 150 mg/L | Volume of Bleach (fl. oz.) or Calcium Hypochlorite Powder (oz.) Needed to Dose 5 Gal of Mixing Water to 200 mg/L |
|---|---|---|---|---|
| Bleach with 5% Available Chlorine | 0.8 fl. oz. | 1.6 fl. oz. | 2.4 fl. oz. | 3.2 fl. oz. |
| Bleach with 12% Available Chlorine | 0.3 fl. oz. | 0.7 fl. oz. | 1 fl. oz. | 1.3 fl. oz. |
| Hypochlorite Powder with 65% Available Chlorine | 0.06 oz | 0.12 oz | 0.18 oz | 0.25 oz |
Formula for pH Control during Chlorination
Mixing hypochlorite solutions will raise the pH and decrease the amount of effective hypochlorous acid available for disinfection. To control the pH, acids such as white vinegar can be added to the mixing water prior to adding the bleach. If the alkalinity of the water is measured or known then the following formula can be used:
Litres of White Vinegar = (Mixing Water Alkalinity ⁄ 100) × (Chlorine Dose ⁄ 500) × (Mixing Water Volume (Litres) ⁄ 100)
or
Gallon of White Vinegar = (Mixing Water Alkalinity ⁄ 100) × (Chlorine Dose ⁄ 500) × (Mixing Water Volume (Gallons) ⁄ 100)
Reminder: Alkalinity and chlorine dose are in milligrams per litre and volume is in litres and Imperial gallons.
Calculating the Volume of Water for a Typical Horizontal Pipe (Waterline) From a Well to a Building
Reminder: Even though it is not a requirement of the Wells regulation, the plumbing in the building should be chlorinated along with the well to reduce pathogens in the entire water distribution system. The calculation used to determine the volume of the water well column can be used to determine the water in the different diameter plumbing lines within the building.
For a Typical Pipe inside Diameter - 2.5 cm (1 inch)
Radius: 1.3 cm = 0.013 m
Area: 3.14 × 0.013 m × 0.013 m = 0.0005 m2
Volume per 1 metre of pipe: = 1m × 0.0005 m2
= 0.0005 m3 = 0.5 Litres (0.2 imperial gallons)
Therefore, multiply length in metres of 3.2 cm (1 ¼ inch) horizontal pipe from plumbing to well by 0.5 L to obtain total volume of water in pipe.
For a Typical Pipe inside Diameter - 3.2 cm(1 ¼ inch)
Radius: 1.6 cm = 0.016 m
Area: 3.14 × 0.016 m × 0.016 m = 0.0008 m2
Volume per 1 metre of pipe: = 1m × 0.0008 m2
= 0.0008 m3 = 0.8 Litres (0.2 imperial gallons)
Therefore multiply length in metres of 3.2 cm (1 ¼ inch) horizontal pipe from plumbing to well by 0.8 L to obtain total volume of water in pipe.
Reminder: In calculating the amount of water in the plumbing, it is also important to add the volume of the hot water tank (typically noted on the tank’s information) and any water storage tank. The additional water in the plumbing has to be added to the volume of the mixing water and the water well column.
Procedure for “Shock” Chlorination on Same Day After Completing the New Well’s Structural Stage
The Wells Regulation - Unless exempt, on the day that the person constructing the well finishes the well’s structural stage, the person must ensure the well is disinfected in accordance with the Wells Regulation.
To “shock” chlorinate a new well after the initial disinfection steps have taken place, the person constructing the well must dose the well to obtain a free chlorine concentration of not less than 50 mg/L and not more than 200 mg/L.
The following is only one suggested method of dosing the well with best practices that achieve the Wells Regulation disinfection requirements.
Suggested Method of Dosing the Well Water
The steps for this recommended treatment approach are to:
Step 1: Calculate the volume of the well water in the well column.
Also, the mixing water should be added to the calculated volume of well water in the well column (e.g., an additional 25 L of water).
For example, the well has 375 L of water in the well column and the person will use 25 L of water to mix. The actual volume of water that needs to be dosed to not less than 50 mg/L and not more than 200 mg/L free chlorine is 375 + 25 = 400 L. These additional 25 L of clean water are the typical volume of water used in the mixing of the chlorine solution at the site. In other cases where the well and the aquifer space around the well need to be treated, the additional water may be five times the volume of the water well column.
Step 2: Determine the free chlorine concentration (e.g., 50, 100, 150 or 200 mg/L) within the required range needed to achieve the most effective treatment. It is also necessary to determine the type of hypochlorite product (e.g., bleach or calcium hypochlorite powder) that will be used in the treatment process. For better mixing results use fresh, unscented bleach.
Step 3: Calculate the amount of chlorine solution required to achieve the most effective treatment determined in step 2. To determine the dose needed to achieve 50, 100, 150 or 200 mg/L free chlorine in the well refer to Table 8-1 to Table 8-6. To determine an alternate concentration of free chlorine within the required range of 50 to 200 mg/L see the formulas in the “Calculating Chlorine Solution Dose Amounts Using Bleach” and “Calculating Chlorine Solution Dose Amounts Using Calcium Hypochlorite Powder” sections in this chapter.
Step 4: Place the calculated mixing water (e.g., 25 L) in a clean container set on the ground surface. The mixing water should be clean and potable. Combine the mixing water with the calculated amount of chlorine product in the container. When placed into the well, the calculated amount of chlorine product should be able to create the desired concentration of free chlorine in a single well volume.
Reminder: See “Best Management Practice – Mixing Large Volume of Clean and Potable Water, Vinegar and Chlorine Products Prior to Dosing the Well to Achieve Higher Concentrations of Hypochlorous Acid” (below).
Best Management Practice – Mix Large Volume of Clean and Potable Water, Vinegar and Chlorine Products Prior to Dosing the Well to Achieve Higher Concentrations of Hypochlorous Acid
To ensure an effective dosing of the well and surrounding formation, a person performing disinfection should place a volume of four to five times the volume of the well water column of clean and potable water into a bulk mixing container set on the ground surface. To create the more effective hypochlorous acid, the pH of the mixing water should be lowered to 4.5 to 5.0 with NSF International approved acids before adding the chlorine product as described in the “pH levels” section in this chapter. An easy and effective acid is distilled white vinegar. A formula to achieve the most effective treatment using vinegar is shown in the “Formula for pH Control During Chlorination” section of this chapter.
Step 5: Prepare the chlorine solution by adding the calculated amount of liquid bleach or calcium hypochlorite powder to the mixing water into the container, taking into account pH levels and other factors that will impact the effectiveness of the dose.
Step 6: Pour this solution in the well and adequately mix to distribute the dose throughout the well column and let it stay undisturbed in the well for the required minimum of twelve (12) hours. Pouring should be done at a rate where the solution will not overflow out of the well. Pouring options to ensure the mixture is distributed throughout the entire well column include the following:
- The chlorine dose is poured into the well. A clean and spray-chlorinated drill string with a surge block or other development tool is moved up and down in the well column. Surge blocks are very effective in wells with well screens.
- Using an injection pump on a rig, the chlorine dose is pumped into the well. Then, the rig is used to surge the well with air. The surging technique lifts the column of water without discharging the water out of the well and drops it back down. The technique will mix the solution in the well column.
- The chlorine dose is poured into a larger diameter well while the well water is re-circulated with a pump, other than the water supply pump (i.e., discharging pumped water back into the well).
- The chlorine dose is placed into the bailer. The bailer is raised and lowered to agitate the well water.
- A clean and spray-chlorinated tremie pipe is installed near the bottom of the well. Then, the chlorine dose is injected into the well through the tremie pipe and allowed to discharge into the well. The tremie pipe is raised during the injection process to mix the dose throughout the entire well water column. This method can be used for both drilled and driven-point wells.
- A jetting tool is installed into the well. Then the chlorine dose is injected throughout the well water column using the jetting tool.
Reminder: It is important to conduct a free chlorine residual test shortly after dosing the well to ensure the free chlorine residual is within the required range and will likely be in the same range during the required testing period of at least 12 hours to not more than 24 hours after dosing the well. If the testing shortly after dosing shows a problem (<50 or >200 mg/L free chlorine) the person constructing the well can immediately:
- discharge or dispose of the chlorinated water in an approved manner (See “Handling Heavily Chlorinated Water Discharge” section in this chapter) and re-dose the well with another chlorine solution, or
- adjust the concentration of the free chlorine accordingly by either adding water or adding additional chlorine solution.
Best Management Practice – Ensuring Free Chlorine Residual Remains Above 50 mg/L for Entire Period
An initial dose that creates a concentration significantly higher than 50 mg/L of free chlorine should be used to ensure the free chlorine remains above 50 mg/L for the entire treatment period.
Best Management Practice – Ensuring Free Chlorine Residual Remains Above 50 mg/L for Entire Period
If the well is located in an area of high, naturally occurring arsenic, high concentrations of free chlorine could release arsenic into the well water after the treatment process. In this type of environment, a person constructing a well should
- not to exceed a dose of 100 mg/L free chlorine
- pump the water in the well 30 minutes after the initial dose has been placed in the well, and
- obtain a Director’s written approval to use an alternate disinfection method (see the “Director’s Written Approval to Use Alternate Method” section in this chapter for further information).
Best Management Practice – Using Field Kit Equipment to Test Water for Chemical Parameters
Field kit equipment should be used to test the water for total dissolved solids (TDS), turbidity and the other common parameters before dosing the well with a chlorine solution to determine if additional cleaning of the well or additional chlorine solution is needed.
Step 7: The treatment process has been completed and no further work is required as long as the person constructing the well ensures that the water will not be used for human consumption. If the person cannot ensure that the water will not be used for human consumption, then the person who undertakes the construction of the well must continue with the next steps.
Reminder: In highly fractured bedrock environments or highly permeable overburden environments, there is a potential for heavily chlorinated water to migrate from the well off-site to receptors (e.g., wells, rivers, streams). The person constructing the well should carefully calculate the volume and concentration of the chlorinated water to reduce the risk of off-site impacts and take all reasonable care to prevent the movement of chlorinated water off-site. It may be advisable to monitor off-site wells and have a contingency plan in case chlorinated water impairs off-site wells or other receptors.
If the person constructing the well cannot ensure that the water will not be used for human consumption:
Step 8: Obtain a grab sample of the well water using clean sampling equipment and bottles at least 12 hours and not more than 24 hours after dosing the well. The grab sample must be tested for free chlorine residual. Testing can be done using simple test strips (Figure 8-4) similar to pH test strips shown in (Figure 8-2). If the free chlorine residual is within the required range (50-200 mg/L) see Step 11. If it is outside the range see Step 9.
Figure 8-4: Measuring free Chlorine
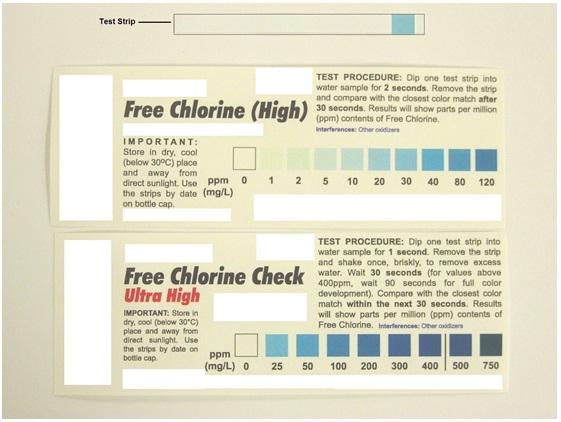
Figure 8-4 provides an example of a free chlorine residual test strip (at the top of figure) and a comparison chart for various free chlorine residual concentrations. The test strip is placed into the chlorinated water solution and changes colour. The test strip’s colour is matched to the comparison chart, which has the corresponding free chlorine residual concentration. In this case, a test strip for the 0 to 120 mg/L range shown at the top of Figure 8-4 was placed in the chlorinated water. The blue colour on the test strip matches a free chlorine residual of 30 mg/L on the 0 to 120 mg/L free chlorine residual comparison chart (shown in the middle of Figure 8-4). In this case, additional work needs to be done to bring the free chlorine in the water above 50 mg/L but not more than 200mg/L. A 0 to 750 mg/L free chlorine residual comparison chart is also shown in the bottom of Figure 8-4. The 0 to 750 mg/L free chlorine residual comparison chart also has similar test strips for testing free chlorine residual in water.
Step 9: Pump the well water out of the well until the well water has a free chlorine residual concentration of less than 1 mg/L if the test shows a free chlorine residual below 50 mg/L or more than 200 mg/L. The person undertaking the construction of the well can obtain a sample of the water in a clean sample container and use the test strips and comparison chart shown in Step 8 to determine the free chlorine concentration. See Step 10.
Reminder: See “Handling Heavily Chlorinated Water Discharge section” in this chapter for details on how to properly discharge or dispose of heavily chlorinated water.
Step 10: If step 9 applies (i.e., the free chlorine residual is outside of the required range), repeat steps 1 to 8 until the test shows the required free chlorine residual concentration range is not less than 50 and not more than 200 mg/L after 12 hours and not more than 24 hours after the water is re-dosed.
Step 11: Pump the well water out of the well until the well water has a free chlorine residual concentration of less than 1 mg/L after a test in accordance with Step 8 shows the free chlorine residual is within the target range (50-200 mg/L). The person constructing the well can obtain a sample of the water in a clean sample container and use the test strips and comparison chart shown in Figure 8-4 to determine the free chlorine residual.
Reminder: See the “Handling Heavily Chlorinated Water Discharge” section in this chapter for details on how to properly discharge or dispose of heavily chlorinated water.
Step 12: Before the well is used as a source of water for human consumption, the person undertaking construction of the well must ensure that the well purchaser is provided with a written record of the test results. An example of what a written record could look like is shown in Figure 8-5.
Step 13: Indicate on the well record that the well has been disinfected.
Download Figure 8-5: An Example Of A Written Record For Reporting Free Chlorine Residual Tests
Procedure for “Shock” Chlorination after Installing The Pump Or After Altering An Existing Well
The Wells Regulation - As soon as possible after the pumping equipment has been installed in a well or where a well has been altered (other than a minor alteration), unless exempt, the person doing the work must ensure that the well water is disinfected in accordance with the Wells Regulation.
This occurs after the debris removal and flushing have taken place (see Process of Disinfection in this chapter).
The following is only one suggested method of dosing the well with best practices that achieve the Wells Regulation disinfection requirements.
Suggested Method Of Dosing The Well Water
The steps for this recommended treatment approach are to:
Step 1: Store enough clean water to meet household and farm water needs for a minimum of 12 hours.
Step 2: Before treating the water system, remove or bypass any carbon filters, water softeners and other treatment units on the plumbing. Highly chlorinated water can damage treatment units including copper piping and fixtures. Therefore, it is important to follow the manufacturer’s recommendations to ensure treatment systems are properly disinfected. Also it is important to ensure that the hot water tank’s heat source is shut off.
Step 3: Follow Steps 1 to 8 from the “Procedure for “Shock” Chlorination on Same Day after Completing the New Well’s Structural Stage” section in this chapter except for the following:
- During Step 1 and where the building’s plumbing is to be chlorinated along with the water in the well, the person should:
- estimate the volume of the water in the residential plumbing including the hot water and pressure tanks, the extra water for mixing (e.g., 25 L) and the volume of the well water column.
- drain all of the water out of plumbing including the hot water tank prior to dosing.
- For Step 5 and where the building’s plumbing and water in the well are to be chlorinated, the person altering the well or installing the pump can install a clean hose from an outdoor tap into the top of the well. The person can then dose the well and circulate the chlorinated water using the building’s own plumbing to evenly distribute the treated water. In other cases where the well and the aquifer near the well need to be chlorinated, the other methods shown in Step 6 may be needed to distribute the chlorine dose.
- During Step 6, open all faucets (hot, cold, laundry and outside) in the plumbing and let the water run until the chlorine odour is detected. Since chlorinated water can damage the action in a septic system, chlorinated water should not be allowed into the building’s sewage system.
- Unlike new well construction, the person altering an existing well or installing the pump is not allowed to stop at Step 7 even if the well will not be used for human consumption and must continue with the next steps.
Step 4: Follow Steps 9 to 13 from the “Procedure for “Shock” Chlorination on Same Day after Completing the New Well’s Structural Stage” section in this chapter.
For steps that involve the discharge of chlorinated water, before turning on the pump after the 12-24 hour period, faucets or fixtures discharging to the septic tank systems should be temporarily diverted to an outside discharge point to avoid affecting the septic system.
Reminder: See “Handling Heavily Chlorinated Water Discharge” section in this chapter for details on how to properly discharge or and dispose of heavily chlorinated water.
Restricting Water Use During “Shock” Chlorination Period
The Wells Regulation - In between the dosing and testing outlined in the “Shock” Chlorination Steps section of the Plainly Stated section of this chapter and the disinfection requirements in the Wells Regulation, no person must disturb the well or use the water for any purpose.
Best Management Practice – Restricting Well Use and Sampling During Chlorination
During the “shock” chlorination period, the person constructing the well should communicate the following necessary precautions to the land owner, well purchaser and well samplers:
- Well use must not take place to ensure that chlorine remains in the well in the target amounts and to meet the Wells Regulation.
- The well should not be sampled as the chemical and bacterial results could be biased. It is recommended that sampling not occur until testing shows there is no free chlorine residual associated with the well water.
- The well and area near the well should be vented if strong chlorine odours are detected.
During the shock chlorination period, a land owner, well purchaser and well samplers should also be notified of the following
- Do not drink the water and avoid all body contact with the water.
- Do not use chlorinated water for laundry, plants, fish tanks, etc.
Best Management Practice – Turn Off Pump During Disinfection Period
The pump should be shut off for the entire period of treatment to ensure the water is not mistakenly used by the well owner/well purchaser. Also, the water system should be set to bypass all water treatment units.
Special Circumstances To Allow Well Purchaser To Discharge Chlorinated Water
The Wells Regulation - The “shock” chlorination process after the initial dosing does not apply to an alteration of a well if all of the following conditions are met:
- The alteration involves the urgent replacement or repair of a pump that unexpectedly failed,
- No water supply is immediately available as an alternative to the water from the well, and
- The well purchaser provides written instructions to the person altering the well (e.g., repair or replacement of pump) to discontinue the disinfection process after the person altering the well initially doses the well to a concentration of not less than 50 mg/L and not more than 200 mg/L of free chlorine
In this case, the Wells Regulation requires the following:
- The well purchaser must ensure that, before the well water is used for any purpose, the water is pumped from the well until no odour of chlorine remains in the well water, and
- The person who undertakes the alteration must retain, for two years, the written instructions from the well purchaser to discontinue disinfection.
Best Management Practice - Using Test Strips or other Free Chlorine Residual Testing Equipment
To verify the chlorinated water has been removed from the well, inexpensive test strips as shown in Figure 8-4 or other types of free chlorine residual testing equipment should be used to test the water in the well.
Handling Heavy Chlorinated Water Discharge
Best Management Practice – Handling Heavily Chlorinated Water Discharge
Care should be taken to ensure that chlorinated well water is not pumped out in a quantity, concentration, or under conditions that may impair the quality of surface water or groundwater, or that cause, or may cause, adverse effects to the natural environment.
To handle water discharge, a hose should be used to direct the water to a safe area or location on the property where the chlorinated water will not cause damage.
When pumping discharge water, avoid
- pumping strong chlorine solutions onto land or landscape plants,
- running the water into any private sewage lines or a septic system as this may overload the leaching bed or cause the system to malfunction by killing the active bacteria in the tank,
- running water into a lake, stream or other body of water, and
- flushing for long periods as this may cause the water to flow onto a neighbouring property or roadways causing damage or flooding, and
- discharging into municipal sanitary or storm sewers without obtaining any necessary municipal or provincial approvals.
Highly chlorinated water can also be neutralized using chemicals such as sulfur dioxide, sodium bisulfite, sodium metabisulfite or sodium sulfite
No waste management or sewage approvals are required for discharging chlorinated water onto the owner’s property. However, as indicated above, no person shall discharge the heavily chlorinated water that causes, or may cause, an adverse effect to the natural environment.
Best Management Practice – Handling Heavily Chlorinated Water Discharge (Continued)
A sewage works environmental compliance approval under the Ontario Water Resources Act will be required if the person discharges heavily chlorinated water off the well owner’s property and the discharge capacity exceeds 10,000 litres per day. A guide to explain the sewage works process can be found on Ontario website.
If a safe discharge location is not available, the person constructing the well may need to properly store and transport the chlorinated water.
If a person wishes to haul heavily chlorinated water to a regulated waste disposal site, the person must have an approved waste management system (i.e., holds a valid environmental compliance approval) to carry the chlorinated water, must meet the requirements of the General – Waste Management regulation (Regulation 347 as amended made under the Environmental Protection Act) and must dispose of the heavily chlorinated water at a licensed facility that is listed on the environmental compliance approval. A guide to explain approved waste management systems can be found on the Ontario website.
Exemption From Disinfecting Flowing Wells
The Wells Regulation - The disinfection requirements in the Wells Regulation do not apply to minor alterations, test holes, dewatering wells and flowing wells.
Best Management Practice – Disinfecting Flowing Wells
In some situations it may be advisable to disinfect flowing wells. One of the following methods may be used:
- Extending casing above the static water level and following the disinfection procedure in this chapter to the extent possible.
- Sealing the top of the well with a packer and inserting a tube. The chlorine solution is injected through the tube. The dosing, contact time and discharge of the heavily chlorinated water should follow this chapter to the extent possible.
- Inserting a perforated container that has solid calcium hypochlorite tablets and allowing the tablets to dissolve near the bottom of a flowing well. The natural upflow will allow for the chlorinated water to disperse throughout the entire well water column. To reduce the loss of free chlorine during the process, the flow of water from the well should be restricted if possible.
Factors to consider when chlorinating flowing wells include:
- the potential for blow out due to improper construction,
- the potential for impairing water with discharging chlorinated water from the flowing well (see Handling Heavily Chlorinated Water Discharge Best Management Practice in this chapter), and
- the health and safety of on-site workers.
Replacing Pumping Equipment Above Or Adjacent To A Well
The Wells Regulation - Disinfection of the well is required during the replacement of a pump that is installed above or adjacent to a well or in a well pit if the well cap or well cover is removed during the installation.
Best Management Practice – Disinfecting all Equipment
To reduce the risk of contamination, the inside and outside of all new or used pumping equipment in or connected to a well should be disinfected.
Collection And Analysis Of Water Samples For Indicator Bacterial Parameters
In cases where wells have been disinfected, proper collection and analysis of well water samples after a “shock” chlorination treatment are a good way to determine if the chlorination treatment was successful.
When well water is tested for bacterial (as opposed to chemical) parameters, typically laboratories test for certain bacteria called indicator organisms or indicator bacteria. The presence of these indicators acts as an early warning signal. They indicate that the well water may not be safe for human consumption. The indicator bacteria usually show up in a test result if water has become contaminated by surface water runoff, soil bacteria, animal waste, sewage waste or some agricultural activities.
Best Management Practice – Sampling and Analyzing Well Water
All disinfection steps including development, cleaning, flushing, “shock” chlorination treatment and removal of heavily chlorinated water are designed to eliminate pathogens from the well water.
“Shock” chlorination treatment does not necessarily guarantee the water is bacteriologically safe for human consumption or bathing. For example, a source of contamination may be impairing the quality of the groundwater that the well has penetrated. Also, various chemical reactions between the chlorine solution and materials in the water (e.g., biofilm) may prevent the elimination of all pathogens in the water.
Therefore, the final step of well disinfection is to verify there are no indicator bacteria in the well water.
The person constructing the well, a Professional Engineer, a Professional Geoscientist or the well owner should sample the well water for bacterial indicator parameters. The first sample should occur 24 to 48 hours after the heavily chlorinated water has been pumped from the well, pumping equipment and plumbing. Two more samples should be taken one to three weeks apart.
All samples should be submitted to a public health laboratory or an accredited and licensed private laboratory. The laboratory should analyze the samples for bacterial indicator parameters to verify that the treatment has eliminated indicator bacteria from the well water.
Reminder: If the test results indicate that the well is not contaminated with indicator bacteria, it may still contain other contaminants such as chemicals. Tests for chemical, radiological or other bacterial parameters will verify that the well water is safe for human consumption and bathing.
Indicator Bacteria
There are two indicator organisms that Ontario public health laboratories will test for in a well water sample. These are Total coliform and Escherichia coli (E. coli).
Total Coliform
Total coliform refers to:
- a general family of bacteria that is commonly found in animal and human wastes, surface soils and vegetation,
- may indicate contamination of water with disease-causing organisms, and possible evidence of surface water runoff contamination in well water, and
- provides an early warning signal that there may be a problem with the water supply.
E. Coli
E. Coli are a group of bacteria that commonly live in the intestines of warm-blooded animals. The presence of E. Coli:
- indicates recent fecal contamination from sources such as human sewage or livestock waste.
- may indicate that there is a problem with the water supply.
Reminder: Do not use water containing total coliform or any E. Coli for drinking, making infant formula and juices, cooking, making ice, washing fruits or vegetables, brushing teeth, hand washing, bathing or showering unless it has been properly disinfected or treated.
Sampling And Analyzing Well Water
Table 8-9 outlines the roles of various groups involved in bacterial sampling and testing.
| Service | Contact If… | How to Locate |
|---|---|---|
| Public Health Unit |
|
|
| Public Health Lab |
|
|
| Private Accredited Lab |
|
|
| Licensed Well Contractor |
|
|
| Professional Geoscientists and Engineers Certified Engineering Technicians and Technologists |
|
|
| Ministry of the Environment and Climate Change (local area or district office) |
|
How To Collect Well Water Samples
The steps for collecting well water samples are to:
- Obtain a clean and sterile sample bottle from the local public health unit, public laboratory or private laboratory along with the required paperwork.
- Determine the location for taking the sample.
- If it is a new well, a temporary clean pump and waterline may have to be installed into the well. As an alternative, a grab sample using clean sampling equipment will have to be lowered into the well.
- If it is an existing well attached to established plumbing, in addition to the above, a person may be able to sample the water from a sampling tap at the pressure tank, kitchen or bathroom sink or at an outside faucet. These locations need to be accessible for sampling, clean, in frequent use, flow in a uniform stream and only hooked into cold, raw water (i.e., should not be taken from a combination hot/cold tap). Avoid taking samples where the tap leaks or is subject to splashing.
- In some situations, the outside tap is a good location to take the sample, provided it is commonly used, clean and it is not hooked up to a hose at the time of sampling.
- Aerators may impact the sample result. The test for indicator bacteria is to verify if the treatment on the well water worked. It is important that the aerator be removed from the tap if present.
- If a tap is chosen, clean and disinfect the sampling location with alcohol wipes or a clean cloth soaked in a chlorine solution. Ensure the chlorine solution or alcohol is removed (e.g., air dries) from the tap before sampling.
- If a pump is used in a new well or a tap is used in an existing well with established plumbing, flush the system at as high a rate as possible for at least 5 minutes at the sample location point to obtain fresh groundwater from the aquifer. The longer the flushing, the more likely the sample will represent the true groundwater quality because the water that has been stagnant in the plumbing and well column will have been flushed out.
- Reduce the flow after at least 5 minutes of flushing.
Reminder: In some cases, problems such as biofilm in the well are protecting bacteria that may be living in the well. If casing and water is removed from the well so that fresh groundwater from the aquifer is being delivered to the sample point, a person will miss any free swimming resident organisms. Sampling for coliform like organisms living in or on the side of the well with biofilm should be done only after the well has set idle for 8 to 12 hours. After this period, a volume of water equal to the volume in the plumbing within the building, the horizontal waterline to the well and the drop pipe in the well (pump out first) should be flushed to allow for the true casing and borehole water to be sampled.
- Using protective and clean vinyl, latex or nitrole gloves, remove cap from sterile sample bottle and if possible do not set the cap on any surface.
- Put the sample bottle under the flow of water and fill the water to no higher than the top of the sample bottle’s label.
Reminder: It is important to not let the water overflow, or not pour any water, out of the sample bottle as the laboratory has put a chemical (sodium thiosulfate preservative) into the bottle to inactivate chlorine and preserve the sample.
- Remove the sample bottle from the flow area of the tap and seal it with the lid.
Reminder: It is important to not touch the lid or interior of the cap as this may introduce bacteria and affect the sample results.
- Place the sample bottle in a cold area such as a fridge or cooler with ice. Do not store the sample bottle in a freezer.
- Complete the paperwork provided by the laboratory.
- Submit the sample bottle and the paperwork to the drop off location specified on the paperwork within 24 hours after the sample of water was collected. Ensure the sample is placed in a cool area such as a cooler with ice during transportation to the drop off location.
- If sample analysis reports no E. coli or total coliform bacteria, repeat the above 11 steps twice more with a 1 to 3 week interval between sample collections. If sample analysis reports E. coli or total coliforms see the section Interpretation of Laboratory Analysis below.
Interpretation Of Laboratory Analysis
The Ontario Drinking Water Quality Standards require that drinking water be free of total coliforms and E. coli
If the three test results report no E. coli or total coliform present, then the well water has been successfully disinfected.
If the test results show the presence of indicator organisms, it is important to take further action. The Public Health Unit can assist the well owner or the person constructing the well with an interpretation of the test results. Some options include:
- re-sampling the well to verify the initial sample results.
- sampling for various chemical or bacterial parameters. If the presence of indicator organisms were confirmed, the well owner should retain a Professional Geoscientist or Professional Engineer. The professional can
- assess the hydrogeology around the well,
- identify the source of contamination, and
- provide recommendations to prevent it from accessing the well.
- consulting with a water treatment specialist to remove the contaminant from the drinking water.
Reminder: In cases where the Professional Geoscientist or Professional Engineer identifies a potential source of off-site contamination, it is important to contact and report the issue to the local Ministry of the Environment and Climate Change office (see resources at the end of this manual for Ministry office locations and telephone numbers) or the Ministry’s Spills Action Centre at
Reminder: The problem will not be resolved if water treatment is pursued without identifying and addressing the source of contamination.
The Wells Regulation - The well owner must abandon a well that is producing water with total coliforms, E. coli or other Ontario Drinking Water Quality parameters that exceed maximum acceptable concentrations found in Ontario Drinking Water Quality Standards (Ontario Regulation 169/03).
The well owner is exempt from this requirement if the well owner immediately seeks the advice of the local Medical Officer of Health (Public Health Unit), follows the directions of the local Medical Officer of Health and ensures that the measures taken are functional at all times. As another alternative the well owner can seek a written consent from the Director not to abandon the well
Reminder: See Chapter 14: Abandonment: When to Plug & Seal Wells for further information.
If the results show that the drinking water contains no significant evidence of bacterial contamination, then it is recommended that the water be tested at least three times per year. One of the three samples sent for testing should be taken in the spring.
Director’s Written Approval To Use An Alternate Method
The Wells Regulation requirements for well disinfection using free chlorine are not required to be followed if the Director gives written approval for another method of disinfection and the approval method is properly followed by the person constructing the well. If the person constructing the well intends to use an alternate method of disinfection, then written approval must be received from the ministry prior to constructing or altering a well including the installation of a pump.
Where Does The Person Constructing The Well Have To Go To Seek A Written Approval From The Director?
If a well owner or a person constructing the well wishes to seek the written approval of the Director to use another method of disinfection the person constructing the new well or altering the existing well, including installing a pump, may contact the Wells Help Desk:
- In writing to Wells Help Desk, Environmental Monitoring and Reporting Branch of the Ministry of the Environment and Climate Change, 125 Resources Road, Toronto ON M8P 3V6;
- By telephone at
1-888-396-9355 (for Ontario residents only); - By fax at: 416-235-5960; or
- By e-mail at: helpdesk@waterwellontario.ca
What Information Is Needed For a Written Consent?
The ministry assesses each case individually and on its merits. As a minimum, applicant’s contacting the ministry for a written consent should provide a written request with the following information:
- The name of the individual(s)/entity that owns the well
- The location of the well
- An indication as to whether or not the well in question is new or an existing well
- The purpose of the well,
- The justification as to why the well needs to be disinfected using another method,
- An overview of the proposed alternate method,
- Written certification by the manufacturer or retailer that the alternate disinfection process will be effective in disinfecting the well, and
- Historical and current water quality information for both raw and treated samples of the water extracted from the well in question if applicable.
If well design, water quality or gas issues exist, a well owner or the person constructing the well may be required to retain a Professional Engineer or Professional Geoscientist who would have to prepare a scientific report showing the appropriate scientific rationale to support the application. The well owner or person constructing the well would have to submit the report along with the request for written approval to the Ministry for its consideration.
The request for written approval should be submitted to the Ministry along with any and all supporting documents such as a hydrogeological and/or a well design report. The person constructing the well and others should be cautioned that obtaining a written approval will not be an automatic process. The Ministry has to provide for the conservation, protection and management of Ontario’s waters and for their efficient and sustainable use, to promote Ontario’s long–term environmental, social and economic well–being.
Depending on the case, and as part of the Director’s consideration, the Director may ask other regulators and interested parties to comment on the request.
The person constructing the well, the well owner and others should be cautioned that obtaining a written consent will not be an automatic process, since the Ministry has to provide for the conservation, protection and management of Ontario’s waters and for their efficient and sustainable use, to promote Ontario’s long-term environmental, social and economic well being.
The Director will review the request, supporting information, and other information generated from internal and external parties with an interest in the application.
Based on the information, the Ministry will contact the well owner in writing indicating the Director’s decision.
Alternate Method When Arsenic Is Present
The Director recognizes that in parts of the Canadian Shield area of Ontario, elevated levels of naturally occurring arsenic can occur in igneous or metamorphic bedrock. In such circumstances, the high pH that may result from chlorination may cause arsenic to leach into groundwater and water supplies (see Chapter 4: Siting the Well for further information on identifying problems with groundwater). The Director will consider giving written approval in areas where elevated levels of arsenic may occur if a person follows “Best Management Practice - Alternate Chlorination Approach When Arsenic is Present.”
Best Management Practice – Alternate Chlorination Approach When Arsenic is Present
The Director would consider giving advance written approval if the person disinfecting the well demonstrates that arsenic is either present or known to be present in the area and follows:
- the application process,
- all of the requirements for Well Disinfection in the Wells Regulation except that the concentration of the free chlorine is not less than 50 milligrams per litre and not more than 100 milligrams per litre and the free chlorine in the well is pumped after 30 minutes of chlorination, and
- the Bacterial Sampling Best Management Practice below.
Alternate Method When Person Cannot Maintain A 50 mg/L Free Chlorine Residual For At Least 12 Hours
The Director recognizes that in some bedrock wells, chlorinated water will move away from the well into the aquifer and the person can not maintain a free chlorine residual of at least 50 mg/L. The Director will consider giving written approval where the person has followed the Alternate Chlorination Approach When 50 mg/L of Free Chlorine cannot be Maintained for at Least 12 hours Best Management Practice.
Best Management Practice – Alternate Chlorination Approach when 50 mg/L of Free Chlorine Cannot be Maintained for at Least 12 hours
The Director would consider giving advance written approval if the person disinfecting the well demonstrates that s/he can not maintain a free chlorine residual of at least 50 mg/L over at least a 12 hour period, and follows:
- The application process
- All of the requirements for Well Disinfection in the Wells Regulation except that the concentration of the free chlorine residual after 12 hours can be less than 50 milligrams per litre
- The Bacterial Sampling best management practice below
Alternate Method - Bacterial Sampling
The following Bacterial Sampling best management practice is part of the alternate disinfection methods discussed above.
Best Management Practices – Bacterial Sampling
The person constructing the well should sample the well for total coliforms and E. coli bacteria one week after the heavily chlorinated water has been pumped from the well, pumping equipment and plumbing.
The person constructing the well should submit all samples to a public health laboratory or an accredited and licensed private laboratory. The laboratory must analyze the samples for bacterial indicator parameters.
The person constructing the well should ensure all laboratory findings and reports are delivered to the well owner and, where applicable, the well purchaser.
If the sample analysis shows indicator bacteria are not present the person constructing the well must obtain one more sample for total coliforms and E. coli bacteria analyses and the sample should be taken between one to two weeks after the initial sample.
The person constructing the well should submit all additional samples to a public health laboratory or an accredited and licensed private laboratory. The laboratory should analyze the samples for bacterial indicators.
The person constructing the well should ensure all additional laboratory findings and reports are delivered to the well owner and, where applicable, the well purchaser.
If indicator bacteria are present, the person constructing the well should provide the well owner, and where applicable, the well purchaser with the documentation that the well owner must:
- abandon a well that is producing water with total coliforms or E.coli,
- immediately seek the advice of the local Medical Officer of Health (Public Health Unit), follows the directions of the local Medical Officer of Health and ensures that the measures taken are functional at all times, or
- immediately seek written consent from the Director not to abandon the well
Reminder: See Chapter 14: Abandonment: When to Plug & Seal Wells for further information on the Wells Regulation requirements when the well is producing water that is not potable (e.g., total coliforms or E.coli are present).
Alternate Method When Petroleum Hydrocarbons, Solvents Or Other Contaminants Are Present
The Director recognizes that in areas contaminated with petroleum hydrocarbons, solvents or other contaminants, reactions with chlorinated water can create other chemicals which can be dangerous or hazardous.
Best Management Practice – Disinfecting when Petroleum Hydrocarbons, Solvents or other Contaminants are Present
The Director would consider giving advance written approval not to follow the disinfection requirements in the Wells Regulation for the time period that the contaminant is impairing the well water if a person constructing a well:
- follows the application process, and
- provides evidence (e.g., laboratory sample analysis reports and an interpretation of the reports) that the area and groundwater are contaminated with petroleum hydrocarbons, solvents or other contaminants.
Footnotes
- footnote[1] Back to paragraph The Ministry of the Environment. 2006. Procedure for Disinfection of Drinking Water in Ontario: Second Revision. Page ii.
- footnote[2] Back to paragraph Holben, Ronald J., and Gaber, Michael R.S. 2003. Michigan Department of Environmental Quality: Water Well Disinfection Manual. Michigan DEQ, Lansing, MI. Page 5.
- footnote[3] Back to paragraph American Water Works Association (AWWA). 2003. ANSI/AWWA C654 - 03 – “Disinfection of Wells.” AWWA, Denver, CO. 2003. AWWA website. Section 4.5.1, Page 5.
- footnote[4] Back to paragraph Holben, Ronald J., and Gaber, Michael R.S. 2003. Michigan Department of Environmental Quality: Water Well Disinfection Manual. Michigan DEQ, Lansing, MI. Page 22.
- footnote[5] Back to paragraph American Water Works Association (AWWA). 2003. ANSI/AWWA C 654 - 03 - “Disinfection of Wells”. AWWA, Denver,CO. 2003. AWWA website. Section 4.1, Page 2.
- footnote[6] Back to paragraph Holben, Ronald J., and Gaber, Michael R.S. 2003. Michigan Department of Environmental Quality: Water Well Disinfection Manual. Michigan DEQ, Lansing, MI. Page 6.
- footnote[7] Back to paragraph American Water Works Association (AWWA). 2003. ANSI/AWWA C 654 - 03 - “Disinfection of Wells”. AWWA, Denver,CO. 2003. AWWA website. Section 4.4, Page4.
- footnote[8] Back to paragraph Holben, Ronald J., and Gaber, Michael R.S. 2003. Michigan Department of Environmental Quality: Water Well Disinfection Manual. Michigan DEQ, Lansing, MI. Pages 7-8.
- footnote[9] Back to paragraph Holben, Ronald J., and Gaber, Michael R.S. 2003. Michigan Department of Environmental Quality: Water Well Disinfection Manual. Michigan DEQ, Lansing, MI. Pages 7-8.
- footnote[10] Back to paragraph American Water Works Association (AWWA). 2003. ANSI/AWWA C 654 - 03 - “Disinfection of Wells”. AWWA, Denver,CO. 2003. AWWA website. Section 4.3, page 3, and Holben, Ronald J., and Gaber, Michael R.S. 2003. Michigan Department of Environmental Quality: Water Well Disinfection Manual. Michigan DEQ, Lansing, MI. Page 9.
- footnote[11] Back to paragraph Holben, Ronald J., and Gaber, Michael R.S. 2003. Michigan Department of Environmental Quality: Water Well Disinfection Manual. Michigan DEQ, Lansing, MI. Page 14.
- footnote[12] Back to paragraph Holben, Ronald J., and Gaber, Michael R.S. 2003. Michigan Department of Environmental Quality: Water Well Disinfection Manual. Michigan DEQ, Lansing, MI. Pages 16-17.
- footnote[13] Back to paragraph Holben, Ronald J., and Gaber, Michael R.S. 2003. Michigan Department of Environmental Quality: Water Well Disinfection Manual. Michigan DEQ, Lansing, MI. Page 18.
- footnote[14] Back to paragraph Holben, Ronald J., and Gaber, Michael R.S. 2003. Michigan Department of Environmental Quality: Water Well Disinfection Manual. Michigan DEQ, Lansing, MI. Page 18.
- footnote[15] Back to paragraph Holben, Ronald J., and Gaber, Michael R.S. 2003. Michigan Department of Environmental Quality: Water Well Disinfection Manual. Michigan DEQ, Lansing, MI. Page 21.
- footnote[16] Back to paragraph American Water Works Association (AWWA). 2004. ANSI/AWWA B300 - 04 - “Hypochlorites”. AWWA, Denver,CO. 2003. AWWA website.
- footnote[17] Back to paragraph NSF International Standard/American National Standard 60, 2009. “Drinking Water Treatment Chemicals - Health Effects,” NSF International, Ann Arbor, MI 2009. NSF website.
- footnote[18] Back to paragraph Holben, Ronald J., and Gaber, Michael R.S. 2003. Michigan Department of Environmental Quality: Water Well Disinfection Manual. Michigan DEQ, Lansing, MI. Page 22.
- footnote[19] Back to paragraph Holben, Ronald J., and Gaber, Michael R.S. 2003. Michigan Department of Environmental Quality: Water Well Disinfection Manual. Michigan DEQ, Lansing, MI. Pages 28 to 30.
- footnote[20] Back to paragraph Schnieders, John H. 2003. Cleaning, Disinfection and Decontamination of Water Wells. Johnson Screens Inc., St. Paul, MN. Page 52.
- footnote[21] Back to paragraph Modified from Schnieders, John H. 2003. Cleaning, Disinfection and Decontamination of Water Wells. page 38.
- footnote[22] Back to paragraph Holben, Ronald J., and Gaber, Michael R.S. 2003. Michigan Department of Environmental Quality: Water Well Disinfection Manual. Michigan DEQ, Lansing, MI. Page 38.
- footnote[23] Back to paragraph Holben, Ronald J., and Gaber, Michael R.S. 2003. Michigan Department of Environmental Quality: Water Well Disinfection Manual. Michigan DEQ, Lansing, MI. Pages 18, 33.
- footnote[24] Back to paragraph American Water Works Association (AWWA). 2003. ANSI/AWWA C 654 - 03 – “Disinfection of Wells.” AWWA, Denver, CO. 2003. AWWA website. Section 4.6, page 6 and Appendix B, Page 11.
- footnote[25] Back to paragraph Ontario Drinking Water Quality Standards (Ontario Regulation 169/03 made under the Safe Drinking Water Act, 2002).